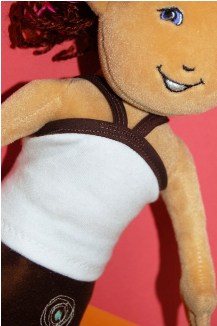
Last week I showed how to make an A-line skirt for a Groovy Girl. Now let’s make the strappy top to match.
This little top is a quick sew and can be made out of smallish scraps of fabric. Dig through your scrap bin and find the material for a new top for your Groovy Girl.
What you need:
- –scrap of fabric 4″ x 10″
- –approx. 17″ bias tape
- –1.5″ Velcro
- —Pattern for the strappy top
How to make it:
1. Using the pattern, cut the body of the shirt out of the fabric. I like to make these little tops out of scraps of t-shirt left over from refashioning projects. When possible, I’ll make use of the existing hemmed edge so I don’t have to finish the bottom myself. I’ve marked the finished length of the shirt with a dashed line.
2. Hem the bottom of the shirt. Because I used a knit that doesn’t fray, I just folded up 1/2″ and zig-zag stitched. If you’re using a fabric that will fray, fold under 1/4″ and fold over again before stitching to get a clean finish.
3. Stitch bias tape to the top edge. There are plenty of other tutorials out there showing how to do this so I’m skipping the blow-by-blow for this step.
4. Now wrap the top around your doll to test the fit. Keep in mind we’ll be turning under 1/4″ on each side when we add the velcro. When you pinch under 1/4″ on each side, the two folded ends should lie neatly one on top of the other. If it’s too large, trim a little off.
5. Now for the Velcro. First, cut your Velcro to the right length (roughly1″). Then, cut it down the middle so you’ve got two sets on long skinny Velcro pieces. We’ll use just one set for this top.
6. Lay the shirt wrong side up and fold over 1/4″ on the right edge. Layer the prickly side of the Velcro on top of the folded piece and stitch all the way around the Velcro to secure it. I don’t bother with pinning; I just hold it in place with my hands and take it to the machine.
7. Now, lay the shirt right side up and fold the right edge 1/4″ under. Lay the soft side of the Velcro tape on top of the right side of the shirt. Take it to the machine and stitch all the way around the Velcro.
If it’s hard holding the Velcro on top and keeping the 1/4″ folded to the back, just do a little basting stitch to hold the 1/4″ fold in place before putting on the Velcro. The Velcro will cover the basting stitch.
8. Now it’s time for the straps. You’ll need roughly 11″ of bias tape to make the two straps. Fold the bias tape in half and stitch it together. I stitched down both sides because I’m anal-retentive like that.
9. Fold the strap in half and stitch to the shirt. I put mine in the center for more of a halter look. In order to get the straps to lie flat against the doll’s shoulders, I usually just put the shirt on the doll and then fiddle around with the angle of the straps until they sit snug against her shoulders. When you’ve got them the way you want, just hold them in place carefully while you remove the shirt. Stitch in place with the machine.
10. Do the same thing to attach the straps at the back. I usually fit them and stitch them down one at a time. I’ve marked places on the pattern where I attached the straps at the center front and on the back. I’d suggest using this as a guide only, and double-checking the fit on the actual doll. Like I said, I’m anal-retentive like that.
You’re done!
Pair the strappy top with an A-line skirt and you’ve got a whole new outfit for your Groovy Girl.


Loved the skirt, so glad you made a top to go with it! I hope to make a bunch of plain skirts and tops, then let my daughters decorate them. I bet we can create a very one-of-a-kind wardrobe and have a ton of fun, too. Thanks!
Thanks for the lovely and achievable tute (and for the skirt tute too). Will have to try both tutes soon.
SO ADORABLE!! I found a Groovy Girl at the thrift store today, but she just wasn’t quite right… Blast! Maybe I should have gotten her anyway!!
I’m thinking these patterns will translate pretty well to the other dolls I have, though! :o) Thanks!!
Thank you so much!!! My daughter just got a Groovy Girl and she was trying to make an outfit out of a napkin. I found this and made the top and the skirt for her. So cute!! I sewed 2 rows of ruffled lace to the top and 1 row at the bottom of the skirt and it looks so cute!!!
Thanks for posting this! One of my favorite things to do as a kid was to design/make clothes for my dolls, and I want to do the same for/with my daughter, but haven’t had much time! I’ve gotten a bunch of cute fabric in anticipation of this, though ;). Having these patterns (halter and skirt) are a great springboard to get started, and embellish from. Thanks!
love this design
AWESOME! Thanks for posting this, it would be awesome if you could post more! I’m not that creative, but I love making stuff for my kids!
Thank you!! Just what I needed.
Julie