I sleep on my side and use a leg pillow in order to keep my back properly aligned. My current leg pillow wore out about 2 years ago, but I’ve continued to use it long past the time it should have been tossed. When the fabric store had pillow forms at 50% off, I decided it was time to stop procrastinating. So I grabbed up a half-price package of foam and created a new, much prettier, leg pillow.
This turned out to be such an easy project that I wrote it up into a tutorial.
Here’s what you need:
— 1/3 yard of 44″ wide cotton fabric. I was tempted to use a cheaper cotton but in the end went for a designer print because the fabric was softer.
— 12″x6″x3″ piece of foam. I used Sew Perfect poly-fil Nu-Foam. It’s actually a poly-fil but it’s really dense and holds its shape like foam. I bought a 14″x14″x3″ form and cut it down to size. (A bread knife is easier than scissors for this.) Make sure that you get a foam that has the right amount of resistance. I tested mine out first to see if it could support the weight of my knees.
Here’s how to make it:
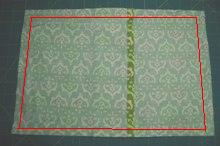
1. Cut your cotton fabric into three rectangles: one that is 15″ x 10″ long, and two that are 10″ x 10″ each.
2. Hem one side of each of your 10″ x 10″ rectangles using a 1/2″ hem that is folded over twice. This will make the new dimensions 10″ x 9″.
These pieces will end up being the back of the pillow. They’ll overlap at the hemmed edges. If your fabric is directional, you’ll want to put your hems on opposite sides of the pieces. In other words, put the hem on the right side of one and the left side of the other. This will make it where the design is going the right direction on both pieces when you assemble them. (I didn’t do this and my directional print is upside down on one of my back pieces.)
3. Now it’s time to layer your pieces to make the pillow cover. Start with the largest rectangle (15″ x 10″) right side up.
Then, lay one of the now 10″ x 9″ rectangles right side down so that it aligns along the left side with the large rectangle and the hemmed edge is slightly more than halfway across the larger rectangle.
Now lay the other hemmed rectangle right side down, with the unhemmed edges aligned with the right side of the larger rectangle.
The two hemmed rectangles should overlap by about 3″ in the middle.
4. Pin in place and sew all the way around.
5. Now it’s time to box the corners. I don’t know if that’s the technical term, but that’s what I call it when you stitch across the corners to create a flat bottom. Or in this case, flat sides for the pillow.
To start, reposition your fabric at one of the corners so that the two side seams that had been at right angles to each other are now laying directly on top of each other. It will take a bit of fiddling to get it right. When it’s all sitting right, your corner will be a 90-degree angle with the side seams running straight down the middle (bisecting the angle, if you remember your geometry).
In order to make sure that I’ve got everything all lined up and my angles are spot on, I lay the piece down on my cutting mat so I can line up the edges of the fabric with the printed squares and the stacked-up seams with one of the 45-degree marks on the mat.
In order to create a stitch line that is 3″ wide, I lay my grid ruler across the corner so that the 0″ lines up with one side, and the 3″ lines up with the other, and the 1.5″ mark lines up with the stitching line down the center.
Use a water-soluble marker to mark your stitch line. You can pin if you like, but I’m lazy and just hold the fabric in place while I walk over to the sewing machine.
Stitch on your marked line, and trim off the tip of the corner leaving a 1/2″ seam allowance.
Look! A boxed bottom.
6. Now do the same thing with the three other corners.

7. Turn the cover inside out, and insert your foam form. It’ll be a tight squeeze, but that just means that the pillow form won’t slip out while you’re sleeping.
You’re done. Stand back and admire your new leg pillow.


What a great idea,thanks for sharing!
Anne, thanks for sharing this with me. I’ll definitely feature!
I sleep with a pillow between my legs too! I can’t sleep without something there. This is a great idea. I featured it at somedaycrafts.blogspot.com
I can’t wait to try this, have a bad back, and this would probabl really help
Oh, this rocks. So simple now that you’ve explained it. Thanks for the step-by-step, Anne!
OH MY Goodness! You ROCK! I have degenerative disk disease and have slept with a leg pillow for 10+ years. I am so pillow deprived that I have been taking an old pillow, folding it in half, and using that to support my knees at night. Sad, but true. Seriously, I purchased one of the premade ones, but it didn’t really fit just right and I kept waking up because I was uncomfortable. I never thought about making my own ~ I can customize the size!!
That’s an awesome pillow one of my twins whose favorite color is green would sleep with that every night if she had it… Love the pattern.