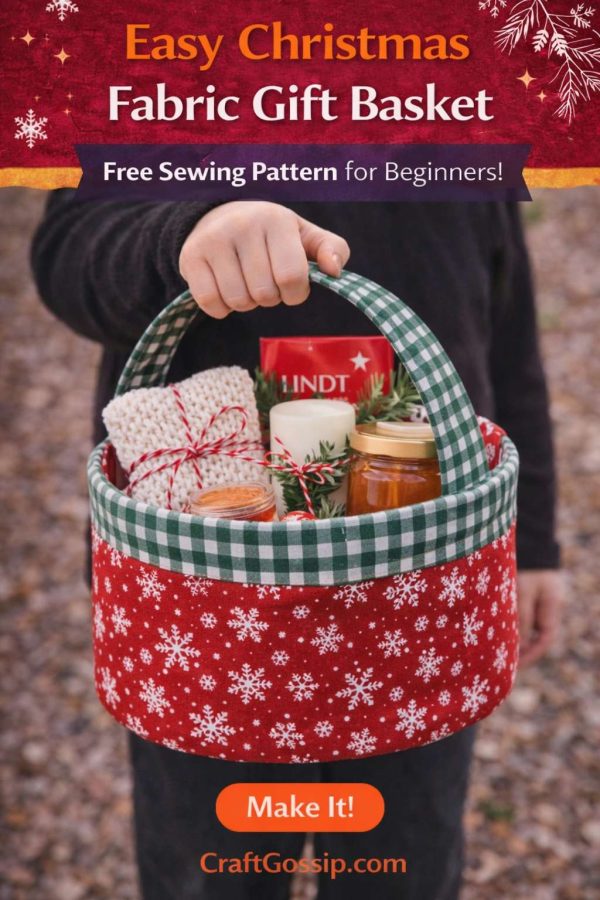
There’s something quietly special about a handmade Christmas gift basket. Not loud. Not over-the-top. Just thoughtful, useful, and clearly made with care. This fabric Christmas gift basket is one of those projects that looks lovely on the day and keeps working long after the wrapping paper is gone.
Instead of disposable boxes or cellophane baskets that never quite survive storage, this reusable fabric basket becomes part of the gift. It’s soft but structured, beginner-friendly to sew, and endlessly adaptable depending on what you fill it with. Think cosy socks, handmade soap, baked treats, or a few carefully chosen favourites for someone you love.
If you’re looking for an easy Christmas sewing project that feels meaningful without being complicated, this one fits beautifully into a busy December.
Why Sew a Fabric Christmas Gift Basket?
A fabric gift basket feels personal in a way store-bought packaging never does. It says, I made this just for you, without needing embroidery skills or weeks of prep time.
This pattern is ideal if you:
- Want a beginner sewing project with practical results
- Prefer reusable, low-waste gift wrapping
- Need a handmade option that works for adults and teens
- Like projects you can repeat year after year
Once the gift has been opened, the basket doesn’t get tossed. It gets reused—for storage, décor, or future gifting.
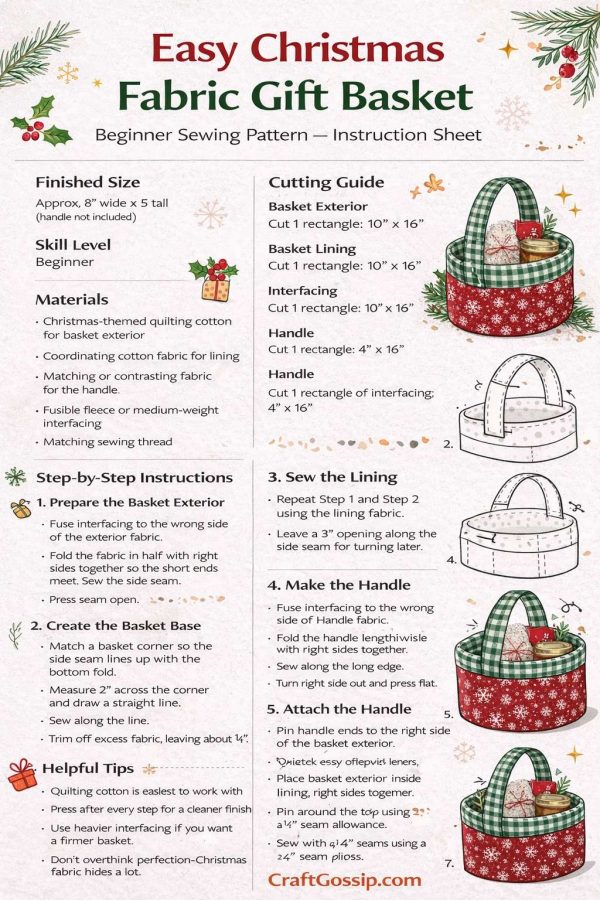
Finished Size
Approx. 8 inches wide x 5 inches tall
(handle not included in height)
This size works beautifully for small gift collections: bath products, candles, jams, knitting notions, stationery, or a cosy winter bundle.
What You’ll Need
- Christmas-themed quilting cotton for the basket exterior
- Coordinating cotton fabric for the lining
- Matching or contrasting fabric for the handle
- Fusible fleece or medium-weight interfacing
- Matching sewing thread
- Sewing machine
- Scissors or rotary cutter
- Pins or clips
- Iron
Optional but helpful: walking foot if your machine struggles with thicker layers
Christmas Fabric Choices That Work Well
You don’t need novelty prints for this to feel festive.
Lovely exterior fabric options include:
- Red, green, or navy with subtle patterns
- Snowflakes, stars, berries, or holly motifs
- Classic stripes, plaids, or gingham
- Tone-on-tone metallic accents used sparingly
For the lining:
- Soft neutrals like cream or grey
- Polka dots or tiny prints
- A surprise pop of colour inside the basket
Small-scale prints hold their shape and age better than large novelty designs.
Cutting Instructions
Basket Exterior
Cut 1 rectangle: 10” x 16”
Basket Lining
Cut 1 rectangle: 10” x 16”
Interfacing
Cut 1 rectangle: 10” x 16”
Handle
Cut 1 rectangle: 4” x 16”
Cut 1 rectangle of interfacing: 4” x 16”
If you want a taller basket, you can add an extra inch to the height measurement. I wouldn’t recommend increasing the width unless you also increase the interfacing strength.
Step-by-Step Sewing Instructions
Step 1: Prepare the Basket Exterior
Fuse the interfacing to the wrong side of the exterior fabric according to the manufacturer’s instructions.
Fold the fabric in half with right sides together so the short ends meet.
Sew the side seam using a ¼” seam allowance.
Press the seam open.
Step 2: Create the Basket Base
With the basket still inside out, flatten one bottom corner so the side seam lines up with the bottom fold.
Measure 2 inches across the corner and draw a straight line.
Sew along the line.
Trim off excess fabric, leaving about ¼”.
Repeat for the opposite corner.
Step 3: Sew the Lining
Repeat Step 1 and Step 2 using the lining fabric.
Leave a 3-inch opening along the side seam—this is for turning the basket later.
Step 4: Make the Handle
Fuse interfacing to the wrong side of the handle fabric.
Fold the handle lengthwise with right sides together.
Sew along the long edge using a ¼” seam allowance.
Turn right side out and press flat.
Topstitch along both long edges for strength and a polished finish.
Step 5: Attach the Handle
Pin the handle ends to the right side of the basket exterior, centred on opposite sides.
Double-check the handle isn’t twisted.
Baste the handle ends in place.
Step 6: Assemble the Basket
Place the basket exterior inside the lining, right sides together.
Match side seams and pin around the top edge.
Sew around the top using a ¼” seam allowance.
Step 7: Turn & Press
Turn the basket right side out through the lining opening.
Push the lining inside the basket and press the top edge neatly.
Step 8: Finish
Topstitch around the top edge to keep the lining in place and give the basket a professional finish.
Close the lining opening with a hand stitch or neat machine stitch.
Your Christmas fabric gift basket is complete.
Gift Ideas That Work Perfectly in This Basket
This basket shines when it’s filled thoughtfully.
- Handmade soap or bath products
- Candles and matches
- Baked goods wrapped in parchment
- Knitted socks or scarves
- Tea, coffee, or hot chocolate kits
- Craft supplies for a creative friend
Tie a simple tag to the handle and you’re done—no extra wrapping required.
Beginner Tips for Success
- Quilting cotton is easiest for first-time sewists
- Press after every step for cleaner results
- Use heavier interfacing if you want a firmer basket
- Shorten the handle for tabletop gifting
- Small imperfections disappear once the basket is filled
A Handmade Christmas Gift That Keeps Giving
This fabric Christmas gift basket sewing pattern is one of those rare projects that feels calm to make and genuinely useful to give. It’s simple enough for beginners, adaptable for experienced sewists, and timeless enough to come back out every December.
It’s not flashy. It doesn’t shout. But it’s the kind of handmade piece people keep—and that’s exactly what a good Christmas project should be.

Leave a Reply