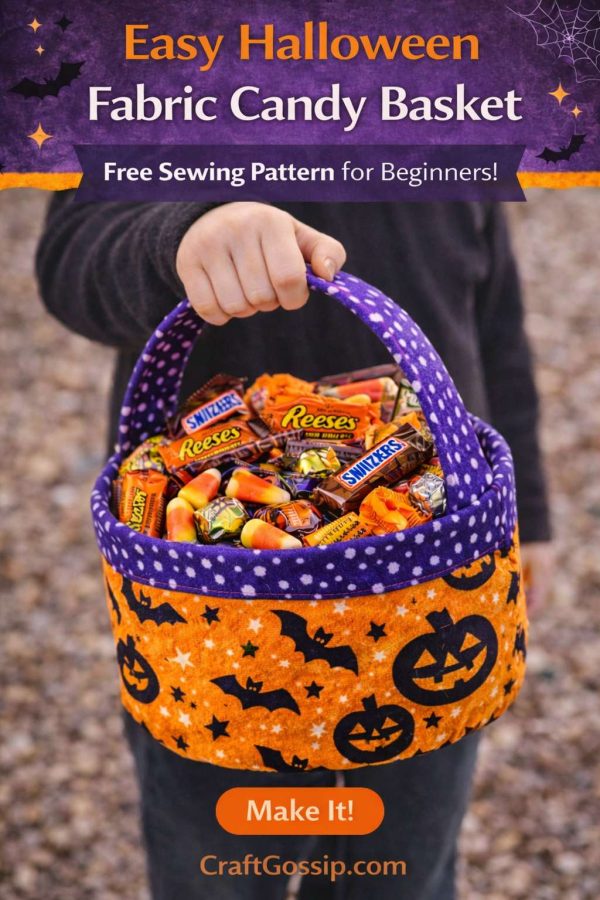
There’s something about Halloween that makes handmade projects feel extra special. Maybe it’s the nostalgia, maybe it’s the excuse to pull out bold fabrics you’d never use any other time of year. This fabric Halloween candy basket is one of those simple sewing projects that feels festive without being fussy—and it’s sturdy enough to survive a proper trick-or-treat haul.
If you’re looking for an easy Halloween sewing project for beginners, this fabric candy basket ticks all the boxes. It’s quick to make, uses straight seams only, and can be reused year after year. No plastic pumpkin buckets cracking in the heat, no noisy handles dragging along the footpath—just a soft, practical basket that actually holds a decent amount of lollies.
Why Sew a Fabric Halloween Candy Basket?
Reusable fabric Halloween baskets are a great alternative to store-bought trick-or-treat buckets. They’re lightweight for kids, easy to personalise, and much nicer to store once Halloween is over.
This pattern is ideal if you:
- Want a beginner-friendly Halloween sewing project
- Prefer reusable, eco-friendly alternatives
- Need a last-minute costume accessory
- Like projects that work for multiple seasons
Once Halloween is over, these baskets also work beautifully for toy storage or dress-up accessories.
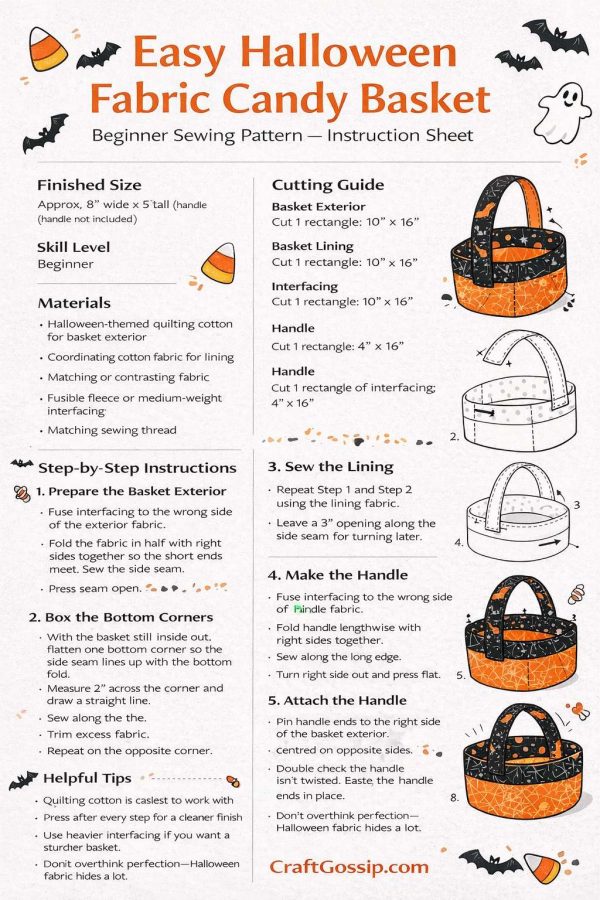
Finished Size
Approx. 8 inches wide x 5 inches tall
(Handle not included in height)
This size is perfect for candy, small toys, glow sticks, and all the treasures kids collect on Halloween night.
What You’ll Need
- Halloween-themed quilting cotton for basket exterior
- Coordinating cotton fabric for lining
- Matching or contrasting fabric for handle
- Fusible fleece or medium-weight interfacing
- Matching sewing thread
- Sewing machine
- Scissors or rotary cutter
- Pins or clips
- Iron
Optional: walking foot if your machine struggles with layers
Halloween Fabric Ideas That Work Well
This is where you can have some fun.
Great exterior fabric choices:
- Black with white stars or moons
- Orange prints with subtle texture
- Small bats, spiders, or pumpkins
- Black-and-white stripes for a modern Halloween look
For the lining, try:
- Polka dots
- Candy-themed prints
- Bold contrast colours (lime green, purple, orange)
Avoid very large novelty prints—small-scale patterns look better once the basket is sewn.
Cutting Instructions
Basket Exterior
Cut 1 rectangle: 10” x 16”
Basket Lining
Cut 1 rectangle: 10” x 16”
Interfacing
Cut 1 rectangle: 10” x 16”
Handle
Cut 1 rectangle: 4” x 16”
Cut 1 rectangle of interfacing: 4” x 16”
Step-by-Step Sewing Instructions
Step 1: Prepare the Basket Exterior
Fuse interfacing to the wrong side of the exterior fabric.
Fold the fabric in half with right sides together so the short ends meet.
Sew the side seam using a ¼” seam allowance.
Press the seam open.
Step 2: Box the Bottom Corners
With the basket still inside out, flatten one bottom corner so the side seam lines up with the bottom fold.
Measure 2” across the corner and draw a straight line.
Sew along the line.
Trim excess fabric.
Repeat on the opposite corner.
Step 3: Sew the Lining
Repeat Step 1 and Step 2 using the lining fabric.
Important: leave a 3” opening along the side seam for turning later.
Step 4: Make the Handle
Fuse interfacing to the wrong side of the handle fabric.
Fold handle lengthwise with right sides together.
Sew along the long edge.
Turn right side out and press flat.
Topstitch along both long edges for strength—Halloween baskets get dragged, swung, and overfilled.
Step 5: Attach the Handle
Pin handle ends to the right side of the basket exterior, centred on opposite sides.
Double-check the handle isn’t twisted.
Baste the handle ends in place.
Step 6: Assemble the Basket
Place the basket exterior inside the lining, right sides together.
Match side seams and pin around the top edge.
Sew around the top edge.
Step 7: Turn & Press
Turn the basket right side out through the lining opening.
Push lining inside basket and press the top edge neatly.
Step 8: Finish
Topstitch around the top edge to secure the lining.
Close the lining opening with a hand stitch or a neat machine stitch.
Your Halloween fabric candy basket is complete and ready for trick-or-treating.
Easy Halloween Customisation Ideas
- Add a name using iron-on vinyl or embroidery
- Use glow-in-the-dark thread for topstitching
- Shorten the handle for toddlers
- Make matching baskets for siblings
- Coordinate basket fabric with a costume
This pattern also works brilliantly as a Halloween party favour basket or table decoration.
Beginner Tips for Success
- Quilting cotton is easiest to work with
- Press after every step for a cleaner finish
- Use heavier interfacing if you want a sturdier basket
- Don’t overthink perfection—Halloween fabric hides a lot