If you’ve ever stepped on a tiny toy car in the middle of the night, you already understand why soft toys are sometimes the superior option.
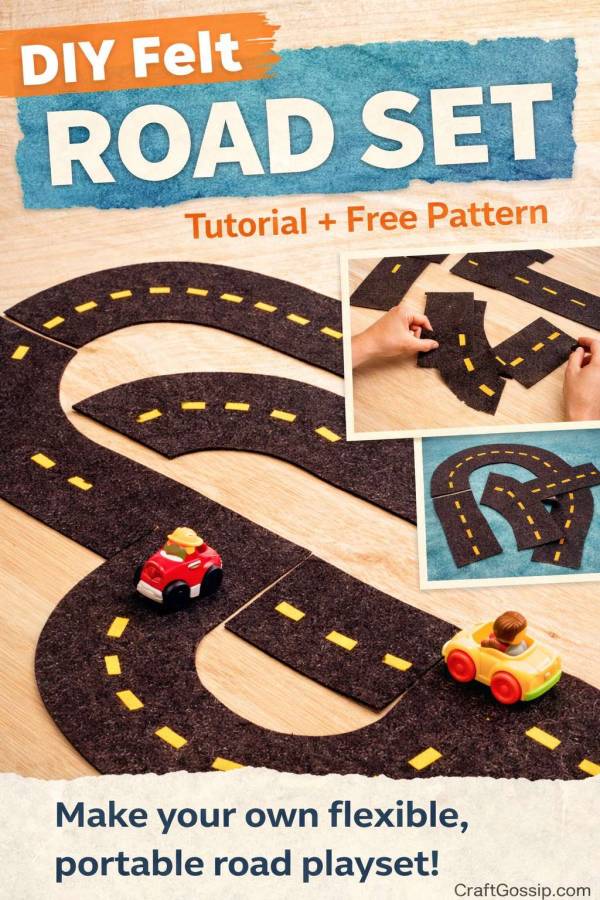
When my kids were little, we had plastic tracks that clipped together… and unclipped themselves just as quickly. They were loud, bulky, and somehow always missing a piece. That’s when I started making a DIY felt road set instead — and honestly, it was one of the best simple sewing projects I ever made.
This easy felt road playset is soft, portable, quiet, and perfect for imaginative play. If you’re searching for a handmade toy for toddlers, a DIY car play mat tutorial, or a free felt road pattern idea, this project is beginner-friendly and incredibly satisfying.
It’s also a wonderful handmade gift idea for birthdays or Christmas — especially if you’re sewing for grandchildren.
Why Make a DIY Felt Road Set?
There’s a reason DIY felt road mats are so popular in the handmade toy world.
A felt road set is:
• Lightweight and portable
• Foldable and easy to store
• Quiet for indoor play
• Affordable to make
• Customizable to any layout
• Perfect for travel or quiet time
Unlike bulky plastic tracks, a homemade felt road playset rolls up neatly into a basket or bag. It works beautifully on carpet and doesn’t scratch wooden floors.
If you love sewing projects for kids that are practical and timeless, this one ticks every box.
Supplies for Your DIY Felt Road Playset
This is a simple sewing project using basic materials. You can sew it or use fabric glue depending on your preference.
Materials Needed:
• Black or dark grey felt (craft felt or wool blend felt)
• Yellow felt for road markings
• Sharp fabric scissors or rotary cutter
• Ruler
• Chalk or washable fabric marker
• Sewing machine or hand sewing needle
• Matching thread
Optional Supplies:
• Non-slip shelf liner for backing
• Velcro dots for connecting pieces
• Green felt for grass borders
• Scrap felt for houses, trees, or road signs
• Drawstring bag for storage
Tip: Wool blend felt is sturdier and holds its shape better than thin craft felt, especially for larger road pieces.
How to Make a Felt Road Set (Step-by-Step Tutorial)
This beginner sewing tutorial requires straight seams only. No complicated techniques needed.
Step 1: Plan Your Road Pieces
Instead of sewing one large felt road mat, create individual road segments. This makes the set more flexible and easier to store.
Basic pieces to include:
• Straight road sections
• Curved corner pieces
• T-junctions
• Crossroads
• Roundabout
A good size guide:
Road width: 3–4 inches
Straight sections: 8–10 inches long
Adjust based on the size of the toy cars you’re using.
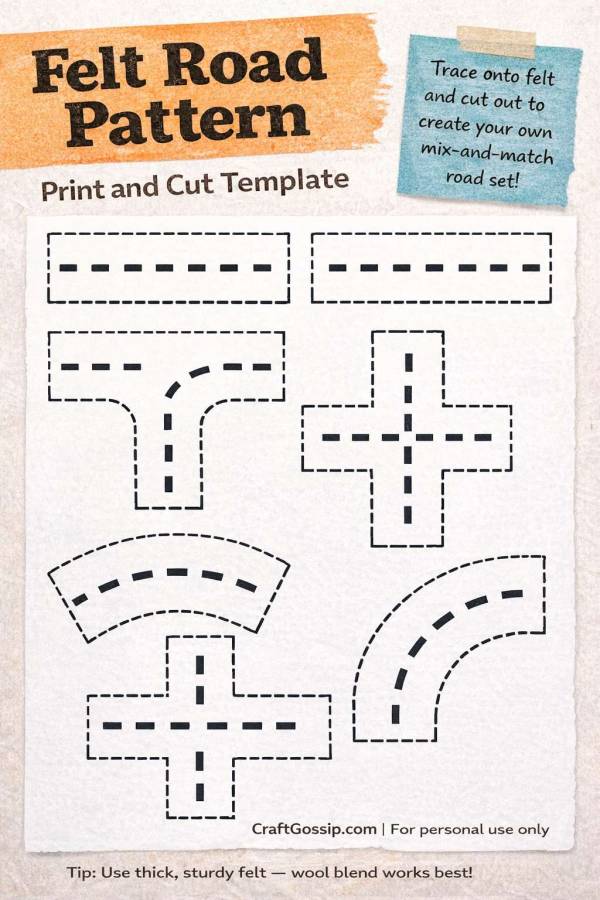
Step 2: Create a Simple Felt Road Pattern
You don’t need a complicated printable pattern.
Draw templates onto cardboard first:
• One long rectangle (straight road)
• One curved quarter circle
• One T-shape
• One cross shape
• One circle for a roundabout
Trace these templates onto your felt using chalk. This keeps your pieces consistent.
Step 3: Cut the Felt Road Base
Cut all your road pieces carefully. Clean edges help the set look polished, but slight imperfections are completely fine — this is a handmade toy, not factory plastic.
If you’d like extra durability, cut two layers of black felt for each piece and stitch them together around the edges.
Step 4: Add Road Markings
Cut small yellow rectangles to create dashed road lines.
Position them evenly down the center of each road piece. You can:
- Machine stitch them in place
• Hand stitch with yellow thread
• Use fabric glue for a no-sew option
Stitching is recommended for long-term durability, especially if this will be heavily played with.
Step 5: Optional Non-Slip Backing
If your felt slides on wooden floors, cut non-slip shelf liner to size and stitch or glue it to the back of each piece.
This transforms your DIY felt road mat into a stable play surface without losing flexibility.
Step 6: Add Extra Details (Optional but Fun)
Now comes the creative part.
You can sew or glue additional felt details like:
• Parking bays
• Gas stations
• Small houses
• Parks and trees
• Traffic lights
• Railway crossings
These little additions turn a simple felt road set into a full imaginative play town.
DIY Felt Road Set for Travel and Quiet Play
One of the biggest benefits of this handmade felt road playset is portability.
You can:
• Roll it up for car trips
• Pack it in a tote bag
• Take it to restaurants
• Use it during flights
Because it’s soft and lightweight, it makes an excellent DIY travel toy for toddlers and preschoolers.
And unlike plastic sets, it’s wonderfully quiet.
How to Store Your Felt Road Playset
Storage is simple and practical.
- Roll the pieces together and tie with ribbon
• Store in a fabric basket
• Sew a coordinating drawstring bag
• Keep flat under a bed
If you’re gifting it, a personalized storage pouch makes it feel extra special.
Why Handmade Felt Toys Are Still Worth Making
In a world of flashing lights and battery-operated everything, there’s something refreshing about simple handmade toys.
A DIY felt road set encourages:
• Imaginative storytelling
• Independent play
• Fine motor skills
• Creative problem-solving
It’s screen-free, timeless, and genuinely engaging.
If you’ve been looking for an easy felt sewing project for kids, this DIY felt road set is a beautiful place to start. It’s simple enough for beginners and thoughtful enough to become a keepsake.
And if you make one, I’d love to hear — did you stick with classic black and yellow, or did you create an entire little felt town?
Looking for more Playmats to sew? Check out these 7 Playmats at Leisure Arts.