• Home
  • Suggest A DIY
  • DIY Newsletter

Sewing

Patterns, Techniques, Articles, Blogs, and other resources to learn how to sew

  • About CraftGossip
  • Our Network
    • Bath & Body Crafts
    • Candle Making Ideas
    • Crochet Ideas
    • Cross Stitch
    • Edible Crafts
    • Felting Patterns
    • Glass Art
    • Home & Garden Ideas
    • Indie Crafts
    • Jewelry Making
    • Kids Crafts
    • Knitting Patterns
    • Lesson Plans
    • Needlework
    • Party Ideas
    • Polymer Clay
    • Quilting Ideas
    • Recycled Crafts
    • Scrapbooking
    • Sewing Patterns
    • Card Making
    • DIY Weddings
    • Not Craft Ideas
  • Giveaways
  • Roundups
  • Store
  • Search

Sewing Pattern – Otis Sling Bag with Phone Pocket on Strap

August 23, 2020 by Shellie Wilson

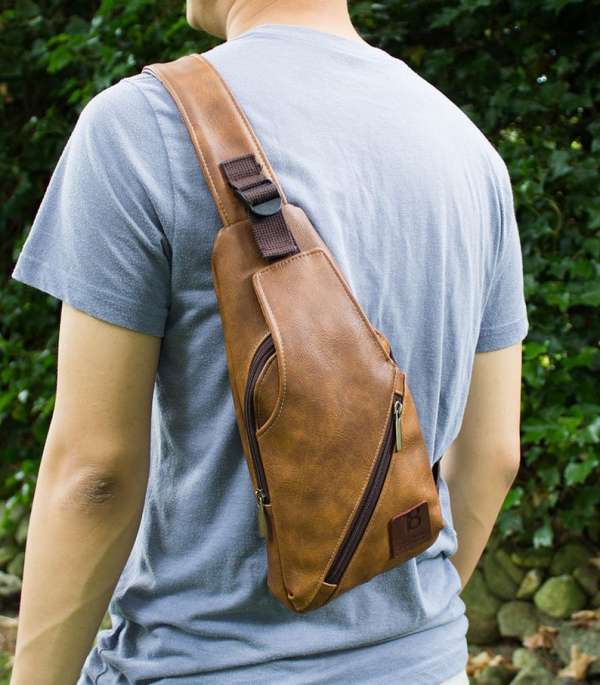
The Otis Sling Bag features a casual and trendy design that is perfect for everyday use. This piece is specially designed for travel purposes, such as biking, hiking, jogging more!

Due to its compact yet roomy figure it can fit your basic needs with ease. Unlike many of our previous sling bags, the front pocket includes a zipper pocket that is used as the cover of the bag, making it an ideal anti-theft bag for any journey! A pouch is added around the chest area for you to keep your phone.. It is recommended to use dark brown materials for a great natural look.

Looking for Sewing supplies? Check out Sewing Machine Plus.

Looking for more DIY sewing patterns to make your own bags, totes and clutches? Check these Sewing patterns out on Etsy.

Looking to chat about sewing? Check out our sewing group on Facebook with over 80K members.

Next Pattern:

  • Crossbody Sling Bag - Sewing Pattern
  • Easy Knot Strap Bag Free Sewing Pattern
  • Water Bottle and Phone Carrier - Free Sewing Pattern
«
»

Comments

  1. Stitching Kitten says

    August 23, 2020 at 3:41 pm

    Title says “free sewing” but links to a paid pattern.

  2. Mcguff's Designs says

    August 24, 2020 at 4:41 am

    This is not a free pattern. Change the title. It’s misleading.

    • Anne Weaver says

      August 24, 2020 at 3:25 pm

      That was an oversight on our part. I’ve changed the title. I’m so sorry about that! –Anne

  3. Kelly Lue says

    August 24, 2020 at 5:27 am

    where is the link to the pattern?

  4. Megen says

    August 24, 2020 at 6:59 am

    Hi Where is the link to the pattern I would like to see it

  5. Kaytee says

    August 24, 2020 at 8:07 am

    Link to Otis Sling Bag???

  6. revaschorus says

    August 24, 2020 at 8:08 am

    There is no link or website to go to for the pattern.

  7. Laurpud says

    August 24, 2020 at 1:13 pm

    Where is the pattern? I don’t see a link

  8. Jan says

    August 24, 2020 at 3:00 pm

    cannot find the link to the pattern

    • Anne Weaver says

      August 24, 2020 at 3:23 pm

      The words “Otis Sling Bag” in the first sentence are linked to the pattern. –Anne

  9. Cheryl says

    August 26, 2020 at 11:46 am

    Hi, there is no link to this Otis Sling Bag. The title doesn’t send me there, and you don’t use that name again during your description.

    • Anne Weaver says

      August 26, 2020 at 12:36 pm

      You can find the link in the first line of the post. It’s right underneath the photo of the bag. Hope that helps! –Anne

  10. Kaytee says

    August 26, 2020 at 4:07 pm

    I tried clicking on each word in the first sentence (none of which were the name of the bag)– none of them link to anything. The first sentence under the picture is: ” The features a casual and trendy design that is perfect for everyday use.” (sic) Looks like an editing error was made– words seem to be missing after “The”, or after “features”.

Have you read?

Free Oven Mitt Sewing Pattern: A Fat Quarter Friendly Kitchen Gift You’ll Actually Use

There are some sewing projects that are cute, some that are practical, and then there are the magical ones that are both. A handmade oven mitt lands firmly in that lovely middle ground — useful enough to keep beside the oven every day, pretty enough to gift, and small enough that you can make one without pulling half your fabric stash out onto the table.

Not that I would ever do that, of course.

A free oven mitt sewing pattern is one of those projects every home sewist should have tucked away. It is perfect for using fat quarters, leftover quilting cotton, and those odd fabric pieces that are too lovely to toss but not quite big enough for a full quilt block. Add some insulated batting, a little quilting, and suddenly you have a handmade kitchen gift that looks polished and actually gets used.

This is a brilliant beginner-friendly sewing project because it teaches practical skills without becoming overwhelming. You’ll work with layers, simple quilting, curves, binding, and heat-safe materials — all in a small project that can be finished in an afternoon.

If you enjoy sewing handmade kitchen gifts, pair this project with our potholder sewing pattern for a lovely matching set. A handmade oven mitt and potholder bundle makes a beautiful housewarming gift, Christmas gift, teacher gift, or hostess gift, especially when wrapped with a tea towel and a wooden spoon.

Why Sew Your Own Oven Mitt?

Shop-bought oven mitts do the job, but handmade ones have so much more personality. You can choose fabrics that match your kitchen, use seasonal prints for Christmas or Easter baking, or make a scrappy version from your quilting leftovers.

And let’s be honest, if you quilt or sew, there is a very good chance you already have enough fabric scraps to make several of these without buying anything new. Fabric stash guilt officially reduced.

A quilted oven mitt is also a lovely way to practise sewing curves and binding on a small scale. If your first one isn’t perfect, it will still hold a hot tray, and that is the sort of forgiving sewing project we all need from time to time.

Best Fabrics For A Handmade Oven Mitt

For oven mitts, stick with 100% cotton fabrics. Quilting cotton is ideal because it is easy to sew, comes in endless prints, and holds up well with regular kitchen use.

Avoid synthetic fabrics for the outer layer, lining, and thread. Polyester can react badly to heat, so cotton is the safer choice. Use cotton thread if you have it, and choose cotton batting along with an insulated heat-resistant batting such as Insul-Bright.

If you need to stock up, fat quarters from Fat Quarter Shop or quilting cottons from Connecting Threads are perfect for this type of kitchen sewing project. A few coordinating prints can give you a boutique-style oven mitt without much fabric waste.

Supplies You’ll Need

To sew a basic quilted oven mitt, you will need:

100% cotton fabric for the outer mitt
100% cotton fabric for the lining
Insulated batting such as Insul-Bright
Cotton quilt batting for extra thickness
Cotton thread
Bias tape or fabric to make your own binding
Rotary cutter and cutting mat
Fabric clips or pins
Sewing machine
Oven mitt template or printed pattern

A walking foot is helpful when sewing through the layers, but don’t worry if you don’t have one. Sew slowly, use clips to keep everything together, and let the machine do the work rather than wrestling the layers through. We have all tried to force bulky layers through a sewing machine at least once, and the machine usually wins.

Tips For Sewing A Better Oven Mitt

The secret to a good homemade oven mitt is in the layers. You want enough padding to protect your hand, but not so much bulk that the mitt becomes stiff and awkward.

Use one layer of insulated batting and one layer of cotton batting for each side of the mitt. The insulated batting helps reflect heat, while the cotton batting adds softness and structure.

Quilt the layers before cutting or assembling the mitt if your pattern allows. Straight-line quilting works beautifully and gives the mitt a clean, modern look. You can also use diagonal lines, crosshatching, or simple wavy quilting if you want something more relaxed.

Keep your quilting lines close enough to hold the layers securely, but not so dense that the mitt becomes rigid. Around 1 inch apart is a good practical spacing for most kitchen sewing projects.

Make It Fat Quarter Friendly

This is a great fat quarter sewing project because oven mitts do not require large cuts of fabric. You can use one print for the outside and another for the lining, or mix several scraps together for a patchwork oven mitt.

For a scrappy version, piece small fabric strips or squares together first, then quilt the patched fabric with batting before cutting out the mitt shape. This is a lovely way to use leftover quilt binding strips, charm squares, or those little fabric pieces we keep because “surely they’ll be useful one day.”

Well, this is their day.

For more scrap-friendly kitchen sewing ideas, you might also enjoy our potholder and oven mitt sewing projects, which are ideal for using up smaller fabric pieces.

Handmade Gift Ideas Using This Pattern

A handmade oven mitt makes a sweet gift on its own, but it is even better as part of a themed bundle.

Try pairing it with:

a matching potholder
a pretty tea towel
a wooden spoon
a jar of cookie mix
a favourite family recipe
a handmade apron
a packet of festive napkins
a small cookbook

For Christmas, use festive fabric and add it to a baking-themed gift basket. For housewarmings, choose neutral linen-look cottons or classic gingham. For Mother’s Day, florals are always lovely. For a teacher gift, tuck in a packet of brownie mix or a handwritten recipe card.

If you’re sewing for holiday gifting, our Christmas pot holders to sew as gifts roundup has more ideas for creating practical handmade kitchen presents.

Oven Mitt Safety Notes

Because oven mitts are used around heat, this is one sewing project where materials really matter. Use cotton fabric, cotton batting, and insulated batting designed for heat-resistant sewing projects.

Do not use regular polyester fleece, acrylic felt, or synthetic quilt batting inside an oven mitt. They may be tempting because they are soft and easy to sew, but they are not the best choice for heat protection.

Also, remember that handmade oven mitts are intended for regular kitchen use, not open flames, BBQ grills, or cast iron that has been sitting over high heat for a long time. Use common sense, test your mitt carefully, and make sure the finished project feels thick enough before gifting it.

Easy Variations To Try

Once you have made one oven mitt, it is very easy to start imagining more. That is how one quick project becomes a whole afternoon of “just one more,” which is also how my scrap basket keeps pretending it is under control.

Try these variations:

Make a patchwork oven mitt from leftover quilt blocks.
Use Christmas fabric for festive baking gifts.
Add a hanging loop for easy storage.
Make a matching potholder and tea towel set.
Use linen-cotton blends for a farmhouse kitchen look.
Try striped binding for a cheerful finish.
Use novelty food prints for a fun baker’s gift.

You can also use this project to practise simple quilting designs before trying them on a larger quilt. If you are new to quilting, small projects like oven mitts, pot holders, mug rugs, and placemats are a brilliant way to build confidence without committing to a full-size quilt.

Why This Is A Great Beginner Sewing Project

A quilted oven mitt is beginner friendly, but it still feels like a “real” sewing project. You are not just sewing a straight rectangle and calling it done. You are learning how fabric, batting, quilting, curves, and binding all work together.

That makes this a useful skill-building project for new sewists and a satisfying quick make for experienced quilters.

It is also practical, which I always appreciate. There is only so much room in life for decorative things that sit in a cupboard, but an oven mitt earns its keep every time someone bakes biscuits, roasts vegetables, or rescues toast from becoming charcoal.

Categories

Bags and purses Children's Christmas Easter fleece Free Sewing Patterns Girl's Dress Halloween Hats Home Decor No-sew Pillows Refashions Scrap Fabric sewing Sewing Patterns Sewing Techniques Skirts Softies T-shirts

Featured Posts

Tutorial: Tie-front fabric belt

Tutorial: Ribbon Mermaid Doll with a swishy fishy fin

Sewing Tutorial: Turn a plain tee into a maternity shirt with ruched sides

Tutorial: Little girl’s Skyline Skirt

Tutorial: Chiffon fairy wings

RSS More Articles

  • Cross Stitch Cards for All Occasions
  • Free Oven Mitt Sewing Pattern: A Fat Quarter Friendly Kitchen Gift You’ll Actually Use
  • What Does PSSO Mean In Knitting? How To Pass A Slipped Stitch Over
  • Sophie Hood Pattern Free: Knit And Crochet Hooded Scarf Patterns For The Viral Winter Look
  • Coca-Cola Foot Soak Recipe: The Viral Fizzy Foot Hack For Tired, Rough Feet
  • 3 FREE Dark Romantasy Coloring Pages
  • Needle Felted Tropical Hibiscus Flower Tutorial
  • 12 Masculine Scrapbook Layouts for Men
  • Book Review: The No-Brainer Brain Explainer
  • Knit and Felt Some Tabi Style Slippers

Pick Your Blog

  • Sewing
  • Knitting
  • Quilting
  • Crochet
  • Home & Garden
  • Recycled Crafts
  • Scrapbooking
  • Card Making
  • Polymer Clay
  • Cross-Stitch
  • Edible Crafts
  • Felting
  • Glass Art
  • Indie Crafts
  • Kids Crafts
  • Jewelry Making
  • Lesson Plans
  • Needlework
  • Bath & Body
  • Party Ideas
  • Candle Making
  • DIY Weddings
  • Not Craft
  • Free Craft Projects

Copyright © 2026 · CraftGossip | Start Here | Contact Us | Link to Us | Your Editors | Privacy and affiliate policy