• Home
  • Suggest A DIY
  • DIY Newsletter

Sewing

Patterns, Techniques, Articles, Blogs, and other resources to learn how to sew

  • About CraftGossip
  • Our Network
    • Bath & Body Crafts
    • Candle Making Ideas
    • Crochet Ideas
    • Cross Stitch
    • Edible Crafts
    • Felting Patterns
    • Glass Art
    • Home & Garden Ideas
    • Indie Crafts
    • Jewelry Making
    • Kids Crafts
    • Knitting Patterns
    • Lesson Plans
    • Needlework
    • Party Ideas
    • Polymer Clay
    • Quilting Ideas
    • Recycled Crafts
    • Scrapbooking
    • Sewing Patterns
    • Card Making
    • DIY Weddings
    • Not Craft Ideas
  • Giveaways
  • Roundups
  • Store
  • Search

Free sewing pattern: Long ear bunny softie

August 28, 2018 by Anne Weaver

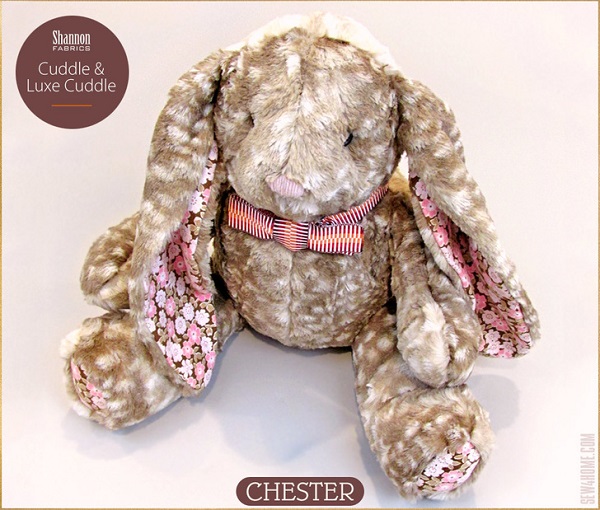
Free sewing pattern: Long ear bunny softieThis bunny is so cute – and so soft made from Cuddle fabric!  Sew4Home shares a free sewing pattern and tutorial showing how you can make one.  The bunny has long floppy ears and a fluffy yarn pom pom tail.  I know my daughter would love for me to make her one.  She has a weakness for stuffed animals – especially ones made from super snuggly fabric!

Click below for the free sewing pattern and tutorial:

Sweet, Soft, Stuffable Bunnies: Shannon Fabrics Cuddle & Luxe Cuddle, by Sew4Home _ link has been updated and now working.

Looking for more Softie toys to sew? Check out these sewing patterns for kids’ toys on Etsy and these Softie Sewing books on Amazon.

Easter is a time for new beginnings and fresh starts, and what better way to celebrate than by creating a handmade Easter Bunny softie? This free sewing pattern for a long ear bunny softie is the perfect way to add a touch of Easter cheer to your home. Not only is it a fun and easy project to make, but it’s also a great way to use up scraps of fabric and other materials you may have lying around.

Sewing a long-ear bunny softie is the perfect project for beginners, as it’s easy to follow and doesn’t require any advanced sewing skills. The pattern includes step-by-step instructions and clear diagrams, making it easy to understand even for those who are new to sewing. This pattern is also a great project for children, as it can be a fun and educational activity to do together.

One of the best things about this Easter Bunny softie is that it can be made with a variety of fabrics and materials. You can use traditional Easter colors like pastel pink, yellow, and blue or you can use more vibrant colors to make your bunny stand out. You can also use different types of fabrics such as fleece, cotton or flannel. This pattern is a great opportunity to get creative and make a unique and special bunny that you’ll love.

Once completed, your long ear bunny softie can be used as a decorative piece, a cuddly toy, or even as a cozy pillow. You can also make a whole family of bunnies in different sizes and colors, to decorate your home for Easter. They also make great gifts for friends and family, especially for those who have children.

This free sewing pattern for a long ear bunny softie is the perfect project to celebrate Easter. It’s easy to follow, can be made with a variety of materials and it’s a great way to get creative. Whether you’re a beginner or an experienced sewer, this pattern is sure to inspire you and provide hours of enjoyment. So grab your fabric and thread, and get ready to create a unique and special Easter Bunny softie that you and your loved ones will treasure for years to come. Happy sewing!
 

«
»

Comments

  1. Lillie Dunn says

    August 29, 2018 at 5:06 am

    Love the bunny! Not able to d/l the pattern

    • Anne Weaver says

      August 29, 2018 at 6:42 am

      Isn’t he a cutie? I was able to download the pattern. The pattern is a link in the first step of their instructions. –Anne

  2. Alice says

    August 29, 2018 at 4:00 pm

    I tried twice but never got the email they said they sent. He sure is cute tho!

  3. Irena Fabisiak says

    July 27, 2019 at 1:50 pm

    Hi I would love to make this cutie for my granddaughter but am unable to download the pattern. Is it possible for you to email it to me.
    Many Thanks

    Irena Fabisiak

  4. Sandie says

    November 1, 2019 at 10:07 am

    I love to bunny but I can’t download it

  5. Sandie says

    November 23, 2019 at 2:44 pm

    I have been trying to download pattern but still can’t get it / Please help me

  6. Jenn says

    February 25, 2020 at 1:39 pm

    I would like to download this pattern but I am unable to do so… Please let me know

  7. Reda R. West says

    January 22, 2021 at 5:37 pm

    How do I download the pattern?

  8. Dawn McGuire says

    September 7, 2021 at 1:18 pm

    Got the pattern yesterday from site, today I cannot get into site to following make up instructions, very frustrating

    • Shellie Wilson says

      September 24, 2021 at 7:14 am

      It seems to be working for me. Please try again

Have you read?

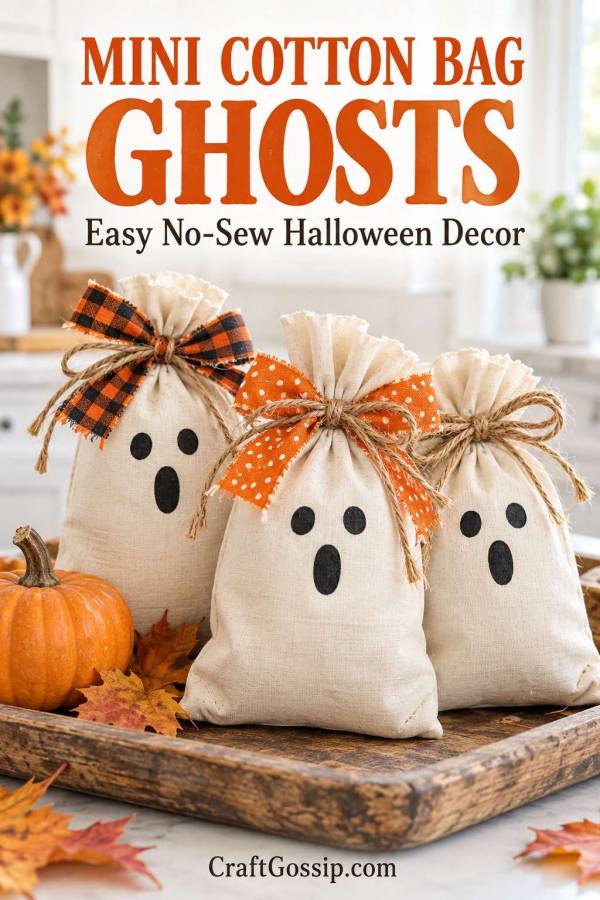
DIY Mini Cotton Bag Ghosts: Easy No-Sew Halloween Decorations

You know those little cotton drawstring bags that seem to accumulate in the craft cupboard? The ones left over from party favours, jewellery packaging or a project you were absolutely going to finish? They make surprisingly charming little Halloween ghosts.

Add some stuffing, a simple ghost face and a messy fabric bow, and you have a soft little decoration ready for a shelf, mantel or autumn display. No sewing machine, paper pattern or complicated construction required.

I particularly love the cream cotton and plaid combination in this project. It has that cosy farmhouse Halloween feel, with just enough spooky personality to sit happily beside pumpkins and a little “Boo” sign. These ghosts look startled rather than terrifying, which is very much my preferred level of haunting.

The supplied inspiration image is credited to Made with Love Country Crafts by Tracy. This tutorial recreates the cotton-bag idea with a few practical adjustments, including drawn or felt eyes instead of the upholstery pins pictured.

Make one as a quick afternoon craft, or create a little ghost family using bags in different sizes. It’s also a lovely excuse to use those fabric scraps that are apparently too precious to throw away.

What You’ll Need

For three mini cotton-bag ghosts:

  • Three plain cream or white cotton drawstring bags, approximately 10 × 15 cm
  • Polyester toy stuffing or clean, pale fabric scraps
  • Black fabric marker
  • Optional black felt for the eyes and mouths
  • Fabric glue, or a low-temperature hot glue gun
  • Cotton fabric scraps in orange, black, cream or plaid
  • Jute twine or cotton string
  • Scissors
  • Ruler
  • A small piece of scrap card to place inside each bag while drawing

Bag size is flexible. Small muslin favour bags work well, provided the weave is tight enough to contain the stuffing and show the face clearly.

Choose undecorated bags with a simple rectangular shape. Cream cotton gives a softer, vintage look, while bright white makes the black features stand out.

Skill level: Beginner
Estimated time: Around 15–20 minutes per ghost, plus any glue drying time
Finished size: Depends on your bags and how much fabric you gather at the top

How to Make Mini Cotton Bag Ghosts

1. Plan the Face Position

Lay an empty bag flat with the opening at the top. Decide which side will be the front.

Leave room above the face for the gathered top and fabric bow. On a 15 cm-tall bag, the eyes will usually look best a little above the middle, rather than immediately beneath the opening.

Lightly mark the eye positions with a pencil if you need a guide. Keep the mouth below and between them.

Before drawing, slip scrap card inside the bag to stop the marker bleeding through to the back.

2. Draw the Ghost Face

Use a black fabric marker to draw two small round or oval eyes. Add a longer oval mouth underneath.

Start with small shapes and build them up gradually. It is much easier to enlarge an eye than persuade a black marker to take it back.

Test the marker on a hidden area or a spare piece of similar fabric first. Some loosely woven cottons allow the ink to spread.

For a slightly different expression, try:

  • A tiny round mouth for a surprised ghost
  • A narrow oval mouth for a singing ghost
  • A curved smile for a friendly ghost
  • Two short eyelashes beside each eye

Allow the ink to dry and follow the marker manufacturer’s fixing instructions before stuffing.

If you prefer crisp shapes, cut the features from black felt and glue them on after filling the bag.

3. Fill the Bag With Stuffing

Pull the stuffing into small, fluffy pieces and add it gradually.

Push a little into the bottom corners first, then fill the centre. Aim for a softly padded shape that still shows the rectangular outline of the bag.

Don’t pack it tightly. Too much stuffing creates a rounded cushion and makes it harder to gather the top neatly.

Leave approximately 3–4 cm unfilled at the opening. This gives you room to close the bag and attach the bow.

If using fabric scraps, choose pale pieces and cut them small. Dark or bulky scraps can show through thin cotton and create lumps.

4. Gather and Secure the Top

Pull the drawstrings to close the bag, then tie them securely.

Wrap a length of twine around the gathered area and tie a firm knot. This helps keep the shape in place and gives the ghost a rustic finish.

If the original drawstrings look untidy, tuck their ends behind the gathered top or trim the excess after tying securely.

Gently squeeze and reshape the bag until the stuffing is distributed evenly. Press the bottom a little flatter if you want your ghost to lean neatly against a shelf display.

5. Make a Scrappy Fabric Bow

For each ghost, cut three or four fabric strips approximately 2–3 cm wide and 15–20 cm long.

Combine a plaid strip with orange cotton, a small polka-dot print or plain cream fabric. Slightly frayed edges suit this project beautifully.

Stack the strips at different angles and pinch them together in the centre. Tie tightly with twine.

For a fuller bow, fold one longer strip into two loose loops before adding the shorter pieces. Wrap extra twine around the middle and leave a few loose ends.

The bow should look relaxed. If every strip matches perfectly, give it a little ruffle. This is Halloween decor, and the ghosts can cope with an uneven hem.

6. Attach the Bow

Position the bow over the gathered top, keeping the face visible.

Tie it onto the neck twine for a removable finish, or secure the centre with a small amount of fabric glue or low-temperature hot glue.

Let the glue set fully before handling. Adults should manage the glue gun when crafting with children.

Turn the ghost around and check that the bow is secure from the back as well as the front.

How to Display Your Cotton Bag Ghosts

These little ghosts look particularly sweet grouped in threes. Use different bag sizes or vary the stuffing slightly to give each one its own shape.

Try arranging them:

  • On a mantel beside fabric pumpkins
  • In a shallow wooden tray with faux autumn leaves
  • Against books on a shelf
  • On an entry table with a small Halloween sign
  • Inside a decorative basket
  • Beside a bowl of wrapped Halloween treats

Stuffed bags may need something behind them for support. Lean them against a sign, basket or books rather than expecting them to stand perfectly on their own.

For a hanging version, tie a loop of cotton string securely around the gathered top and hide the knot behind the bow.

If you’re decorating a larger space, our DIY Halloween ghost wreath offers another way to carry the ghost theme through your display.

Easy Variations to Try

Make a Neutral Farmhouse Ghost Family

Use cream bags, beige gingham, cotton lace and natural twine. The soft colours look lovely with wooden trays and pale pumpkins.

Use Recycled Shirt Fabric

Cut bow strips from a worn plaid shirt or leftover dressmaking fabric. It adds texture and gives small scraps a useful second life.

Create Colourful Halloween Ghosts

Try purple, lime green or bright orange bows. Keep the faces simple so the fabric remains the main decorative detail.

Make Mini Hanging Ghost Ornaments

Use smaller bags and lighter bows, then add hanging loops. Display them on indoor branches or cupboard knobs where they won’t interfere with opening the doors.

Tips for a Neater Finish

Keep the faces small. The simple eyes and oval mouth are what give these ghosts their charm.

Use less stuffing than you think. Add more only after checking the shape.

Choose lightweight bow fabric. Heavy upholstery fabric can overwhelm a small cotton bag.

Avoid sharp pin eyes. Drawn features or glued felt shapes achieve the look without exposed points.

Display indoors. Cotton, stuffing and paper details can absorb moisture outdoors.

These are decorative craft pieces rather than toys. Keep glued features, twine and loose fabric strips away from babies, pets and children who may pull them off.

Store Them for Next Halloween

Once Halloween is over, place your ghosts in a dry storage box without crushing the bows beneath heavier decorations.

You can untie removable bows and store them separately, then fluff the fabric and reshape the stuffing next year. Spot-clean the cotton if needed, avoiding the face and glued details.

That’s a lot of seasonal charm from a few little bags and some scraps. Give each ghost a different expression, let the bows be slightly wonky and tuck them somewhere that needs a cheerful Halloween touch.

And if three somehow become seven, I’m certainly not going to judge. Small ghosts have a habit of gathering.

Categories

Bags and purses Children's Christmas Easter fleece Free Sewing Patterns Girl's Dress Halloween Hats Home Decor No-sew Pillows Refashions Scrap Fabric sewing Sewing Patterns Sewing Techniques Softies T-shirts Women's

RSS feed: More Articles More Articles

  • From Trash to Illusion: Thomas Deininger’s Recycled Art Challenges Perception and Promotes Sustainability
  • Fun Halloween Worksheets for Kids
  • How to Start Junk Journaling with Items You Already Have
  • Free Printable Witch Hat Bag Toppers for Doritos
  • Granny Square Along by Lori Holt: A Crochet Book for Lovers of Vintage Colour
  • 10 DIY Scary Halloween Decorations for a Seriously Spooky Home
  • Pumpkin Man Doughnut Treats With a Free Halloween Printable
  • How to Make a Double Interactive Cauldron Card for Halloween
  • Book Review: Stitch Alphabets & Numbers
  • Knit a Leopard Print Shawl and Learn about Yarn Substitution

Pick Your Blog

  • Sewing
  • Knitting
  • Quilting
  • Crochet
  • Home & Garden
  • Recycled Crafts
  • Scrapbooking
  • Card Making
  • Polymer Clay
  • Cross-Stitch
  • Edible Crafts
  • Felting
  • Glass Art
  • Indie Crafts
  • Kids Crafts
  • Jewelry Making
  • Lesson Plans
  • Needlework
  • Bath & Body
  • Party Ideas
  • Candle Making
  • DIY Weddings
  • Not Craft
  • Free Craft Projects

Copyright © 2026 · CraftGossip | Start Here | Contact Us | Link to Us | Your Editors | Privacy and affiliate policy