• Home
  • Suggest A DIY
  • DIY Newsletter

Sewing

Patterns, Techniques, Articles, Blogs, and other resources to learn how to sew

  • About CraftGossip
  • Our Network
    • Bath & Body Crafts
    • Candle Making Ideas
    • Crochet Ideas
    • Cross Stitch
    • Edible Crafts
    • Felting Patterns
    • Glass Art
    • Home & Garden Ideas
    • Indie Crafts
    • Jewelry Making
    • Kids Crafts
    • Knitting Patterns
    • Lesson Plans
    • Needlework
    • Party Ideas
    • Polymer Clay
    • Quilting Ideas
    • Recycled Crafts
    • Scrapbooking
    • Sewing Patterns
    • Card Making
    • DIY Weddings
    • Not Craft Ideas
  • Giveaways
  • Roundups
  • Store
  • Search

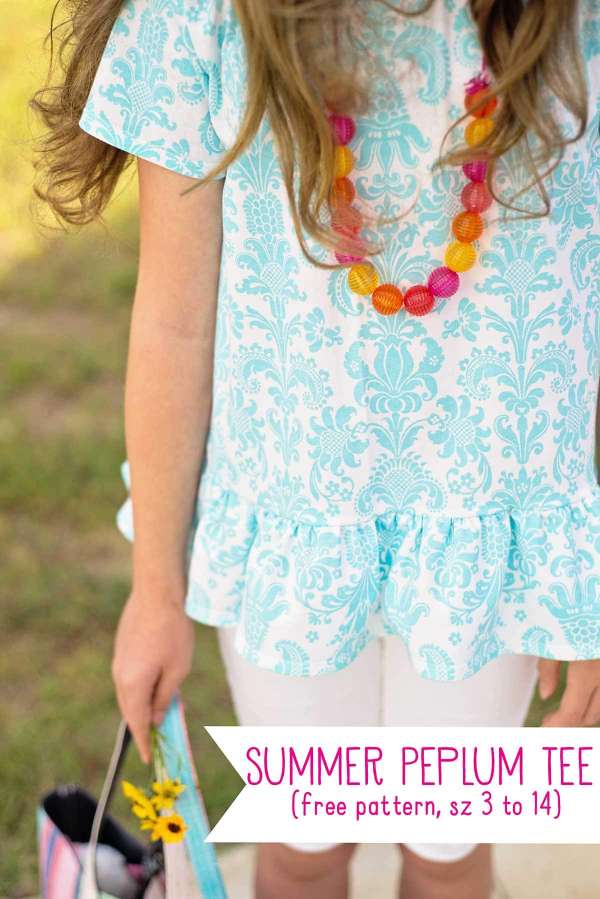
Girls Peplum Top Free Sewing Pattern

May 11, 2022 by Anne Weaver

Girls Peplum Top Free Sewing Pattern

This peplum tee is a cute look for summer!  You can sew one in girls’ sizes using a free pattern from Scattered Thoughts of a Crafty Mom.  It’s an easy pattern to sew and comes together quickly.  The shirt is designed to be made from knit fabric.  The free pattern comes in girls sizes 3 to 14.

[photo credit: Scattered Thoughts of a Crafty Mom]
«
»

Have you read?

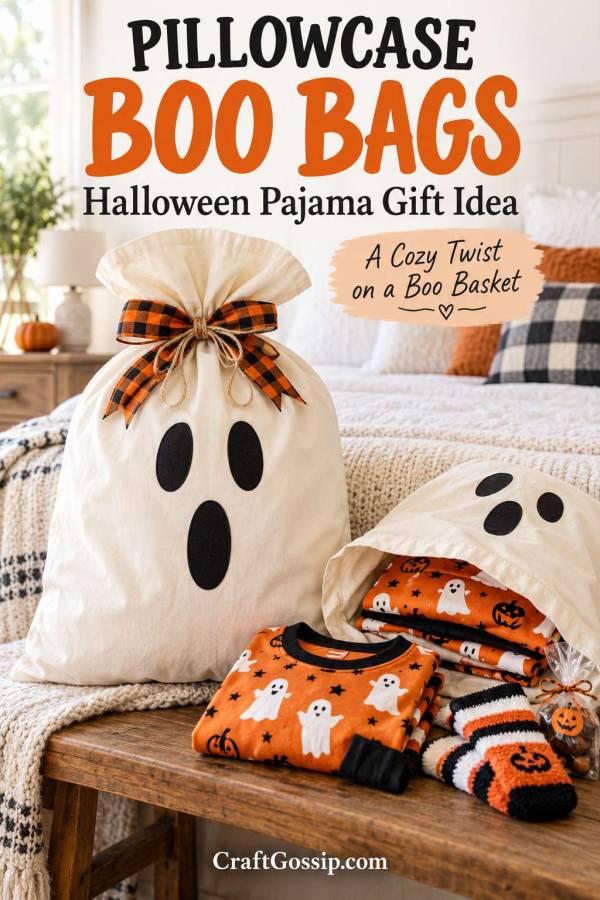
DIY Pillowcase BOO Bags: A Halloween Pyjama Gift Instead of a Boo Basket

If you love the idea of a Halloween boo basket but would rather give something cosy and useful, this pillowcase BOO bag is such a sweet alternative.

A plain white or cream pillowcase becomes a friendly ghost, complete with a surprised little face and an orange plaid bow. Inside, tuck a pair of Halloween pyjamas, some cosy socks and perhaps a small treat. The gifts give the ghost its softly rounded shape, while the pillowcase becomes reusable wrapping.

I love a project where the packaging is part of the present. There’s no basket to find a home for afterwards, and no mountain of shredded paper to extract from the carpet. Just a cheerful ghost bag and something lovely to wear for an October movie night.

These are easy to personalise for children, grandchildren, teenagers or an adult who enjoys a little Halloween fun. Choose the pyjamas first, then build your bag around them. You don’t need to fill it with a dozen extras to make it thoughtful.

What Is a Pillowcase BOO Bag?

For this project, a BOO bag is a Halloween gift bundle packaged inside a decorated pillowcase.

It follows the same idea as a boo basket: a small collection of seasonal gifts chosen for someone you care about. Here, Halloween pyjamas are the main present, and the pillowcase is decorated to look like a ghost.

Tie the opening with ribbon, add a handwritten tag and give it at the beginning of October so the recipient has time to enjoy their new pyjamas.

It also makes a lovely surprise for a Halloween sleepover or a family film night.

What You’ll Need

For one pillowcase BOO bag:

  • One clean white or cream cotton pillowcase
  • One pair of Halloween pyjamas in the recipient’s size
  • A black fabric marker or fabric paint
  • Scrap cardboard large enough to sit behind the face
  • Pencil or tailor’s chalk
  • Scissors
  • Orange-and-black plaid ribbon or lightweight fabric strips
  • Cotton ribbon or string for closing the bag
  • Cardstock and a pen for a gift tag
  • Optional cosy socks, a small book or a sealed treat
  • Optional tissue paper for keeping items together

A standard pillowcase, around 50 × 75 cm, is a useful starting point. Sizes vary, so use what you have and adjust the face placement to suit.

Skill level: Beginner
Sewing required: None
Making time: Approximately 20–30 minutes, plus drying and fixing time for your fabric marker or paint

Choose Your Pillowcase and Gifts First

A plain cotton pillowcase is easy to decorate and gives the ghost a lovely soft texture. White looks bright and crisp, while cream suits the rustic plaid-and-twine style.

You can use an existing pillowcase if it is clean and in good condition. For a gift, choose one without obvious stains, thinning fabric or damaged seams.

An envelope-style pillowcase works too. Pull the inner flap out of the way while filling, then gather the whole opening to close it.

Before decorating, place your folded pyjamas inside and check how much of the pillowcase they fill. A tiny children’s set will make a smaller ghost than a bulky adult set, and that’s perfectly fine.

Don’t buy extra gifts simply to make the bag look full. You can fold the spare fabric towards the back or tie the opening lower down.

How to Make a Ghost Pillowcase BOO Bag

1. Wash and Prepare the Pillowcase

Wash and dry the pillowcase according to its care label. Avoid fabric softener when preparing it for fabric paint or markers.

Press out major creases, then lay it flat with the opening at the top.

Choose the front of your ghost. If you want to add the recipient’s name, leave room beneath the face or plan to write it on the gift tag.

2. Check the Face Position

Temporarily fill the pillowcase with the folded pyjamas and gather the opening loosely.

Look at the front and decide where the eyes and mouth should sit. The face needs to be on the filled section, below the gathered top.

Mark the positions lightly with tailor’s chalk, then remove the gifts.

This quick check saves you discovering that your ghost’s eyes disappear into the bow once the bag is tied. Even ghosts deserve a sensible outfit fitting.

3. Draw or Paint the Ghost Face

Slide cardboard inside the empty pillowcase to stop colour bleeding through to the back.

Draw two black oval eyes and a longer oval mouth underneath. For a standard pillowcase, eyes around 4–5 cm tall and a mouth around 7–9 cm tall are a reasonable starting point. Adjust them to suit your filled bag.

Keep the shapes simple. You can sketch around paper oval templates if you’d like matching eyes, or draw them freehand for a little handmade character.

Fill the outlines with a fabric marker or fabric paint suitable for cotton. Test the product on a hidden area first.

Allow the face to dry completely and follow the manufacturer’s instructions for curing or heat-setting. Finish any required ironing before putting gifts back inside.

If you enjoy decorating pillowcases as a group activity, our paint-your-own party pillowcase project is another lovely idea for sleepovers.

4. Fold and Arrange the Pyjamas

Fold the pyjamas into a broad, soft bundle and place them in the lower part of the pillowcase.

Spread them gently across the width so the ghost looks softly filled rather than having one hard lump in the centre. Tuck socks beside the pyjamas if you’re including them.

Keep books, boxes and sealed treats towards the back. This helps the face remain smooth.

There’s no need for loose toy stuffing. The clothing is your filling, and the recipient can unpack everything easily.

If you are adding a blanket as part of the gift, fold it beneath or around the pyjamas for a fuller shape.

5. Tie the Opening Closed

Gather the empty fabric above the gifts, leaving enough room for the contents to sit comfortably.

Wrap cotton ribbon around the gathered section and tie a bow that can be undone. Avoid pulling it so tightly that the knot becomes difficult to open.

Smooth the front with your hands, then gently adjust the clothing inside until the face sits neatly.

For the fuller look shown in the hero image, leave a little gathered fabric above the tie. It creates a ruffled top beneath the decorative bow.

6. Add a Fabric Bow

Use a length of orange-and-black plaid ribbon, or cut lightweight cotton fabric into strips.

For a scrappy bow, try three strips approximately 4–5 cm wide and 35–45 cm long. Layer them at different angles, pinch the centre and tie them together with cotton string.

Attach the finished bow by tying it onto the closing ribbon. Keep it removable so the pillowcase is easy to open and wash.

You can add a little natural twine for the farmhouse look, but keep rough jute as a removable decoration rather than attaching it permanently to bedding.

7. Finish With a BOO Tag

Cut a simple tag from cardstock, punch a hole and tie it beneath the bow.

Try one of these messages:

  • “You’ve been BOO’d!”
  • “A cosy little Halloween surprise”
  • “New jammies for a spooky movie night”
  • “BOO! Something comfy for you”
  • “A little October treat”

Write the recipient’s name on the back and add a short personal note.

Let them know the pillowcase can be reused, along with any washing instructions for the decorated fabric.

What to Put Inside a Halloween Pyjama BOO Bag

The pyjamas can be the whole gift. If you’d like to add something extra, choose one or two items that suit the recipient.

For Children

  • Halloween pyjamas
  • A small picture book
  • Soft socks
  • An age-appropriate colouring activity
  • A sealed treat suitable for their dietary needs

For Teenagers

  • Comfortable pyjamas or lounge shorts
  • Cosy socks
  • Their favourite wrapped snack
  • A handwritten invitation to a Halloween movie night

For Adults

  • Pyjamas or a comfortable lounge set
  • A favourite tea or coffee sachet
  • Wrapped chocolate
  • A book
  • A note promising an evening off and control of the remote

Keep food sealed and separate from the clothing. Package toiletries separately too, so scents or leaks don’t transfer to the fabric.

Make It a Halloween Movie-Night Gift

Give the BOO bag with a little card naming the film you’ll watch together. Let the recipient open their gift, change into their pyjamas and settle in for a cosy evening.

That shared activity can be the nicest part of the present, especially when you’re gifting to grandchildren.

If you want to carry the friendly ghost theme into your decorations, our DIY Halloween ghost wreath would make a cheerful backdrop.

Tips for a BOO Bag That Looks Good and Opens Easily

Choose the correct pyjama size. When in doubt, ask before shopping.

Decorate before filling. Markers, paint and heat-setting should be finished before gifts go inside.

Keep the closure removable. A tied bow is more practical than gluing the opening shut.

Use washable fabric products. Follow both the pillowcase care label and the decoration product’s instructions.

Adjust the bag to the gift. A smaller ghost is just as charming as a full-sized one.

Remove ribbons before bedtime. The bow, string and tag are gift packaging, not part of the bedding. Keep long ties away from babies and young children.

Reuse the Ghost Pillowcase

Once the gifts have been unpacked, remove the ribbon and tag. The decorated pillowcase can become seasonal bedding if the fabric products are suitable for that use and have been fixed as directed.

It can also be saved as a Halloween gift bag for next year.

I like the idea of bringing it out each October, adding a new pair of pyjamas and making it a small family tradition. It doesn’t have to become bigger or more expensive every year. A familiar ghost face, a fresh bow and something cosy are plenty.

That’s what makes this Halloween BOO bag so lovely. It combines a quick handmade project with a useful gift, and the wrapping has a life beyond the first excited untying.

Pick the pyjamas, draw your little ghost and use the plaid fabric you’ve been saving. There’s a very good chance this will be the friendliest thing haunting the bedroom.

Categories

Bags and purses Children's Christmas Easter fleece Free Sewing Patterns Girl's Dress Halloween Hats Home Decor No-sew Pillows Refashions Scrap Fabric sewing Sewing Patterns Sewing Techniques Softies T-shirts Women's

RSS feed: More Articles More Articles

  • Learning Activities with Snap Cubes
  • Mini Mending Mondays: Save a Favorite Cardigan with a Small Darned Repair
  • Easy and Quick Yorkshire Puddings: How to Make Yorkshire Pudding From Scratch
  • Easy Egg Bites Recipe With Cottage Cheese: Make-Ahead Breakfast in a Muffin Tin
  • Crochet Pretty Scallop Pattern Necklace – A Delicate DIY You Can Make With Thread, Wire and Beads
  • Knits for the Table for Thanksgiving and Beyond
  • 10 Ways to Upcycle Old Wool Scarves with Felting
  • BOO Halloween Mini Scrapbook Album
  • Ghost S’mores Favour Bags: Easy Halloween Treat Gifts
  • 10 Halloween Wreaths You Can Make in an Hour

Pick Your Blog

  • Sewing
  • Knitting
  • Quilting
  • Crochet
  • Home & Garden
  • Recycled Crafts
  • Scrapbooking
  • Card Making
  • Polymer Clay
  • Cross-Stitch
  • Edible Crafts
  • Felting
  • Glass Art
  • Indie Crafts
  • Kids Crafts
  • Jewelry Making
  • Lesson Plans
  • Needlework
  • Bath & Body
  • Party Ideas
  • Candle Making
  • DIY Weddings
  • Not Craft
  • Free Craft Projects

Copyright © 2026 · CraftGossip | Start Here | Contact Us | Link to Us | Your Editors | Privacy and affiliate policy