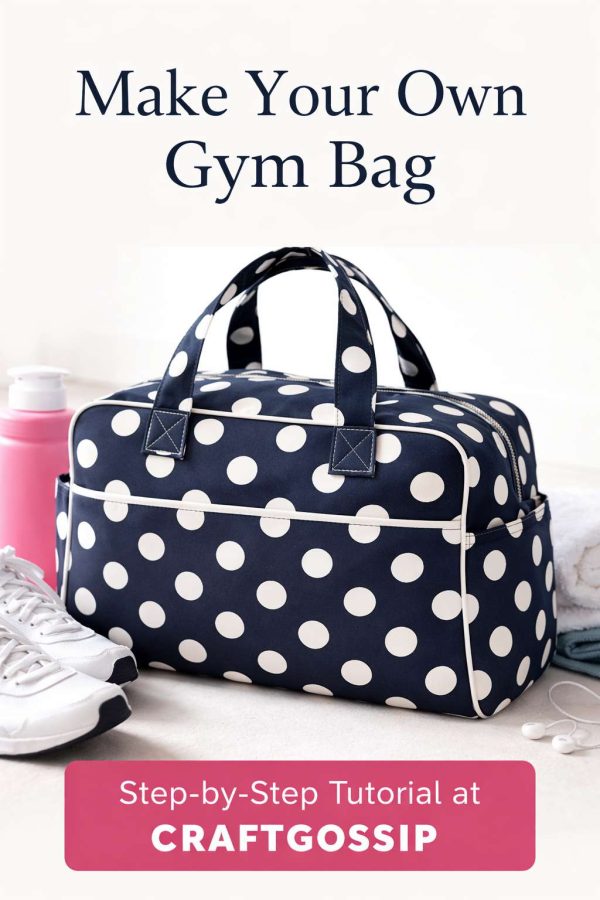
I’ve sewn a lot of bags over the years, and if I’m honest, most of them end up being “too nice” to use. This one doesn’t. This polka dot gym bag is sturdy, washable, roomy, and practical enough to be thrown in the car, tossed on the locker room bench, or stuffed with damp towels after a swim.
It’s the kind of bag you reach for without thinking — and that’s exactly what you want from a handmade gym bag.
The classic shape gives it structure, the zip keeps everything contained, and the polka dot fabric adds a little personality without screaming “handmade craft project.” Think fun, not flimsy.
Why This Gym Bag Works So Well
This isn’t a floppy tote pretending to be a gym bag.
The design includes:
• A full zip opening so nothing spills
• A structured base that holds shoes properly
• Reinforced handles that won’t stretch
• Enough room for clothes, towel, water bottle, and trainers
It’s perfect for:
• Gym sessions
• Swim days
• Pilates or yoga classes
• Sports training
• Even kids’ activities or dance class
And yes — polka dots are surprisingly forgiving when it comes to wear and marks.
Fabric Choice: Polka Dots Done Right
For the outer fabric, choose a medium to heavy cotton or canvas with a polka dot print. Small or medium dots work best — they hide scuffs and won’t look dated next season.
Great options include:
• White dots on navy or charcoal
• Black dots on a neutral base
• Soft grey with muted dots
• Colourful dots on a darker background for a sportier look
For the lining, go with a coordinating solid or subtle geometric print. This is where you can sneak in something fun without it clashing.
Interfacing is not optional here — it’s what gives the bag its gym-bag sturdiness instead of “shopping tote energy.”
What You’ll Need
- Polka dot fabric for the outer bag
• Coordinating lining fabric
• Fusible interfacing or foam stabiliser
• One long zipper (longer than the bag opening)
• Matching thread
• Pins or clips
• Sewing machine
• Iron
If you want to make this extra gym-friendly, a wipeable lining fabric is a great upgrade.
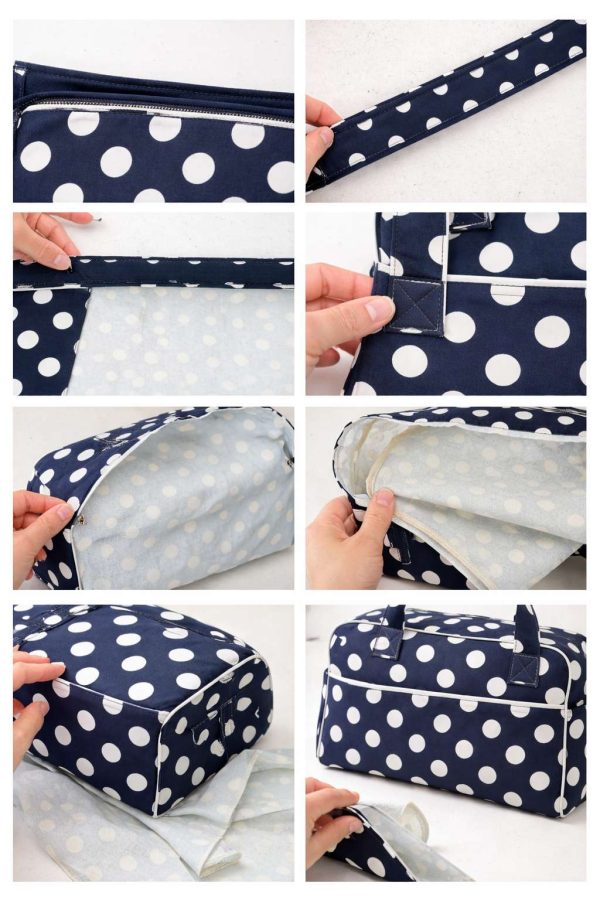
Sewing the Zipper Panel
Start by creating the zipper panel — this is the backbone of the bag.
Sandwich the zipper between the polka dot outer fabric and the lining fabric, right sides together. Stitch along the zipper edge, then flip and press so both fabrics sit neatly away from the zip.
Repeat on the other side so the zipper is fully enclosed.
This step sets the tone for the whole bag — neat sewing here makes everything else easier.
Attaching the Bag Panels
Lay the zipper panel right sides together with the main bag body piece and stitch across the top edge.
Repeat with the lining piece.
When you open it out flat, you should see the zipper centred with the bag panels extending on both sides — this is exactly what you want.
Making Strong Handles (Because Gym Bags Get Heavy)
Handles need to cope with real weight.
Fold each handle strip lengthwise, press, then fold the raw edges inward and press again. Topstitch along both long edges to lock everything in place.
Position the handles evenly on the outer bag panels and secure them with a reinforced box stitch with a diagonal cross inside. This spreads the load and stops the handles pulling loose over time.
This is not the step to rush.
Adding the Gussets for Shape
The gussets are what turn this from a flat bag into a proper gym bag.
Attach the zipper gusset first, pinning carefully around the curve and sewing slowly. Then add the bottom gusset, matching centres and working outward.
Once these pieces are in, the bag suddenly looks like it could survive a locker room — always a good sign.
Sewing the Lining (Don’t Forget the Turning Gap)
Assemble the lining the same way as the outer bag, but leave a generous opening along one seam so you can turn the bag right side out later.
Everyone forgets this once. Everyone regrets it immediately.
Joining, Turning, and Finishing
Place the lining inside the outer bag with right sides together and stitch around the top opening, securing the zipper ends well.
Turn the bag through the lining opening, push out corners gently, and give everything a good press.
Close the lining opening by hand or with a neat topstitch, tuck the lining inside, and press once more.
At this point, you should have a polka dot gym bag that feels solid, balanced, and ready for real life.
Optional Gym Bag Upgrades
If you want to level this up:
• Add an internal zip pocket for keys
• Use waterproof lining fabric
• Add a clip for locker keys
• Make a matching wet bag from scraps
A Handmade Bag You’ll Actually Use
This is the kind of project that earns its keep.
It’s practical, washable, strong, and cheerful without being childish. The polka dots give it personality, but the construction makes it last.
And honestly? There’s something very satisfying about walking into the gym with a bag you made yourself — especially when it holds up better than the shop-bought one you replaced.
Weekender-Bag free printable pattern (1)