• Home
  • Suggest A DIY
  • DIY Newsletter

Sewing

Patterns, Techniques, Articles, Blogs, and other resources to learn how to sew

  • About CraftGossip
  • Our Network
    • Bath & Body Crafts
    • Candle Making Ideas
    • Crochet Ideas
    • Cross Stitch
    • Edible Crafts
    • Felting Patterns
    • Glass Art
    • Home & Garden Ideas
    • Indie Crafts
    • Jewelry Making
    • Kids Crafts
    • Knitting Patterns
    • Lesson Plans
    • Needlework
    • Party Ideas
    • Polymer Clay
    • Quilting Ideas
    • Recycled Crafts
    • Scrapbooking
    • Sewing Patterns
    • Card Making
    • DIY Weddings
    • Not Craft Ideas
  • Giveaways
  • Roundups
  • Store
  • Search

Scrap Fabric Jar Of Hearts Valentine Card

January 21, 2025 by Anne Weaver

Scrap Fabric Jar Of Hearts Valentine Card

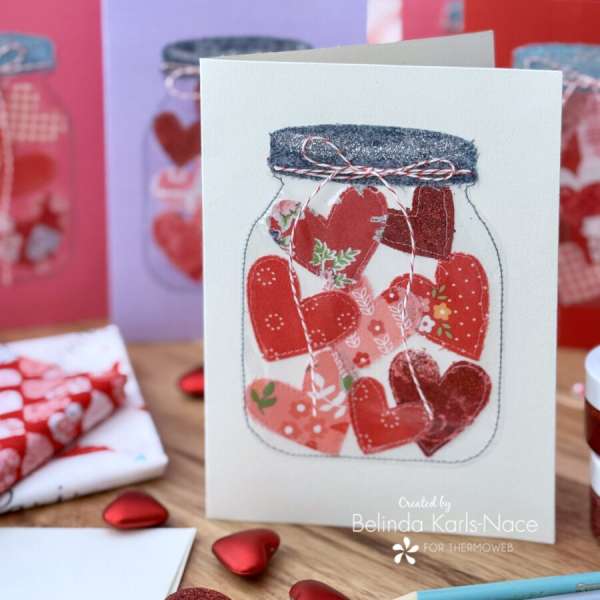
Here’s a fun Valentine project you can make from your fabric scraps! This heart card at Therm O Web blog would make a sweet Valentine to send to all of your favorite people. Designed by Belinda Karls-Nace from Blue Ribbon Designs, this card uses fabric scraps and machine stitching to create a jar full of happy scrappy fabric hearts.

These sweet cards feature a stitched jar filled with hearts, with a bit of twine tied in a bow around the top of the jar. They make sweet gifts just by themselves, but add in a small box of candy or some homemade cookies and it’s a whole Valentine or Galentine present.

I love projects like this to use up my smaller fabric scraps. I have a whole bin of just these tiny scraps, too small for most sewing projects but too cute to just throw away. I’m always looking for ways to put them to good use. These little scraps are the perfect size for cutting out some cute little hearts!

In addition to the fabric scraps, you’ll need some other special notions and adhesives to make this card. You’ll need fusible webbing to easily adhere the fabric pieces down to the paper and iron-on vinyl to make the jar. They also use some fusible glitter to add sparkle to the card. I’d never heard of a fusible glitter before, but I’m pretty excited to learn about it.

You can stitch up a stack of these sweet little Valentine cards in an afternoon. I love quick projects like this for a day when I’m wanting to do something creative but not wanting to invest my time and material in starting a long term project.

Go to Therm O Web blog to get the tutorial and the free pattern by Karis Nace of Blue Ribbon Designs.
[photo credit: Therm O Web blog]

«
»

Have you read?

How to Make a DIY Cooling Neck Scarf: Easy Beginner Sewing Tutorial

When summer reaches that point where simply walking to the letterbox feels like an endurance event, a DIY cooling neck scarf can make outdoor jobs far more comfortable.

These clever little fabric wraps are filled with a very small amount of water-absorbing crystals. Once soaked, the crystals expand and hold moisture inside the scarf, helping it stay cool around the back of your neck for much longer than an ordinary wet bandana.

They are brilliant for gardening, walking, camping, outdoor markets, sporting events, summer festivals and those days when the sewing room feels more like a sauna than a creative sanctuary.

Best of all, this is an easy beginner sewing project made almost entirely with straight seams. You can make one from a single strip of quilting cotton, which means it is also a very satisfying way to use those odd lengths of fabric we all keep because they are “far too useful to throw away.”

What Is a Cooling Neck Scarf?

A cooling neck scarf, sometimes called a cooling neck wrap or water crystal neck tie, is a narrow fabric tube containing water-absorbing polymer crystals.

When the scarf is soaked in cold water, the crystals swell and hold moisture inside the fabric. The damp cotton and slow evaporation help create a cooling sensation around the neck.

Unlike an ice pack, the scarf remains flexible enough to tie comfortably and does not need to stay frozen. Once it eventually dries, the crystals shrink again and the scarf can be re-soaked for another use.

Why Make One Instead of Buying One?

Making your own cooling neck wrap means you can:

  • Choose comfortable, breathable cotton fabric.
  • Adjust the length for adults or older children.
  • Make several from one piece of fabric.
  • Use up leftover quilting cotton.
  • Create practical handmade gifts.
  • Choose prints that people will actually wear.
  • Replace the scarf if the fabric becomes worn.

It is also a handy project for charity sewing groups, community organisations and volunteers supporting people who work or spend time outdoors.

DIY Cooling Neck Scarf Supplies

You will need:

  • One strip of tightly woven cotton fabric measuring 4 1/2 × 44 inches
  • Water-absorbing polymer crystals or water-storing crystals
  • Coordinating all-purpose sewing thread
  • Sewing machine
  • Universal sewing machine needle
  • Fabric scissors or a rotary cutter
  • Cutting mat and quilting ruler
  • Fabric marker or tailor’s chalk
  • Small measuring spoon
  • Paper funnel or small craft funnel
  • Pins or sewing clips
  • Iron and ironing board
  • Chopstick, point turner or blunt knitting needle

A tightly woven quilting cotton is the best fabric for this project. Avoid loose-weave fabrics, gauze, stretch knits and very thin fabric because swollen gel may push through the weave.

If your fabric stash is mysteriously missing the one colour you need—and isn’t that always the way?—a quilting cotton bundle from Fat Quarter Shop or Connecting Threads will give you plenty of coordinating options.

You can usually find water-absorbing crystals in garden centres, floral departments and craft stores. They may be labelled water crystals, moisture-retaining crystals, hydrogel crystals or super-absorbent polymer crystals. Small packets are also readily available from Amazon.

Important Water Crystal Safety

These crystals expand dramatically when placed in water, so you need much less than you might expect.

Never fill the scarf generously “just to be safe.” Overfilling can make the scarf stiff, uncomfortable and more likely to leak or split when the crystals expand.

Keep loose crystals and finished scarves away from babies, young children and pets. Water beads and similar expanding products must never be swallowed.

Inspect the scarf before each use. Stop using it immediately if you notice:

  • Split stitching
  • Crystals escaping through the fabric
  • Gel leaking through the seams
  • Damaged or thinning fabric
  • An unpleasant smell that remains after washing

A cooling scarf may make hot weather more comfortable, but it does not replace drinking water, taking breaks in the shade or following heat-safety advice.

Choosing the Right Amount of Water Crystals

Different brands of crystals expand at different rates. This is the one part of the project where a tiny test saves a great deal of unpicking later.

Before sewing the full scarf, make a small fabric test tube from a scrap of the same cotton. Add 1/8 teaspoon of dry crystals, stitch the opening closed and soak it according to the packet directions.

The hydrated pocket should feel soft and flexible, not packed solid.

For the adult scarf in this tutorial, start with:

Four pockets containing approximately 1/8 teaspoon of dry crystals each.

That is approximately 1/2 teaspoon in total.

Do not automatically increase the quantity. Some brands expand much more than others, and a surprisingly small amount may be all you need.

Finished Size

This adult cooling scarf finishes at approximately:

43 inches long × 2 inches wide

The central cooling section measures approximately 20 inches long, leaving two fabric ties of about 11 to 12 inches each.

Cutting Instructions

Cut one fabric strip:

4 1/2 inches wide × 44 inches long

For the neatest result, cut the strip across the width of standard quilting cotton. A rotary cutter, acrylic ruler and self-healing cutting mat make cutting long, straight strips much easier, particularly when you are making several scarves at once.

Prewash and dry the fabric before cutting. This removes excess dye and fabric sizing and prevents unexpected shrinkage later.

How to Sew a DIY Cooling Neck Scarf

Step 1: Mark the Cooling Section

Place the fabric wrong side up.

Measure 12 inches in from each short end and mark both points. The 20-inch section between these marks will become the cooling area that sits around the neck.

Within that central section, make additional marks every 5 inches.

Your marks should be positioned approximately:

  • 12 inches from the first end
  • 17 inches from the first end
  • 22 inches from the first end
  • 27 inches from the first end
  • 32 inches from the first end

These markings will create four separate 5-inch cooling pockets.

Dividing the crystals into compartments stops all the gel from sliding into one lumpy section while you are wearing the scarf.

Step 2: Shape the Ends

Fold the fabric strip in half lengthwise with right sides together.

At each short end, trim the corners diagonally to create a gentle pointed or tapered tie.

Do not make the point too narrow. A soft angle is easier to turn and more durable than a very sharp point.

Step 3: Sew the Long Fabric Tube

Keeping the fabric folded lengthwise with right sides together, pin or clip along the long raw edge.

Sew along the long edge using a 1/4-inch seam allowance.

Sew one tapered short end closed, but leave the opposite short end open. This opening will be used for turning and adding the crystals.

Backstitch securely at the beginning and end of every seam.

Use a short stitch length of approximately 2 to 2.5 mm. Smaller stitches help prevent dry crystals from working their way through the seam.

Step 4: Trim and Turn

Trim the seam allowance around the sewn tapered end, taking care not to cut through your stitching.

Turn the tube right side out through the open end.

Use a chopstick, blunt knitting needle or point turner to gently push out the sewn point. Do not jab at it enthusiastically—we have all poked straight through a freshly sewn corner at least once.

Roll the long seam between your fingers so it sits neatly along one edge or down the centre back of the scarf.

Press the tube flat.

Step 5: Finish the Open End

At the open short end, turn approximately 1/4 inch of fabric to the inside and press.

Turn it in once more by another 1/4 inch and press again. Leave this end unstitched for now because it will be used to add the crystals.

Step 6: Sew the First Pocket Boundary

Locate the mark 12 inches from the sewn end.

Sew straight across the width of the scarf at this mark. Stitch over the line two or three times for extra strength.

This seam separates the empty fabric tie from the first cooling pocket.

Step 7: Add Crystals to the First Pocket

Insert a small funnel into the open end of the scarf.

Measure approximately 1/8 teaspoon of dry crystals and pour them into the tube.

Hold the scarf vertically and gently shake the crystals down until they reach the crosswise seam you have just sewn.

Use your fingers to check that no crystals are sitting on the next marked stitching line.

Step 8: Close the First Pocket

Locate the second mark, approximately 17 inches from the sewn end.

Sew across the width of the scarf at this mark, stitching over the line two or three times.

You now have one sealed 5-inch pocket containing the crystals.

Step 9: Create the Remaining Pockets

Repeat the filling and stitching process three more times:

  1. Add 1/8 teaspoon of crystals.
  2. Shake the crystals down into the empty section.
  3. Keep the crystals away from the marked line.
  4. Stitch securely across the next mark.

Continue until you have four separate cooling pockets between the 12-inch and 32-inch marks.

The remaining section beyond the final pocket becomes the second empty fabric tie.

Step 10: Close the Final End

Check that all loose crystals have moved away from the open end.

Pin or clip the folded end closed.

Topstitch across the opening approximately 1/8 inch from the folded edge. Sew a second line of stitching directly beside the first for extra security.

Trim all loose threads.

Your homemade cooling neck scarf is now ready to soak.

How to Activate a Cooling Neck Scarf

Place the scarf in a bowl or basin of cold water.

Soak it according to the crystal manufacturer’s directions. Depending on the product, this may take anywhere from 20 minutes to several hours.

During the first soak, check the scarf regularly. The pockets should become plump but remain soft and bendable.

Once hydrated:

  1. Lift the scarf from the water.
  2. Gently squeeze away excess water.
  3. Pat the outside with a towel.
  4. Place the cooling section around the back of your neck.
  5. Tie the empty fabric ends loosely at the front.

For an extra-cold scarf, place the hydrated wrap in a sealed container or reusable bag in the refrigerator before wearing it.

Do not freeze it solid. Frozen gel may become uncomfortable and may place unnecessary strain on the stitching.

How Long Does a Cooling Neck Wrap Stay Cool?

The cooling time depends on:

  • Air temperature
  • Humidity
  • Wind
  • Fabric thickness
  • How much water the crystals absorbed
  • Whether the scarf was refrigerated first
  • Your activity level

In very hot or dry conditions, it may need to be re-soaked sooner. In milder weather, it may remain damp and cool for several hours.

When it begins to feel warm, rinse or soak it again in cool water.

How to Wash a Cooling Neck Scarf

Hand washing is the gentlest option.

Add a small amount of mild soap to cool water and gently swish the scarf through the water. Rinse thoroughly without twisting or wringing.

Avoid:

  • Machine washing
  • Tumble drying
  • Bleach
  • Fabric softener
  • Hot water
  • Ironing the scarf after crystals have been inserted

Hang the scarf in a well-ventilated place until it dries completely.

The crystals may take several days to shrink and dry, particularly in humid weather. Make sure the wrap is completely dry before storing it to help prevent mildew and odours.

How to Store Your Cooling Scarf

Once completely dry, store the scarf flat in a clean, dry cupboard.

Do not seal a damp scarf in a plastic bag or container. Trapped moisture can encourage mildew.

Before storing it for winter, check all seams and make sure the crystals have fully shrunk.

Cooling Scarf Size Guide

These measurements can be adjusted to suit the wearer.

Standard Adult Size

Cut:

4 1/2 × 44 inches

Suggested cooling section:

20 inches

Longer Adult Size

Cut:

4 1/2 × 48 inches

Add the extra length to the fabric ties rather than the cooling pockets.

Older Child Size

Cut:

4 1/2 × 34 inches

Suggested cooling section:

14 to 16 inches

Use smaller crystal pockets and complete a test before filling the finished scarf.

Cooling scarves containing expanding beads should only be used by children under responsible adult supervision. They are not suitable for babies, toddlers or anyone likely to chew the scarf.

No-Crystal Cooling Scarf Alternative

Would you rather avoid water crystals altogether? You can make a removable cold-pack version.

Sew the scarf with a central fabric pocket and insert a slim, flexible reusable cold pack. Add a flap or hook-and-loop closure so the cold pack can be removed before washing.

This version will not stay cool as long once the pack warms up, but it is easier to launder and avoids loose polymer crystals.

Another simple option is to sew a long cotton tube, dampen it with water and refrigerate it before use. It will dry more quickly than the crystal-filled version, but it is useful for short periods outdoors.

Troubleshooting Your Cooling Neck Scarf

The Scarf Became Hard and Overstuffed

Too many crystals were added.

Allow the scarf to dry completely and assess whether it becomes flexible again. If it repeatedly expands too firmly, it is safest to remake it with a smaller quantity.

Do not try to cut open a wet, swollen scarf.

Gel Is Seeping Through the Fabric

The fabric may be too loosely woven, the scarf may be overfilled or the crystals may have broken down.

Stop using the scarf and dispose of it safely where children and pets cannot access the contents.

Use tightly woven quilting cotton and less filling when making a replacement.

All the Crystals Gather in One Spot

The scarf needs more compartment seams.

Four or five small pockets distribute the filling more evenly than one long chamber.

The Scarf Smells Musty

It was probably stored before it dried completely.

Hand wash it with mild soap, rinse thoroughly and hang it in moving air until completely dry. Discard it if the smell remains or mildew is visible.

The Scarf Takes Too Long to Dry

Hang it over a drying rack so air can circulate around the entire scarf. A fan can help in humid weather.

Do not place the scarf in a tumble dryer.

Useful Ways to Use Cooling Neck Wraps

These reusable cooling scarves are handy for:

  • Gardening
  • Mowing and yard work
  • Camping
  • Hiking
  • Dog walking
  • Outdoor sporting events
  • Summer markets
  • Theme parks
  • Festivals
  • Outdoor volunteering
  • Hot craft rooms and workshops
  • Keeping in a caravan or camping kit

They also make practical handmade gifts for gardeners, campers, delivery drivers, outdoor workers and sports volunteers.

Use bright cotton prints for family members, subtle solids for reluctant scarf wearers and different colours so everyone can identify their own. Nothing starts a family argument quite like discovering someone else has worn your freshly washed neck scarf.

Make a Batch for Summer

Once you have tested your chosen water crystals, these scarves are quick to sew assembly-line style.

Cut several fabric strips at once, sew all the tubes, turn and press them together, and then fill each scarf carefully.

A good rotary cutting setup makes batch sewing much quicker. You can also use leftover jelly-roll strips, provided they are wide enough and made from tightly woven cotton.

For another version of this practical summer project, take a look at the original CraftBits neck cooler instructions. You can also browse more beginner-friendly sewing patterns and tutorials on CraftGossip.

This is exactly the sort of useful little sewing project that earns its place in the fabric stash. It does not require a paper pattern, complicated fitting or twenty-seven tiny pattern pieces that somehow disappear beneath the sewing table.

Just a strip of cotton, a few straight seams and a very restrained amount of water crystals—and the next hot day may feel considerably more manageable.

Frequently Asked Questions

Can I Use Water Beads in a Cooling Neck Scarf?

Small water-absorbing crystals are generally easier to distribute inside narrow stitched pockets than large decorative water beads.

Always check the manufacturer’s directions and test the product inside a scrap fabric tube before making the full scarf.

Can I Put a Cooling Scarf in the Freezer?

Refrigerating the hydrated scarf is a gentler option.

Freezing may make the scarf rigid, uncomfortable against the skin and more likely to place stress on the seams.

Can I Machine Wash a Cooling Neck Wrap?

Hand washing is recommended because machine agitation may damage the swollen crystals, fabric or seams.

How Much Water Crystal Should I Use?

Begin with approximately 1/8 teaspoon per 5-inch pocket and test your particular product.

Four pockets would use approximately 1/2 teaspoon in total. Some products expand more than others, so do not rely on quantity alone.

Can I Use Flannel?

Lightweight, tightly woven cotton flannel may work, but it will remain wetter and take longer to dry than quilting cotton.

Standard quilting cotton is generally the most practical choice.

Can I Make Cooling Scarves to Donate?

Yes, but check with the organisation before making a large batch. Some charities may have specific material, labelling or safety requirements.

Include written soaking, washing and safety instructions with every donated scarf.


Categories

Bags and purses Children's Christmas Easter fleece Free Sewing Patterns Girl's Dress Halloween Hats Home Decor No-sew Pillows Refashions Scrap Fabric sewing Sewing Patterns Sewing Techniques Softies T-shirts Women's

RSS More Articles

  • 6 FREE Wedding Pattern Papers to Download
  • 15 Winnie The Pooh Crochet Patterns Featuring Pooh Bear, Eeyore, Tigger And Friends
  • Easy Diagonal Knit Dishcloth Patterns for Beginners
  • 10 DIY Butter Squishies To Make From Paper
  • Snarky Crochet Book Review: 15 Cheeky Patterns for Stitchers With a Sense of Humour
  • Designer Spotlight: Lifted Spirit Patterns
  • How to Print Vintage Junk Journal Pages at Home Like a Pro
  • Sewing Pattern Saturday Review: Raman Dress Sewing Pattern (PDF)
  • 15 Western Knitting Patterns For Modern Line Dancers And Cowgirls
  • 12 DIY Squishy Balls And Toys You Can Make At Home

Pick Your Blog

  • Sewing
  • Knitting
  • Quilting
  • Crochet
  • Home & Garden
  • Recycled Crafts
  • Scrapbooking
  • Card Making
  • Polymer Clay
  • Cross-Stitch
  • Edible Crafts
  • Felting
  • Glass Art
  • Indie Crafts
  • Kids Crafts
  • Jewelry Making
  • Lesson Plans
  • Needlework
  • Bath & Body
  • Party Ideas
  • Candle Making
  • DIY Weddings
  • Not Craft
  • Free Craft Projects

Copyright © 2026 · CraftGossip | Start Here | Contact Us | Link to Us | Your Editors | Privacy and affiliate policy