• Home
  • Suggest A DIY
  • DIY Newsletter

Sewing

Patterns, Techniques, Articles, Blogs, and other resources to learn how to sew

  • About CraftGossip
  • Our Network
    • Bath & Body Crafts
    • Candle Making Ideas
    • Crochet Ideas
    • Cross Stitch
    • Edible Crafts
    • Felting Patterns
    • Glass Art
    • Home & Garden Ideas
    • Indie Crafts
    • Jewelry Making
    • Kids Crafts
    • Knitting Patterns
    • Lesson Plans
    • Needlework
    • Party Ideas
    • Polymer Clay
    • Quilting Ideas
    • Recycled Crafts
    • Scrapbooking
    • Sewing Patterns
    • Card Making
    • DIY Weddings
    • Not Craft Ideas
  • Giveaways
  • Roundups
  • Store
  • Search

Tutorial: Adapt a basic sleeve pattern to create different sleeve styles

August 28, 2010 by Anne Weaver

The series on drafting patterns for kids’ clothes at ikat bag continues!  In this installment, Jen from My Measuring Tape shows how to adapt a basic sleeve block for other styles.  Once you have the basic sleeve block, a few simple changes can turn it into a roll up sleeve, a gathered sleeve, puff sleeve, a puff-top sleeve, a puff-bottom sleeve, or a bell sleeve.  And yes, she shows how to adapt the basic sleeve pattern to make every single one of those styles!  Go to the tutorial.

[photo from ikat bag]

[tags]sewing, tutorial, basic, sleeve, block, pattern, draft, sloper, bell, puff, gathered, roll[/tags]
«
»

Comments

  1. gwen says

    February 14, 2011 at 2:36 pm

    How do I make a juliet sleeve pattern.

  2. sushma says

    November 13, 2011 at 3:51 am

    i would like to follow ur blog regularly as i am very crazy about sewing and want to learn more about drafting.

  3. Nidhi says

    April 28, 2012 at 8:43 am

    Hi Jen,
    Your tutorial is really very informative. The diagrams explain the process very clearly. However, as I am new to sewing, I am facing a few problems. It would be great if you could help me out.
    I tried making a bell sleeve. I took a basic sleeve pattern and slashed and rotated as illustrated, but the cap side curve changed drastically. Instead of just becoming angular that could be just smoothened out, mine had a dent in the centre (at the point that is joined to the shoulder seem). It would not acquire the normal shape without being extended by an inch at the centre top (though I did not extend at the top).
    Secondly, when I stitched everything together, although there was a bell shape, the fold was falling only at the centre. The side folds are falling only when I take all the ease and create a pleate at the required places.
    Please tell me where I am going wrong. Looking forward to your response.
    Nidhi.

  4. Sherry says

    February 26, 2013 at 9:02 am

    I read your tutorial regarding making puff sleeves from a plain sleeve pattern. Does that work in reverse? When I reverse it do I have to take fabric from the sleeve cap(i see you’ve added fabric to make the puff)? Thanks very much for this terrific information.

Have you read?

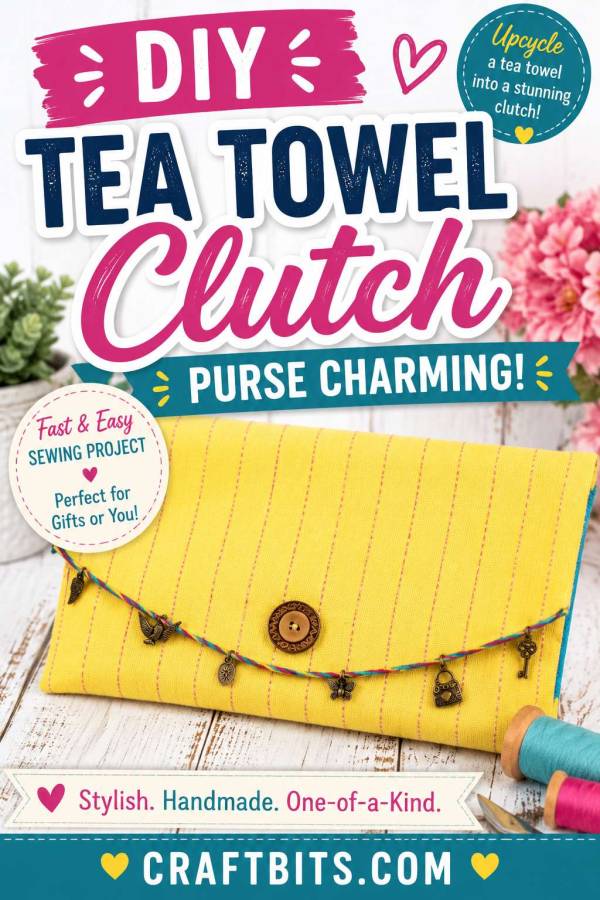
Charming Tea Towel Clutch Purse – Free Sewing Tutorial

This Charming Tea Towel Clutch Purse is such a clever upcycling project, and I love that it turns something as simple as a tea towel into a pretty handmade accessory. It is one of those sewing ideas that feels practical, affordable, and creative all at once — exactly the kind of project that makes you look at your linen drawer a little differently.

The tutorial uses a tea towel, lining fabric, heavyweight interfacing, snap buttons, embroidery thread, charms, and a feature button, so the finished clutch has more structure than you might expect from a tea towel project. The interfacing is the real hero here, helping the clutch hold its shape rather than feeling flimsy. That makes it much more useful as an actual purse, gift pouch, or little organiser inside a larger bag.

What makes this project especially charming is the way it can be personalised. The tutorial finishes the clutch with hand-sewn charms along the flap, plus a button to disguise the snap closure, giving the purse a decorative, one-of-a-kind look. You could easily change the style by using vintage buttons, embroidery, lace trim, beads, ribbon, or even little keepsake charms from old jewellery.

This would be a lovely project for using a pretty tea towel you have been saving, especially one with a vintage print, bold stripes, florals, or souvenir design. It would also make a thoughtful handmade gift, because each clutch can be matched to the recipient’s style. A bright yellow tea towel creates something cheerful and modern, while a floral or linen-look towel would give it more of a cottage or vintage feel.

The instructions are nicely broken down, starting with the downloadable clutch pattern, then cutting the towel, lining, and interfacing, sewing the pieces together, turning and pressing the clutch, adding the snap buttons, top stitching the sides, and finishing with decorative charms. It is a project best suited to someone who is comfortable sewing straight seams and handling a few small finishing details, but it is still approachable for a confident beginner.

Overall, this is a fun and satisfying sewing project with plenty of room for creativity. It is practical enough to use, pretty enough to gift, and a great reminder that handmade accessories do not need to start with expensive fabric. Sometimes all you need is a tea towel, a little interfacing, and a handful of buttons or charms to create something completely unique.

Categories

Bags and purses Children's Christmas Easter fleece Free Sewing Patterns Girl's Dress Halloween Hats Home Decor No-sew Pillows Refashions Scrap Fabric sewing Sewing Patterns Sewing Techniques Softies T-shirts Women's

RSS More Articles

  • 13 Sweet Summerween Handmade Card Ideas
  • Stitch a Color Wheel in Flowers
  • Charming Tea Towel Clutch Purse – Free Sewing Tutorial
  • Mini Mending Mondays: Fix a Towel Edge with Simple Hand Stitching
  • 12 DIY Tooth Fairy Pillows, Boxes And Pouches To Make Losing A Tooth More Magical
  • 15 Free Crochet Curtain Patterns For A Handmade Window Makeover
  • 10 Clever Things To Make With An Old Thrifted Bowling Ball
  • Free Gingham Printable Backgrounds – 5 Clean and Classic Designs for Cardmaking
  • Biscoff Milkshake – Creamy Coffeehouse Style Recipe
  • Hats to Knit for Kids

Pick Your Blog

  • Sewing
  • Knitting
  • Quilting
  • Crochet
  • Home & Garden
  • Recycled Crafts
  • Scrapbooking
  • Card Making
  • Polymer Clay
  • Cross-Stitch
  • Edible Crafts
  • Felting
  • Glass Art
  • Indie Crafts
  • Kids Crafts
  • Jewelry Making
  • Lesson Plans
  • Needlework
  • Bath & Body
  • Party Ideas
  • Candle Making
  • DIY Weddings
  • Not Craft
  • Free Craft Projects

Copyright © 2026 · CraftGossip | Start Here | Contact Us | Link to Us | Your Editors | Privacy and affiliate policy