• Home
  • Suggest A DIY
  • DIY Newsletter

Sewing

Patterns, Techniques, Articles, Blogs, and other resources to learn how to sew

  • About CraftGossip
  • Our Network
    • Bath & Body Crafts
    • Candle Making Ideas
    • Crochet Ideas
    • Cross Stitch
    • Edible Crafts
    • Felting Patterns
    • Glass Art
    • Home & Garden Ideas
    • Indie Crafts
    • Jewelry Making
    • Kids Crafts
    • Knitting Patterns
    • Lesson Plans
    • Needlework
    • Party Ideas
    • Polymer Clay
    • Quilting Ideas
    • Recycled Crafts
    • Scrapbooking
    • Sewing Patterns
    • Card Making
    • DIY Weddings
    • Not Craft Ideas
  • Giveaways
  • Roundups
  • Store
  • Search

Tutorial: Adjustable Carry All Lanyard

March 17, 2015 by Anne Weaver

Tutorial: Adjustable Carry All Lanyard

Tutorial: Adjustable Carry All Lanyard

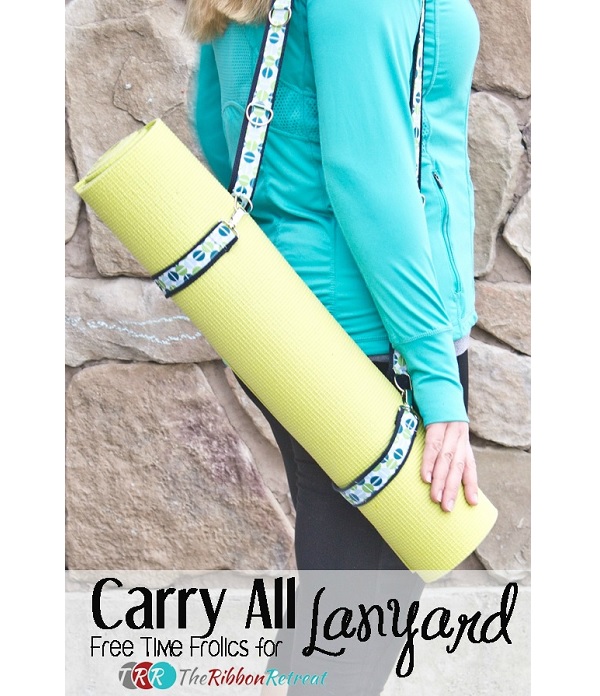
This adjustable length Cary All lanyard by Adrienne from Free Time Frolics adds a handy carrying strap to a yoga mat or picnic blanket or more.  She shares a tutorial at The Ribbon Retreat showing how to make one.  The lanyard is made from a sturdy webbing topped with a decorative ribbon.  It wraps around a bulky item and hooks in place in a D-ring.  There are D-rings at different spots down the lanyard so the length of the wrap is adjustable for the type of item you’re carrying.

Click below to go to her tutorial at The Ribbon Retreat:

Carry All Lanyard, by Free Time Frolics

[photo from Free Time Frolics]
«
»

Have you read?

Free Baby Booties Sewing Pattern: Easy Fabric Booties in 4 Sizes

There are some sewing projects that are almost impossible to resist making tiny, and baby booties are definitely one of them.

Give me a couple of pretty fabric scraps and suddenly I am mentally matching booties to bibs, blankets and little handmade outfits. They are also a brilliant scrap-busting sewing project because you need so little fabric that even those pieces you have been hanging onto for years can finally earn their place in the stash.

This free baby booties sewing pattern makes a pair of soft, lined fabric booties with a gently elasticated heel and a bound soft sole. I have deliberately kept the construction beginner friendly and, even better, you do not need to download or print a pattern template.

You can draft all three pattern pieces using the measurements below.

The pattern includes four baby sizes from approximately 0 to 12 months, but babies do not read size charts, so I strongly recommend measuring the baby’s foot whenever possible.

These are intended as soft crib shoes for babies who are not confidently walking. They are not structured outdoor footwear.

If you are specifically looking for a grippy sole, have a look at our older baby booties with nonskid bottoms sewing pattern for another idea.

Why I Like This Baby Booties Pattern

Tiny shoes can become surprisingly fiddly when you have to turn several layers through a little opening.

For this version, the upper is lined first and the sole seam is finished on the outside with bias binding. That gives you a nice soft interior without wrestling an entire baby shoe through a two-inch gap while questioning all your life choices.

The finished booties have:

  • a soft fabric sole
  • a lined toe
  • an elasticated heel
  • no bulky turning opening underneath the foot
  • four sizes
  • very small fabric requirements
  • an optional padded sole
  • a pattern you can draft without a printer

They are lovely for baby showers, handmade gift baskets, new grandbabies and using up coordinating quilting cotton scraps.

Baby Booties Size Chart

Measure from the back of the baby’s heel to the longest toe.

Choose a finished sole approximately 7 to 10 mm longer than the baby’s actual foot. If the measurement falls between sizes, use the larger size.


SizeFinished Sole LengthFinished Sole Width
0 to 3 months10 cm / approx. 4 in4.8 cm / approx. 1 7/8 in
3 to 6 months10.8 cm / approx. 4 1/4 in5 cm / approx. 2 in
6 to 9 months11.5 cm / approx. 4 1/2 in5.2 cm / approx. 2 in
9 to 12 months12.2 cm / approx. 4 13/16 in5.4 cm / approx. 2 1/8 in

The ages are a guide only. Foot measurement should always win over the label on the chart.

What Fabric Is Best for Baby Booties?

For your first pair, quilting cotton is probably the easiest fabric to sew.

You can also use lightweight denim, linen, cotton flannel, chambray or fine wale corduroy for the outer fabric.

For the lining, choose something soft against the baby’s foot. Cotton, flannel and lightweight jersey all work well.

Avoid anything very stiff or scratchy.

For cool weather booties, you can add a thin layer of fusible fleece to the sole. Keep it light. Tiny shoes become surprisingly chunky once several layers start piling up.

If you want something completely different for your next pair, we also have this leather baby shoes free sewing pattern.

Supplies

You will need:

  • approximately 25 cm x 25 cm of outer fabric
  • approximately 25 cm x 25 cm of lining fabric
  • 6 mm or 1/4 inch elastic
  • approximately 75 cm or 30 inches of 1/2 inch double-fold bias binding
  • matching sewing thread
  • lightweight fusible fleece or felt for the sole, optional
  • sewing machine
  • iron
  • fabric scissors or a rotary cutter
  • sewing pins or clips
  • safety pin or bodkin for threading elastic
  • ruler
  • paper and pencil for drafting your pattern

Seam Allowance

The measurements in the drafting chart below describe the stitching line.

After drawing each pattern piece, add a 6 mm or 1/4 inch seam allowance around the outside before cutting your paper pattern.

This little distinction matters. If you draw the measurements and then forget to add the seam allowance, your booties will finish smaller than intended.

Ask me how many times a sewist needs to learn that particular lesson.

Free Baby Booties Pattern Measurements

You need three pattern pieces:

  1. Sole
  2. Toe Upper
  3. Heel Band
SizeToe Upper Width x DepthRounded Toe Corner RadiusHeel Band Length x HeightElastic Per Bootie
0 to 3 months6 x 4.3 cm1.8 cm12.7 x 4.5 cm9 cm
3 to 6 months6.2 x 4.6 cm1.9 cm13.7 x 4.8 cm9.5 cm
6 to 9 months6.4 x 4.9 cm2 cm14.5 x 5 cm10 cm
9 to 12 months6.6 x 5.2 cm2.1 cm15.3 x 5.3 cm10.5 cm

Remember to add the 6 mm seam allowance after drafting each piece.

How to Draw the Baby Booties Sole Pattern

The sole is basically a long oval with gently rounded ends.

Use the finished sole length and width from the size chart.

Draw a centre line equal to the required finished length.

Mark the centre.

Draw the widest section across the centre using the finished sole width.

Round the toe and heel ends smoothly to create an elongated oval.

An easy way to keep both ends even is to fold your paper lengthwise before cutting.

For a slightly more natural baby-shoe shape, make the toe end just a few millimetres broader than the heel.

Add your 6 mm seam allowance around the entire piece.

Mark:

T at the toe centre.

H at the heel centre.

Mark the midpoint on both sides of the sole as well. These four marks will make assembling the tiny curved pieces much easier.

How to Draw the Toe Upper Pattern

Draw a rectangle using the Toe Upper Width and Depth measurements from the chart.

The width runs across the baby’s foot.

The depth runs from the instep towards the toes.

Leave the back edge straight. This will become the opening across the top of the bootie.

Round the two front corners using the radius measurement in the chart.

The rounded edge runs around the toes and will eventually be attached to the front half of the sole.

Mark the exact centre of the rounded toe edge.

Add a 6 mm seam allowance around the whole pattern.

How to Draw the Heel Band

Draw a rectangle using the Heel Band measurements from the chart.

Add 6 mm seam allowance around the bottom and short sides.

At the top edge, add approximately 15 mm extra instead. This gives you enough fabric to create the elastic casing.

Mark the centre of the lower edge. This will match the heel centre of the sole.

Cutting Instructions

For one pair of booties, cut:

Outer fabric

2 toe uppers
2 heel bands
2 soles

Lining fabric

2 toe uppers
2 heel bands
2 soles

Optional fusible fleece

2 soles

Cut two pieces of elastic using the measurement for your chosen size.

Because the sole is symmetrical in this beginner version, you do not need separate left and right sole patterns.

How to Sew Baby Booties

Step 1: Prepare the Sole

If you are using fusible fleece, apply it to the wrong side of each outer sole following the manufacturer’s directions.

Place one outer sole and one lining sole wrong sides together.

The pretty sides should both face outwards.

Baste approximately 3 mm from the raw edge to hold the layers together.

Repeat for the second sole.

You now have two soft sole units ready for assembly.

Step 2: Sew the Toe Upper

Place one outer toe upper and one lining toe upper right sides together.

Sew along the straight instep edge only using a 6 mm seam allowance.

Do not sew around the curved toe edge yet.

Turn the pieces right side out.

Press the finished instep edge carefully.

Topstitch approximately 2 to 3 mm from the folded edge if desired.

Baste the outer fabric and lining together around the remaining curved raw edge.

Repeat for the second bootie.

Step 3: Make the Heel

Place one outer heel piece and one lining heel piece right sides together.

Sew across the top edge.

Turn right side out and press.

Create an elastic casing by stitching a second line approximately 10 mm below the finished top edge.

The casing needs to be wide enough for your 6 mm elastic to slide comfortably.

Thread the elastic through the casing using a safety pin or bodkin.

Secure one end.

Gently gather the heel until the elastic sits comfortably without pulling the fabric into a tight bunch.

Secure the other end.

You want the heel to spring back gently, not clamp around the baby’s ankle.

Repeat for the second heel.

Step 4: Join the Heel to the Toe

Place one finished heel band behind the toe upper.

Overlap each short end of the heel band behind the side of the toe upper by approximately 10 mm.

Make sure both sides are even.

Topstitch the overlapping areas securely.

You should now have one complete upper with a low opening at the front and elastic around the heel.

Repeat for the other bootie.

Step 5: Attach the Upper to the Sole

Place your prepared sole with the lining side facing upward.

Position the upper over the sole exactly as it will sit when finished.

Match the toe centre of the upper to the toe centre of the sole.

Match the heel centre to the heel centre.

Then match the side points.

Clip everything into position.

The toe should sit smoothly around the front half of the sole. If you have a tiny amount of excess fabric, ease it gently around the toe rather than making one large tuck.

Sew around the entire sole using a 6 mm seam allowance.

Go slowly around the curves.

Tiny projects are not the place to see how fast your sewing machine can go.

Step 6: Bind the Sole Edge

The seam allowance will be sitting on the outside of your bootie.

This is intentional.

Cover the entire raw sole seam with double-fold bias binding.

Start near the heel.

Slip the binding over the raw edge and clip it into place as you work around the shoe.

Overlap the ends neatly when you return to the starting point.

Stitch through the binding and all the layers underneath.

This creates a neat little bound edge around the sole while keeping the inside of the bootie smooth.

Repeat for the second shoe.

Check the Fit Before Baby Wears Them

Check that there are no loose threads inside the shoe.

Make sure the elastic is secure.

Slide a finger under the heel elastic. It should hold gently without feeling tight.

Check that the toes have room to move.

For a baby who is beginning to pull up or stand, consider using a grip fabric for the outer sole. You can also see our nonskid baby booties sewing idea for inspiration.

These soft booties are primarily designed for keeping little feet covered and cosy rather than functioning as structured walking shoes.

My Baby Booties Look Too Flat

Do not panic when they first come off the machine.

Fabric booties often look a bit flat until you shape them.

Pop your fingers into the toe and gently push out the curve. Roll the bound sole seam between your fingers and shape the heel.

Once they have been worn, the upper naturally takes on more of a little shoe shape.

If the toe is genuinely too shallow, increase the depth of the toe upper by about 5 mm on your next pair.

What If the Booties Keep Falling Off?

The first thing I would check is the heel elastic.

If the elastic is too loose, shorten it slightly.

Also check your sizing. A bootie with far too much growing room is much more likely to disappear somewhere between the pram and the supermarket checkout.

That is not a scientific measurement, merely years of observing how determined babies are at removing anything placed on their feet.

Can I Make These Baby Booties Reversible?

Not with the bound-sole construction exactly as written, because the sole edge is intentionally visible.

You can, however, choose two beautiful coordinating fabrics so the lining looks just as lovely as the outside.

A floral outer with gingham lining is gorgeous.

So is linen with a tiny printed cotton lining.

Denim with a red or mustard lining makes a lovely little unisex pair.

Can I Use Minky or Fleece?

Yes, but I would recommend making your first pair from woven cotton.

Minky stretches and slips, while fleece adds bulk around very small seams.

Once you understand how the pieces fit together, both are much easier to manage.

If using fleece, you may not need extra sole padding.

Turn Them Into Mary Jane Baby Shoes

You can easily change the look by adding a narrow fabric strap across the instep before joining the upper to the sole.

Secure one end into the side seam and finish the opposite end with a snap.

If you love that style, have a look at these Mary Jane baby shoes with a free sewing pattern for more inspiration.

Make a Matching Handmade Baby Gift Set

One of the nicest things about fabric baby booties is how little material they use.

If you are already making a baby quilt, bib or blanket, save the scraps and make a tiny matching pair.

Suddenly something very simple looks like a coordinated handmade gift set.

You can also make several pairs in different sizes so the baby has another pair waiting as those ridiculously fast-growing feet get bigger.

And if your idea of baby booties involves yarn rather than a sewing machine, we have an old favourite over on CraftBits, the Can’t Fail Easy Baby Booties knitting pattern. That pattern has been around for years and is still a lovely quick baby gift.

Baby Booties Sewing Pattern Variations

Once you have made the basic version, this is a fun little pattern to play with.

Try contrast bias binding around the sole.

Use scraps from a handmade baby quilt.

Add a tiny machine-embroidered initial to the toe before assembly.

Piece the toe from two coordinating fabrics.

Use chambray outside with floral cotton inside.

Make Christmas baby booties from festive cotton.

Try linen for a beautifully simple neutral pair.

Add a very small fabric bow securely into the construction for a special-occasion pair.

Just be cautious about buttons, beads or other small detachable embellishments on anything intended for a baby.

A Very Handy Scrap Fabric Sewing Project

This is exactly the sort of pattern I like keeping around for those pieces of fabric that are too lovely to throw out but far too small for anything sensible.

A baby bootie does not care that its fabric began life as a leftover corner of a fat quarter.

In fact, those tiny scraps are often where the prettiest combinations come from.

Once you have drafted the paper pattern, write the size directly onto each piece and keep the set in an envelope with your baby sewing patterns.

The next time you need a quick handmade baby shower gift, you can pull out the pattern, rummage through the scrap basket and have another pair underway without having to print a thing.

And really, if keeping beautiful scraps for years eventually results in miniature shoes, I think that proves the fabric stash was justified all along.

Categories

Bags and purses Children's Christmas Easter fleece Free Sewing Patterns Girl's Dress Halloween Hats Home Decor No-sew Pillows Refashions Scrap Fabric sewing Sewing Patterns Sewing Techniques Softies T-shirts Women's

RSS More Articles

  • Easy Halloween Fabric Candy Basket Beginner Sewing Pattern for Trick-or-Treating
  • Book Review: Once in a Blue Moon
  • 12 Scrapbook Layouts with Stenciled Backgrounds
  • Why Brava Yarn Is a Great Choice for Crochet Projects
  • Jelly Roll Gems Quilt Kit Featuring Handmade Sweetness by My Sew Quilty Life
  • Easy Thanksgiving Turkey Finger Painting Craft for Kids
  • I’m The Bomb Bath Bomb Maker T-Shirt Review – A Fun Gift For Bath Bomb Makers
  • Halloween Sampler Cross Stitch Patterns
  • Video Ribbon Embroidery Tutorials for French Knots
  • Book Review: Knits for Little Ones

Pick Your Blog

  • Sewing
  • Knitting
  • Quilting
  • Crochet
  • Home & Garden
  • Recycled Crafts
  • Scrapbooking
  • Card Making
  • Polymer Clay
  • Cross-Stitch
  • Edible Crafts
  • Felting
  • Glass Art
  • Indie Crafts
  • Kids Crafts
  • Jewelry Making
  • Lesson Plans
  • Needlework
  • Bath & Body
  • Party Ideas
  • Candle Making
  • DIY Weddings
  • Not Craft
  • Free Craft Projects

Copyright © 2026 · CraftGossip | Start Here | Contact Us | Link to Us | Your Editors | Privacy and affiliate policy