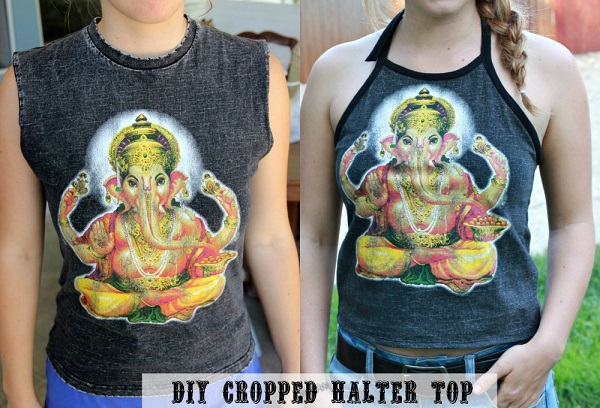
Tutorial: Make a cropped halter top from an old t-shirt
There is something deeply satisfying about turning an old t-shirt into something you actually want to wear again. You know the ones — soft, comfy, maybe slightly stretched at the neckline, and sitting in the drawer because you cannot quite bring yourself to throw them out. This easy cropped halter top tutorial is exactly the sort of summer sewing project those shirts were waiting for.
This is a simple t-shirt refashion that turns a basic tee into a cute cropped halter top with neck ties and a clean bound edge. It is a great beginner-friendly sewing project if you are comfortable sewing knit fabric, and it is also a lovely stash-busting project because you only need a small amount of extra stretch fabric for the binding.
If you love quick warm-weather sewing projects, you may also like our roundup of halter tops to sew for summer, which includes a mix of free tutorials, sewing patterns, and easy refashion ideas. But this version is especially handy because it starts with something many of us already have — an old t-shirt.
Why This T-Shirt Refashion Works So Well
A t-shirt is already halfway to becoming a halter top. The side seams are sewn, the fabric is soft, the stretch is comfortable, and the hem can often be reused if you are clever with your cutting. That makes this a quick sewing project rather than a full pattern-drafting adventure.
The key is shaping the front high enough through the centre so it gives proper coverage, then cutting the back lower and finishing the raw edges with stretch binding. The binding continues into ties at the neck, which gives the top that classic halter shape without needing hardware, buttons, zippers, or anything fussy.
And let’s be honest, any sewing project that gives an old t-shirt a second chance is a win. Especially if your wardrobe has one of those “too nice to toss, too daggy to wear” piles. Mine seems to breed when I’m not looking.
What You Need
- One old t-shirt that still fits comfortably around your bust and waist
- A small piece of knit fabric for binding, or fabric cut from the bottom of the t-shirt
- Fabric scissors or a rotary cutter and cutting mat
- Fabric marker, chalk, or washable pen
- Measuring tape
- Pins or sewing clips
- Sewing machine
- Ballpoint or stretch needle
- Matching thread
- Iron
If you sew with knits often, a rotary cutter, self-healing mat, and a good stretch needle make this kind of project much easier. You can find basic sewing tools on Amazon, and if you want to browse indie halter top patterns for extra inspiration, Etsy has plenty of modern PDF sewing patterns. You do not need a bought pattern for this version, but it can be helpful if you want a more fitted or graded style later.
Choosing The Best T-Shirt
For this DIY cropped halter top, choose a t-shirt with a decent amount of stretch and recovery. Cotton jersey, cotton-spandex, and soft knit tees are ideal. Avoid shirts that are too thin, twisted out of shape, or stretched beyond saving. We are refashioning here, not performing miracles — although every now and then sewing does feel like one.
A slightly oversized t-shirt works well if you want a relaxed beachy halter. A fitted t-shirt will create a closer-fitting cropped top. Before cutting, try the shirt on and decide where you want the finished length to sit. Mark that point lightly with chalk or a pin.
If you enjoy refashion sewing, you might also like our men’s button-up shirt to halter dress tutorial, which is another clever way to turn something unworn into something fun and wearable.
Step 1: Try On And Mark The New Length
Put the t-shirt on and stand in front of a mirror. Decide how cropped you want your halter top to be. For a casual summer crop, mark around the natural waist or slightly above it. If you want more coverage, leave it longer and trim later.
Take the t-shirt off and lay it flat on your work surface. Smooth it carefully, matching the side seams and shoulders. Use a ruler or measuring tape to mark a straight cutting line across the bottom.
Do not cut too short at this stage. Knit fabric can roll, and a top always seems to become shorter once it is actually on your body. Ask me how many times I have learned that lesson the annoying way.
Step 2: Draw The Front Halter Shape
Turn the t-shirt inside out and lay it flat with the front facing up. Use chalk or a washable fabric marker to draw your new halter neckline.
The centre front should come up higher than the sides. This is important because a halter top needs coverage through the middle front, especially once the fabric is pulled upward by the neck ties. Curve the line from the centre front toward the armhole area, keeping the shape smooth and balanced.
A good starting point is to keep the centre front close to the original neckline, then curve down toward the armholes. You can always trim a little more later, but you cannot put fabric back once it is cut.
Step 3: Draw The Back Shape
Flip the t-shirt over so the back is facing up. Draw a lower back line that curves gently from one side seam to the other. The back can sit lower than the front, but keep enough fabric at the sides so the top feels secure when worn.
For a more modest version, keep the back higher. For a beach cover-up style, you can cut the back lower. This is one of those projects where you can adjust the look to suit your own comfort level.
Step 4: Cut The Halter Top Shape
Cut along your marked lines carefully, using sharp fabric scissors or a rotary cutter. After cutting the front, fold it in half at the centre front to check that both sides match. Trim lightly if needed.
Repeat the same check for the back. Knit fabric can shift, so take your time. A slightly imperfect handmade curve is not a disaster, but wildly uneven sides will be noticeable once the binding is sewn on.
Step 5: Make The Knit Binding
Cut a long strip of knit fabric approximately 2 inches wide. You will need enough to bind the back, armholes, and continue upward into the neck ties. If your t-shirt was long enough, you can use the bottom portion you cut away to make the binding. Otherwise, use a coordinating knit fabric from your stash.
Press the strip in half lengthwise with wrong sides together. Open it out, then fold each long raw edge toward the centre crease and press again. This creates a stretch binding similar to bias tape, but because knit fabric stretches, it works beautifully around the curves of the halter top.
If your fabric is very curly, use plenty of steam and patience. Knit fabric likes to behave like a toddler in a lolly aisle sometimes, but pressing makes a huge difference.
Step 6: Bind The Front Neckline
Start with the front neckline because it is the most visible part of the top. Pin or clip the binding to the front neckline with right sides together. Sew along the first fold line using a stretch stitch, narrow zigzag, or lightning stitch if your machine has one.
Fold the binding over the raw edge to the inside of the top. Pin it in place and stitch close to the folded edge. You can stitch in the ditch from the right side if you prefer a cleaner finish.
This step encloses the raw edge neatly, so the inside of the top looks tidy too. It is a small detail, but it makes the finished project feel much less “I hacked this up five minutes before leaving the house.”
Step 7: Bind The Back And Armholes
Now take the longer piece of binding. Find the centre of the binding strip and match it to the centre back of the top. Pin the binding along the back edge, around each armhole, and up past the shoulders so the remaining length becomes the neck ties.
Make sure both tie ends are even before sewing. This is one of those moments where measuring saves you from muttering at your sewing machine later.
Sew the binding to the top with right sides together, following the fold line. Then fold the binding over the raw edge, pin it neatly, and stitch it down. Continue sewing along the loose binding ends to close the neck ties.
Step 8: Finish The Bottom Hem
If you kept the original t-shirt hem, you may not need to do anything else. That is the beauty of using an old tee. The hem is already done, and we are absolutely allowed to enjoy that little shortcut.
If you cut off the original hem, fold the bottom edge up by about 1/2 inch and press. Sew with a stretch stitch, twin needle, or narrow zigzag. Try the top on before hemming if you are unsure about the final length.
Tips For Sewing A Better Cropped Halter Top
Use a ballpoint or stretch needle so the machine does not skip stitches or chew the knit fabric. A regular universal needle can work sometimes, but stretch fabric behaves much better when you use the right needle.
Do not pull the fabric as you sew. Guide it gently and let the feed dogs do their job. Pulling can stretch the neckline and make the finished top ripple.
Use clips instead of pins if your knit fabric shifts easily. Clips are especially helpful when attaching binding around curves.
Try the top on before final hemming. Cropped tops can look longer on the table than they do on the body.
For a softer drape, use lightweight cotton jersey. For a more secure fit, use a t-shirt with a little spandex in it.
Easy Variations To Try
Once you have made one t-shirt halter top, it is very easy to start eyeing off the rest of the laundry pile. Try a few of these simple variations:
- Use contrast binding for a sporty look.
- Make the ties extra long so they can be wrapped or tied in a bow.
- Add a lettuce hem to the bottom for a playful finish.
- Use a graphic tee and centre the print on the front.
- Leave the top longer for a tank-style halter instead of a crop.
- Make a matching scrunchie from the leftover t-shirt fabric.
For more handmade summer wardrobe ideas, have a look at our twist front halter top sewing pattern. It is a dressier style if you want something with a bit more shape and detail.
Common Mistakes To Avoid
The biggest mistake is cutting the front too low. Remember, the neck ties will pull the centre front upward, but you still need enough fabric through the bust for coverage. Keep the centre front higher than you think at first and adjust slowly.
Another common problem is binding that is too short. If the binding is stretched too much as you sew, the armholes may pucker or pull awkwardly. Cut a little extra length and trim the ties later if needed.
Also, avoid using woven bias tape for this project unless your t-shirt has very little stretch and you are confident with fitting. Knit binding moves with the t-shirt, which makes the halter top much more comfortable to wear.
How To Style Your DIY Cropped Halter Top
This handmade cropped halter top is perfect with denim shorts, linen pants, a maxi skirt, or layered over swimmers as a beach cover-up. It also works well under a loose button-up shirt if you want a little more coverage while still keeping that breezy summer feel.
If you are sewing for teens or tweens, you can make it longer, use a higher back, or layer it over a fitted tank. Handmade clothing should always feel comfortable for the person wearing it, not just cute on the hanger.
For readers who prefer to sew from a proper pattern rather than refashioning, our halter top sewing pattern post is another useful place to start.
A Quick Summer Sewing Project Worth Saving
This DIY cropped halter top is one of those sewing projects that feels quick, thrifty, and surprisingly wearable. It gives an old t-shirt a fresh new life, uses simple sewing techniques, and does not require a printed pattern or a big fabric shop run.
It is also a lovely project for practising knit binding on a low-pressure garment. If your first one is not perfect, it is still a useful summer top, and if it turns out brilliantly, well, you may suddenly find yourself “accidentally” sorting through the t-shirt drawer for candidates.
And really, that is the best kind of refashion — the one that makes you want to make another.
DIY cropped halter top tutorial, by Sew Country Chick
[photo from Sew Country Chick]
Looking for more refashion patterns? Check these out on Etsy.