
When the folks at J & O Fabrics asked if I’d like some of their fabrics to use for a project, well… I’m sure you know what my answer was!
I’d been thinking that my daughter needed a new spring dress, so this seemed like the perfect opportunity. She’s a tween-ager now so I wanted to make something appropriate for her half kid, half teen stage. It needed to be sophisticated but also playful.

When I saw this black & white stripe, I knew what I wanted to make. I’d been kicking around an idea for a criss-cross wrapped low on the bodice, and the stripes are perfect for that. I got some turquoise broadcloth to make contrast piping to make the edges pop. I also got some white broadcloth to line the bodice. (I find that it’s easier to line the bodice than fiddle with making individual faces for all those curved edges.)
The dress itself is pretty straightforward. At its core, it’s a sleeveless dress with a gathered skirt and a zipper down the back. I started with a basic dress pattern I’d used several times before, but made some minor modifications to create the piped wrap bodice.
I’ve written out the modifications below, so you can make one of your own. A stripe will show off the criss-cross effect, but I’m thinking it would also be nice out of a solid for a more subtle effect. Though mine was made for a tween, I think the classic lines would be pretty for younger girls, too.
Making the pattern
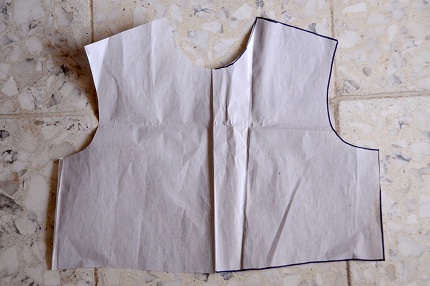
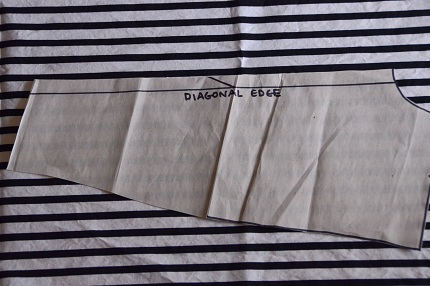
1. Trace your bodice front. You’ll need the full bodice, not just the half that you usually get in a pattern. The easiest way to get this is to trace it on a folded sheet of paper with the fold of the paper aligned with the fold line on the pattern. Cut it out and unfold it to get the full bodice.
2. Draw a diagonal line across the bodice for the criss-cross. Since you’ll be layering the criss-cross pieces over a full bodice, you don’t have to worry about it creating too deep a V. I liked the idea of a low wrap that mimics the lines of a wrapped cummerbund. You can alter the angle to suit your design.
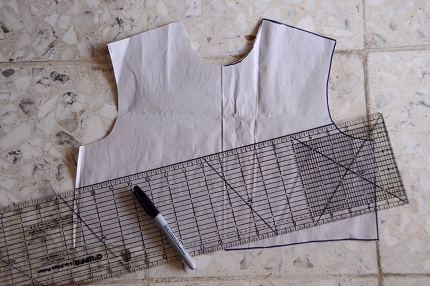
Do you see those little hash marks on the photo below? I folded the pattern in half and transferred markings for the top and bottom positions. Then I just connected the marks with my ruler and drew the line, stopping at the diagonal so I could see what it would look like when the two pieces overlap.
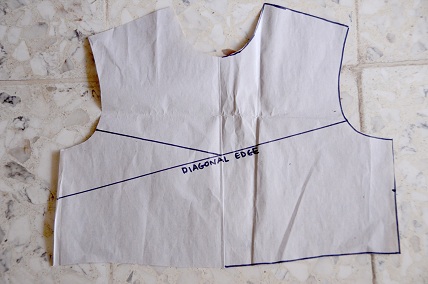
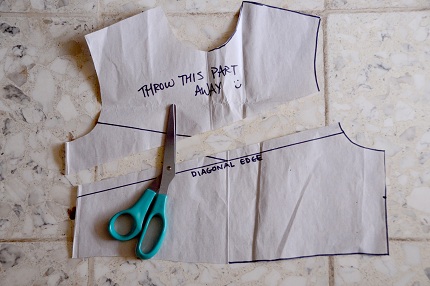
3. Cut the pattern on the diagonal line, adding your seam allowance as you cut. We’ll call this your wrap piece. Label the diagonal line on the pattern. It’ll help you keep things straight when you’re cutting the pieces and sewing the bodice together.
Cutting the pieces
Cut all of the bodice pieces out of both your main fabric and a lining. If you’re using a stripe, you’ll need to take care when cutting the pieces out so the stripes end up how you like. When you’re cutting a striped fabric on a fold, take the time to line up the stripes on the top and bottom layers. That’ll prevent any surprise crooked stripes on the bottom layer.
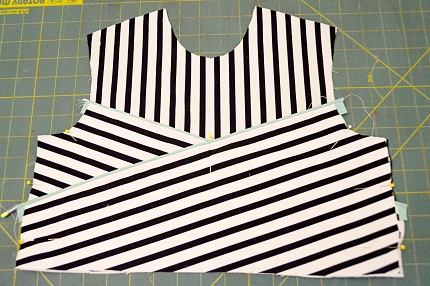
I oriented my pieces like this:
Bodice front – Cut 1 each of main fabric and lining. Stripes are vertical.
Bodice back – Cut 1 each of main fabric and lining. Stripes are vertical.
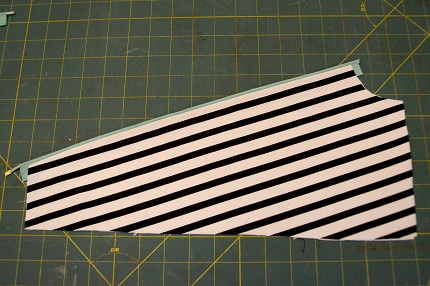
Wrap piece – Cut 2 pieces each from main fabric and lining. Horizontal stripe is aligned with the diagonal edge.
I made sure the stripes fell at the same place on each piece.
Waistband – Cut 1 each of main fabric and lining. Stripes can be either vertical or horizontal. (Here’s where I kind of boo boo’d. I had intended to cut this on a horizontal stripe, but I forgot and cut it on a vertical stripe instead. I didn’t realize I had cut it wrong until the entire dress had been assembled. It turns out that I like the vertical stripes on the waistband, but I think the horizontal stripes would make it look more like a low cummerbund.)
Sash – Cut from main fabric. Stripes are horizontal.
Skirt – Cut from main fabric. Stripes are vertical.
Putting it together
For the most part, you’ll just follow the pattern directions to assemble the dress. But first you’ll need to assemble the bodice front.
1. Make your piping. (There are plenty of tutorial out there showing how to do this. Two good ones are here and here.) The amount you need will depend on the size of the dress. To make this dress for my 9-year-old daughter I needed 3-4 yards of piping. That includes the piping around the wrap pieces and some piping at the waistband.
2. Stitch wrap piece lining & main fabric pieces together along the diagonal edge, with piping tucked in between. (You can find a tutorial for stitching the piping here.) Topstitch close to the piping.
3. Lay the pieces down on the bodice and pin in place. Fold the whole thing in half to verify that the center of the V (where the wrap pieces intersect) falls directly in the center of the bodice. Make adjustments as needed.
4. Baste the wrap pieces to the bodice at the side seam. I used a ¼” allowance for basting, which fell well within the 5/8” seam allowance I’d use later for the actual side seams.
5. At this point you might want to baste the bodice front and back together at the sides and shoulders to verify the fit across the chest. With the layered wrap pieces, the bodice fit is important. If it’s too big across the chest, the wrap pieces will sag. Even though I’d never really had an issue with fit with this pattern before, I ended up trimming about a quarter of an inch off the armhole to make the fit perfect. A sash at the waist will also help keep the wrap pieces from sagging. (If, after finishing the dress and adding a sash, you find the wrap pieces still sag, you can always topstitch them down. You’ll lose some the dimensionality you get with just having them layered, but it’s better than having saggy wrap pieces.)
Now that you’ve got the bodice layered and tacked together, follow your pattern’s instructions to finish constructing the dress. From this point, the only other modification I made was to add piping to the waistband.


And what’s a tween photo shoot without a zombie apocalypse? At least the zombie has a pretty dress, right?


It would be great to have this as a grown up pattern too!