Roubidou shows how to make a rainbow thread spool rack that’s as pretty as it is practical. Colored pencils serve as spindles that match the color of thread they hold. Brilliant!! And gorgeous!! Sigh… Get the how-to.
[photo from Roubidou]
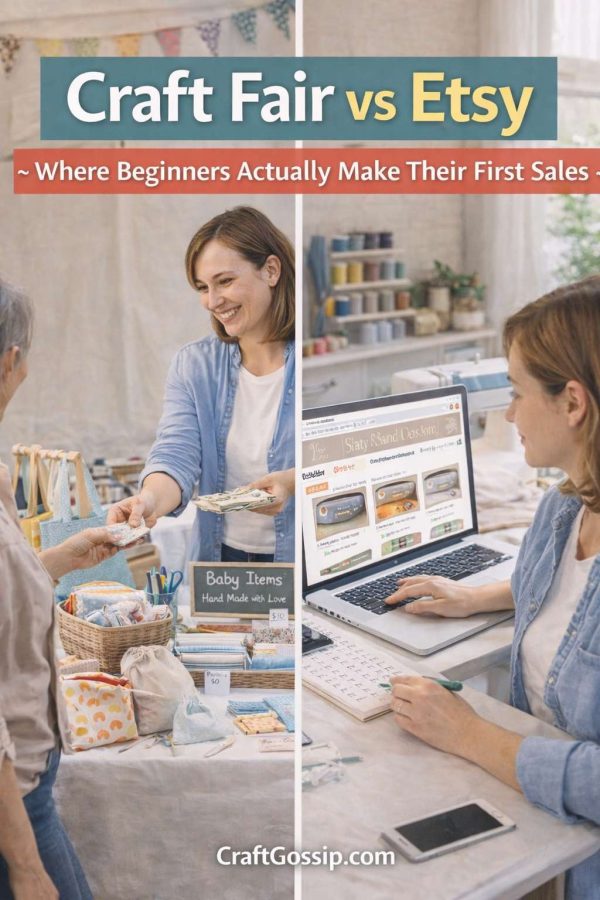
Patterns, Techniques, Articles, Blogs, and other resources to learn how to sew
by Anne Weaver

There are a few sewing skills that feel a little bit like magic once you finally “get” them, and the slip stitch is absolutely one of them.
Also called a ladder stitch, invisible stitch, hidden stitch, or sometimes a blind stitch, this simple hand sewing technique is used when you want to close an opening or finish a hem without your stitches shouting, “Look at me, I was sewn by hand!” across the fabric.
And honestly? We have all had that moment.
You finish a beautiful cushion cover, softie, quilt binding, lined bag, or hem, and then suddenly you’re left with that last little opening. The machine can’t quite get in there neatly, the fabric is already turned right side out, and you’re holding a needle and thread wondering why the final five inches of a project always feels like the bit that judges you.
That is where the slip stitch earns its keep.
This beginner-friendly hand sewing stitch is one of those quiet finishing techniques that makes handmade projects look cleaner, neater, and more professional. It is especially useful for sewing hems by hand, closing pillows, finishing plush toys, stitching quilt binding, repairing seams, and tidying up linings on bags and garments.
If you are building your hand sewing skills, this is a very handy one to practise. You do not need fancy tools, and once your fingers understand the rhythm, it becomes surprisingly relaxing. Almost. Let’s not get too carried away — it is still hand sewing.
A slip stitch is a small hand sewing stitch used to join folded fabric edges or attach a folded edge to a flat piece of fabric while keeping the thread mostly hidden.
The stitch “slips” in and out of the fabric folds, catching only tiny amounts of fabric at a time. When done neatly with matching thread, it becomes almost invisible from the outside.
You will often see this stitch used for:
If you have ever made a softie or fabric toy, you have probably already seen this stitch used to close the stuffing gap. This Baby Pip Teddy Bear tutorial on CraftBits is a lovely example of where a ladder stitch is used to close stuffed limbs and body openings neatly.
Most sewists use the terms slip stitch and ladder stitch very casually, and in many beginner tutorials they are treated as the same thing.
Technically, there are small differences depending on whether you are stitching a folded hem to a flat fabric layer or closing two folded edges together. But for everyday sewing, especially for beginners, the goal is the same: tiny hidden stitches that close or secure fabric without showing on the right side.
Here is the simple way to remember it:
So if you see these terms used interchangeably, don’t panic. Sewing terminology can be a bit like sorting a button jar — lots of similar-looking things with slightly different names.
You only need a few basic supplies:
For most projects, use a fine hand sewing needle and a single strand of thread. Matching thread makes a huge difference. If you are working on visible repairs or decorative fabrics, it is worth reading our guide to choosing the best thread color for invisible repairs before you start.
If you do a lot of hand sewing, a small needle book, quality thread, and sharp thread snips are well worth keeping nearby. You can usually find beginner hand sewing supplies through Amazon, sewing stores, or quilting suppliers such as Fat Quarter Shop and Connecting Threads. A self-healing cutting mat and a good pair of fabric scissors are also useful if you are preparing small sewing projects or fabric pieces.
This is the tiny step that makes the biggest difference.
Before sewing a slip stitch, fold the raw edge under and press it well. If you are closing a cushion or softie, tuck the seam allowance neatly inside and press or finger-press the fold.
Pressed fabric behaves better. Unpressed fabric likes to argue.
If you skip pressing, your folded edge may wobble, your stitches may show, and the finished result can look lumpy. Pressing gives your needle a clean fold to follow, which makes the stitch much easier to sew evenly.
Cut a length of thread around 18 inches long. Longer thread sounds helpful, but it tangles more easily and can become fuzzy as you sew.
Thread your needle and knot one end.
For delicate fabrics, use a single strand of thread. For sturdier projects like cushions, plush toys, or home décor, you can use a doubled thread if you need extra strength.
Start from inside the folded edge so the knot is hidden between the fabric layers.
Bring the needle out through the fold. This anchors your thread without leaving the knot visible on the outside of the project.
This is one of those small details that makes a handmade finish look tidy rather than rushed.
Directly across from where your thread came out, take a very small stitch through the opposite fabric layer.
You only want to catch one or two threads of the fabric if you are hemming, or a tiny bite of the folded edge if you are closing an opening.
The smaller the bite, the less visible the stitch.
Now insert your needle back into the folded edge, very close to where the thread came out.
Run the needle through the inside of the fold for a short distance, then bring it back out.
This hidden travel inside the fold is what makes the stitch disappear.
Continue working back and forth:
Come out of the fold.
Catch a tiny bit of fabric across from it.
Go back into the fold.
Travel along inside the fold.
Come out again.
Repeat.
The thread will start to form little ladder-like bars across the opening. When you gently pull the thread, those bars disappear into the folds.
Do not yank the thread too tightly. That is how puckers happen, and puckers are the sewing version of a raised eyebrow.
Try to keep your stitches small and evenly spaced. Around 1/8 inch to 1/4 inch apart works well for many sewing projects, but this depends on your fabric and what you are making.
Fine fabric needs smaller stitches.
Thicker fabric can handle slightly larger stitches.
Stuffed toys and cushions need secure stitches, especially if they will be handled often.
If you are working on a project that will be washed regularly, make the stitches close enough to hold firmly.
When you reach the end, take a tiny backstitch or knot close to the fabric fold.
Then pass the needle through the inside of the project or hem and bring it out a short distance away. Pull gently and snip the thread close to the fabric. The thread tail will disappear inside.
This gives a clean finish with no loose thread ends showing.
Once you know how to sew a slip stitch, you will start noticing places to use it everywhere.
A slip stitch is perfect for hand sewing hems on skirts, trousers, dresses, sleeves, and lightweight garments.
It is especially useful when you do not want a visible line of machine stitching on the outside of the garment.
This is lovely for dressy fabrics, vintage-style sewing, formalwear, or anything where you want a softer finish.
If you sew cushion covers, throw pillows, or stuffed home décor, a ladder stitch gives the neatest closure after stuffing.
Use firm but not aggressive tension. You want the seam to close smoothly without pulling the fabric into little mountain ranges.
Softies almost always need an invisible hand-sewn closure after stuffing.
A ladder stitch is ideal because it closes the opening while hiding the thread inside the seam. For soft toy inspiration, the CraftBits Baby Pip Teddy Bear project shows how invisible stitching is used after turning and stuffing fabric pieces.
Many quilters use a slip stitch to finish the back of quilt binding by hand. It gives a beautiful soft edge and avoids visible stitching on the front.
If you enjoy handmade gifts, this same technique is useful for pot holders, table runners, mug rugs, and small quilted projects. Our roundup of Christmas pot holders to sew as gifts includes a helpful reminder that hand stitching binding can give a polished invisible finish.
If you have ever made a lined tote bag, zipper pouch, or drawstring backpack, you know that turning gaps are part of the process.
Slip stitch closes those gaps neatly without needing to squash the whole project under the sewing machine again. You can use this technique after making beginner-friendly projects like this DIY drawstring backpack tutorial or a washable terry toweling makeup bag.
A slip stitch is also very useful for mending.
Use it to close small seam openings in clothing, repair cushion seams, fix stuffed animals, or tidy up linings that have come loose.
For repairs, matching the thread matters even more. A close colour match can make the difference between “beautifully mended” and “yes, I absolutely fixed this in a hurry five minutes before leaving the house.”
This is the biggest beginner mistake.
If your seam puckers, you are probably pulling too hard. The thread should sit snugly, not strangle the fabric.
Large stitches are more visible and less secure.
If your stitches are showing, take smaller bites of fabric and keep them tucked closer to the fold.
A close thread match helps hide imperfect stitches.
When in doubt, choose a thread slightly darker than your fabric rather than lighter. Lighter thread tends to stand out more.
Pressed folds are easier to sew and look neater.
Yes, it means getting up and using the iron. I know. The sewing machine is right there and the iron feels miles away, even when it is two steps. But it is worth it.
Keep your stitches close to the folded edge. If you sew too far away, the stitch may show or the fabric may not sit flat.
If you are learning, start with a medium-weight cotton fabric. Quilting cotton is ideal because it holds a crease well and is easy to see.
Avoid slippery satin, sheer fabrics, thick fleece, or stretchy knits for your first attempt. Those fabrics can be used later, but they are not the friendliest starting point.
Good practice fabrics include:
If you have a scrap basket that has developed its own postcode, this is a perfect time to use it.
Use smaller stitches and catch fewer threads of the main fabric. Also check that your thread colour matches well.
Loosen your tension. Pull the thread just enough to close the gap, but not so much that the fabric gathers.
Use a shorter length of thread. You can also run the thread through beeswax or thread conditioner for smoother stitching.
Check that the seam allowance is tucked in evenly before stitching. Press or finger-press the fold again if needed.
Make your stitches a little closer together and use a strong thread suitable for the fabric. For toys, cushions, and items that will be handled often, durability matters more than speed.
Cut two small rectangles of cotton fabric.
Place them right sides together and sew around the edges, leaving a small opening.
Turn the fabric right side out.
Press the edges neatly.
Use a slip stitch to close the opening.
This little sample gives you the same situation you will find in cushions, softies, fabric ornaments, and lined accessories.
Once you can close that opening neatly, you can use the same skill on real projects.
For a visual demonstration, this Grainline Studio tutorial on how to sew a slip stitch is a helpful reference, especially if you like seeing the needle path in photos.
You may also find this YouTube tutorial useful: How to Sew a Ladder Stitch – Slip Stitch, Blind Stitch or Invisible Stitch. Sometimes watching the movement once or twice makes the written instructions suddenly click.
The slip stitch is not flashy. It will not make your sewing machine jealous. It will not use up your fancy presser feet or require a complicated setup.
But it will make your handmade sewing projects look neater.
It is one of those finishing skills that quietly improves everything — hems, bindings, soft toys, bags, cushions, repairs, and small handmade gifts.
And the best part? You do not need to be an expert. You just need a needle, matching thread, a pressed fold, and a little patience.
Once you learn it, you will use it constantly. Probably while muttering, “Why didn’t I learn this sooner?” which is honestly how half of us learn sewing skills anyway.