• Home
  • Suggest A Craft
  • DIY Newsletter

Sewing

Patterns, Techniques, Articles, Blogs, and other resources to learn how to sew

  • About CraftGossip
  • Our Network
    • Bath & Body Crafts
    • Candle Making Ideas
    • Crochet Ideas
    • Cross Stitch
    • Edible Crafts
    • Felting Patterns
    • Glass Art
    • Home & Garden Ideas
    • Indie Crafts
    • Jewelry Making
    • Kids Crafts
    • Knitting Patterns
    • Lesson Plans
    • Needlework
    • Party Ideas
    • Polymer Clay
    • Quilting Ideas
    • Recycled Crafts
    • Scrapbooking
    • Sewing Patterns
    • Card Making
    • DIY Weddings
    • Not Craft Ideas
  • Giveaways
  • Roundups
  • Store
  • Search

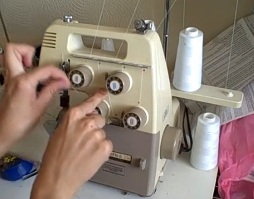
Video tutorial: Changing serger thread the easy way

October 3, 2011 by Anne Weaver

Does the idea of changing the thread on your serger bring about fits of anxiety?  Jessica from Running With Scissors shares a video tutorial showing the easy way to do it.  Rather than breaking out the threading diagram and the tweezers, she ties the new thread to the old thread and pulls it through.  Get the video tutorial to see how it’s done.

[photo from Running With Scissors]


Next Pattern:

  • Easy Way to Shorten Sweater Sleeves - DIY Sewing Tutorial
  • Easy Way to Make a Shirt Bigger
  • Easy Way to Hem Jeans to Keep Original Hem
«
»

Comments

  1. Cheryl says

    October 3, 2011 at 6:43 am

    I used to do this… then the man who cleans and repairs my 7 machines (2 of which are sergers) said not to , when you run the knot through the tension mechanism, continually like that, it springs the tension springs… makes them go out of whack . eventually you will have to have them adjusted or replaced… and that is not cheap.
    Now, I just thread them.. don’t want to ruin my machine

  2. Vicki Richardson says

    January 23, 2015 at 10:31 pm

    I turn my tension wheels to zero b4 I pull the thread through

Have you read?

DIY Shirt Extender – Sewing Pattern

I like having a little extra coverage when I wear leggings, but I could never find a cute top that was just the right length. So I decided to make this Easy Sew Shirt Extender! This is so simple to sew and is an easy sewing project for beginners. It is easy to layer under your shirt or top of choice and I added some lace trim to mine for a fancier look. You can mix and match colors and fabrics to suit your needs!

Categories

Bags and purses Children's Christmas Easter fleece Free Patterns Girl's Dress Halloween Hats Home Decor More Sewing Patterns No-sew Pillows Refashions Scrap Fabric sewing Sewing Techniques Skirts Softies T-shirts

RSS More Articles

  • Local Woman Crochets 1000 Socks for Charity Despite Tragic Loss
  • A Ray of Sunshine in Crochet Form
  • Handmade with a Past: Tuesday’s Top Recycled Etsy Find
  • 12 Handmade Cards Ideas with Stenciling
  • DIY Shirt Extender – Sewing Pattern
  • Summer Headband Knitting Patterns
  • Swirly Do – Online Quilt Class
  • Create a Beautiful DIY Flower Press and a Little Girl’s Flower Garden
  • 13 Fun Door Stops You Can Crochet For Your Home
  • Creative Ways to Reuse UNO Cards: Fun Upcycled Crafts to Try

Copyright © 2025 · CraftGossip | Start Here | Contact Us | Link to Us | Your Editors | Privacy and affiliate policy