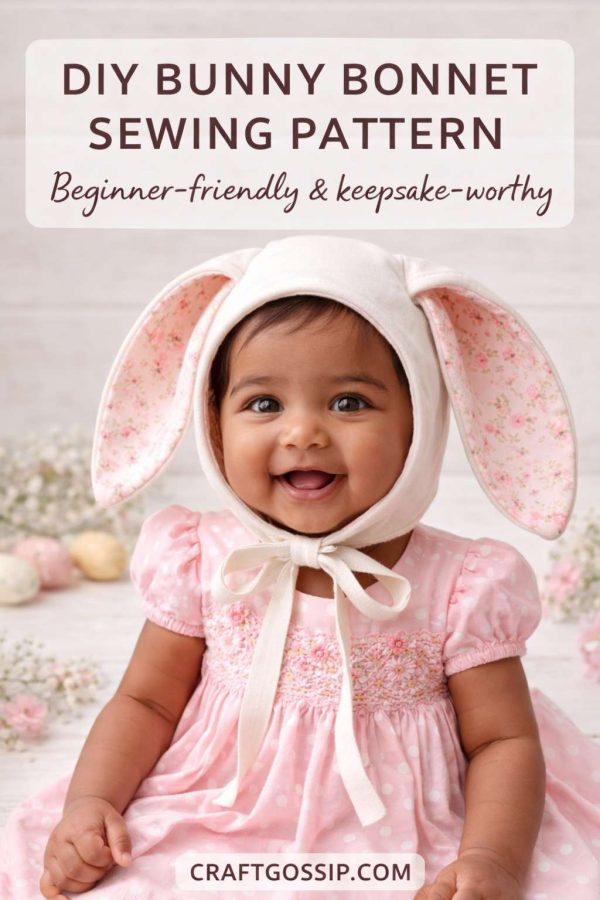
There’s something about a bunny bonnet that just melts me every time. Maybe it’s the floppy ears. Maybe it’s the fact that babies instantly look like they belong in a vintage Easter postcard. Or maybe it’s because I blinked and suddenly my kids were teenagers and I never made enough of these sweet little keepsakes when I had the chance.
This DIY bunny bonnet sewing pattern is one of those projects that feels special without being hard. You don’t need fancy tools, complicated steps, or “advanced beginner confidence” (whatever that means). If you can sew a gentle curve and tie a knot, you’re more than capable.
It’s perfect for Easter photos, baby shower gifts, keepsake boxes, or just because you found the cutest scrap of fabric and couldn’t bear to waste it.
Why I Love This Bunny Bonnet Pattern
I’ve made (and unpicked) enough baby sewing projects over the years to know when something is going to be a joy and when it’s going to end up in the “I’ll finish that later” pile.
This one? It’s a joy.
Here’s why:
- It’s genuinely beginner-friendly
- No buttons, zips, elastic, or fiddly closures
- The fit is forgiving (babies help with that)
- It works beautifully with scrap fabric
- And it looks far more impressive than the effort involved
It’s the kind of project you can sew in an afternoon and still feel smug about later.
Choosing Fabric (Don’t Overthink This)
Soft is the goal here. Always soft.
My go-to fabrics for a bunny bonnet are:
- Quilting cotton (easy, reliable, presses well)
- Cotton flannel (extra cozy, especially for cooler weather)
- Lightweight linen blends for a more heirloom feel
For the ears, I love using a contrast fabric on the inside. Florals, tiny polka dots, gingham — this is where you can have a bit of fun.
If you’re using fabric from old baby clothes, swaddles, or even a shirt from someone special, this bonnet makes a lovely keepsake piece. Those are always my favourites.
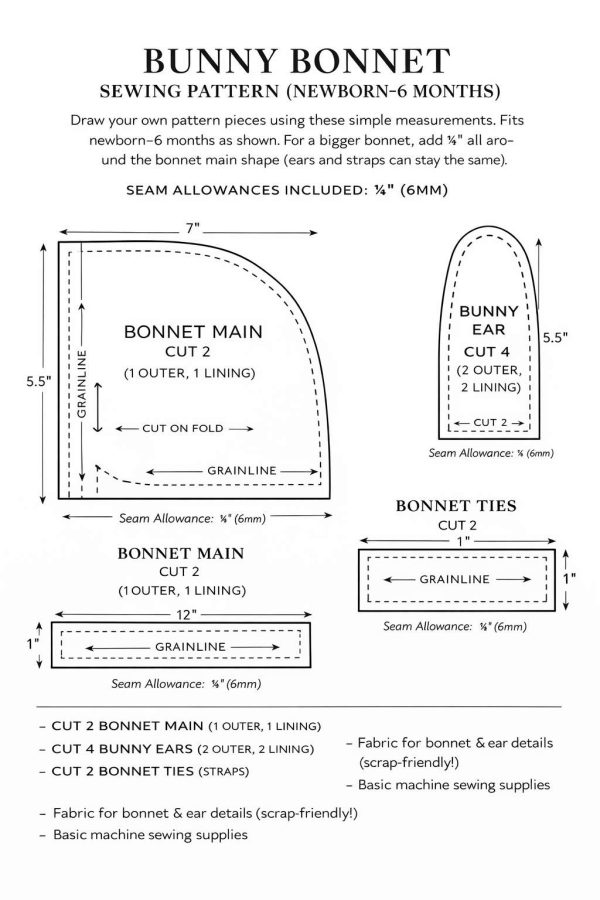
What You’ll Need
Nothing fancy, I promise.
- Fabric for outer bonnet
- Fabric for lining (can be the same or contrasting)
- Small amount of fabric for ears
- Two fabric ties or cotton tape
- Basic sewing supplies
If you’ve got a scrap drawer that’s getting out of hand, this project will happily help you feel virtuous about it.
Sewing the Bunny Bonnet (Step by Step, No Stress)
Step 1: Make the Ears
Start with the ears — they’re the fun part.
Place two ear pieces right sides together and stitch around the curved edge, leaving the bottom open. Clip the curves gently (no hacking!) and turn right side out. Give them a soft press.
A little tip from years of softie sewing: don’t over-press the ears flat. Let them keep a bit of softness — floppy ears are the whole point.
Step 2: Place the Ears
Lay your outer bonnet piece right side up. Position the ears along the top edge, angling them slightly outward.
Pin well. Take a second to step back and look — ear placement changes the whole personality of the bonnet, so trust your eye.
Step 3: Add the Ties
Place the ties at the lower edges of the bonnet, raw edges aligned, with the ties pointing inward.
This feels fiddly but makes everything neat once it’s turned through.
Step 4: Sew It All Together
Place the lining bonnet piece on top, right sides together. Stitch all the way around the outer edge, leaving a small gap at the back or side for turning.
Clip curves, turn right side out, and press gently.
Close the opening with a small hand stitch or a neat topstitch.
Step 5: Admire Your Work
Give the bonnet a final press and let those ears fall naturally.
That’s it. You’re done.
Turning This Bunny Bonnet Into a Keepsake
This is where this pattern really shines.
A few simple ideas:
- Embroider a name or year on the lining
- Use fabric from a loved one’s shirt
- Add a tiny pom-pom tail at the back (optional, but adorable)
- Sew a matching bunny softie from leftover fabric
This is the kind of bonnet that ends up in a memory box instead of being donated six months later.
When You’ll Actually Use a Bunny Bonnet
Obviously Easter is the big one — but this bonnet doesn’t need to be a one-holiday wonder.
It’s perfect for:
- Baby shower gifts
- Newborn and milestone photos
- First birthdays
- Spring family photos
- Handmade market items
- Keepsake sewing projects
I’ve seen versions of this bonnet resurface year after year in family photos, and that never gets old.
A Few Gentle Sewing Tips
- Press as you go — it really makes a difference
- Clip curves carefully for smooth edges
- Don’t stress if things aren’t perfectly symmetrical
- Handmade charm beats perfection every time
If one ear flops more than the other, congratulations — you’ve made it exactly right.
A Pattern Worth Keeping
After more than twenty years of crafting, I can say with confidence that this is one of those patterns you’ll come back to again and again. It’s quick, heartfelt, endlessly adaptable, and always makes people smile.
If you’re looking for a free bunny bonnet sewing pattern, a beginner baby sewing project, or a handmade Easter keepsake, this one is a keeper.
And yes… I still wish I’d made more of these when my kids were little.