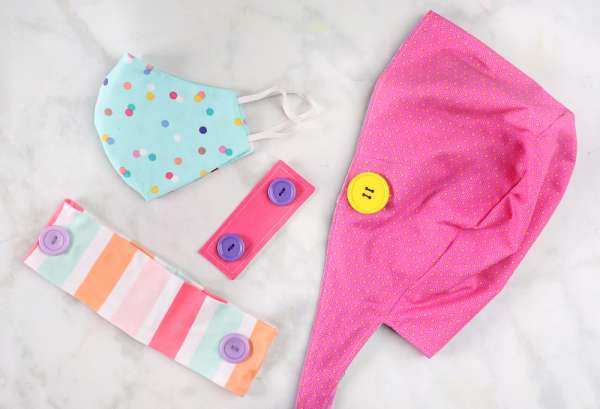
This is a highly requested tutorial on how to sew an ear saver to prevent ear irritation. Kim from Sweet Red Poppy shows three ways you can sew ear savers. Go to Sweet Red Poppy to see how with free printable patterns.
[photo from Sweet Red Poppy]
Patterns, Techniques, Articles, Blogs, and other resources to learn how to sew
by Anne Weaver

This is a highly requested tutorial on how to sew an ear saver to prevent ear irritation. Kim from Sweet Red Poppy shows three ways you can sew ear savers. Go to Sweet Red Poppy to see how with free printable patterns.
[photo from Sweet Red Poppy]

Bubble skirts are back, and this time they are not being saved for flower girls, dance costumes or the more adventurous corners of our wardrobes.
The modern bubble hem skirt—also called a puffball skirt—can be soft and wearable, especially when you choose the right fabric and control the amount of gathering. Think gentle rounded volume rather than an enormous fabric balloon following you through the supermarket.
This easy adult bubble skirt tutorial does not require a commercial sewing pattern. The skirt is drafted from your own hip and length measurements, then finished with a comfortable elastic waistband.
The secret is the lining. The outer skirt is cut both wider and longer than the lining, then gathered to it at the lower edge. The extra fabric rolls underneath and creates that distinctive rounded bubble hem.
You can make the finished skirt as a mini, knee-length or midi design, with anything from a subtle puff to full “big skirt energy.”
A bubble hem skirt has an outer layer that folds underneath and attaches to a shorter lining.
The outer fabric is longer and usually wider than the lining. When the two lower edges are joined, the extra fabric gathers and rolls underneath, creating a soft, rounded hem.
You may also see this style described as:
Sewing CraftGossip has shared several older bubble-skirt ideas for children, including this easy bubble skirt for girls and a paper-bag waistband bubble skirt. This tutorial updates the idea with adult measurements, adjustable fullness and a separate elastic waistband.
This is a confident-beginner sewing project.
You should be comfortable with:
There are no zips, buttons or complicated fitted pattern pieces.
The most important part is labelling the top and bottom edges before construction. Once you have two large fabric tubes and one of them has been turned inside out three times, they can begin to look suspiciously alike.
Before buying fabric, decide whether you want a subtle everyday bubble or a more dramatic puffball shape.
Use an outer-skirt width approximately 1.5–1.75 times your hip measurement.
Add approximately 12–15 cm of extra outer length.
This creates a soft rounded hem without excessive volume around the hips.
Use an outer-skirt width approximately 1.75–2 times your hip measurement.
Add approximately 18–22 cm of extra outer length.
This is a good starting point for a modern adult bubble skirt.
Use an outer-skirt width approximately 2–2.5 times your hip measurement.
Add approximately 25–35 cm of extra outer length.
This creates a much fuller silhouette and works best with lightweight fabric that holds its shape without becoming heavy.
The fabric determines whether your skirt produces a soft puff, a crisp architectural shape or something that looks as though you have accidentally worn a duvet cover.
Cotton poplin is one of the easiest options for beginners.
It is crisp enough to hold the bubble shape, easy to sew and available in plenty of prints and solid colours.
Cotton lawn creates a softer, lighter bubble.
It works well for spring and summer skirts but may need a light lining because pale colours can be transparent.
Taffeta produces dramatic volume and a more structured, occasion-style skirt.
It can be slippery and may show pin marks, so use fine pins or sewing clips.
A lightweight linen-viscose or linen-cotton blend creates relaxed volume with a slightly crumpled finish.
Pure heavy linen may create too much weight around the gathered hem.
Chambray and very lightweight denim can create a casual bubble skirt.
Avoid heavy jeans denim. Once gathered, lined and folded under, the hem can become extremely bulky.
These fabrics create a softer, more draped bubble.
The finished silhouette will be less structured, but it can feel more wearable if you are cautious about adding volume.
Avoid:
Choose a lightweight, smooth lining that does not cling to tights or bunch around your legs.
Suitable options include:
The lining should be lighter and less bulky than the outer fabric.
A cotton lining is easier for beginners to control, while a slippery garment lining allows the skirt to move more freely over the body.
A reliable rotary cutter, large self-healing cutting mat and clear quilting ruler make cutting these long rectangular pieces considerably easier. They are useful sewing-room basics rather than supplies you will use for one skirt and then abandon beside the bias-tape maker.
Fabric requirements depend on your measurements, the desired skirt length, fabric width and the amount of fullness.
For many adult knee-length skirts, allow approximately:
A dramatic midi version may require more.
Calculate your pattern pieces before purchasing fabric, particularly when using narrow fabric or a print that must be matched.
Wear the type of undergarments or clothing you expect to wear beneath the skirt.
Measure:
Measure around the point where you want the elastic waistband to sit.
Measure around the fullest part of your hips and bottom.
Keep the tape level and comfortably loose.
Measure from the lower edge of the planned waistband to where you want the visible bubble hem to finish.
This is the finished length rather than the cutting length of the outer fabric.
Write these measurements down. Trusting yourself to remember three numbers while walking from the mirror to the sewing table is how a knee-length skirt quietly becomes a mini.
This tutorial uses two rectangular outer-skirt panels, two lining panels and one waistband.
The formulas include 1.5 cm seam allowances unless otherwise stated.
Choose your fullness multiplier.
For medium fullness:
Full hip measurement × 2
Divide that number by two to create a front panel and a back panel.
Add 3 cm to each panel for the two side seam allowances.
Hip measurement: 105 cm
105 cm × 2 = 210 cm total outer width
210 cm ÷ 2 = 105 cm per panel
Add 3 cm seam allowance:
Cut two outer panels measuring 108 cm wide.
Take your finished skirt length and add:
Desired finished length: 55 cm
Extra bubble length: 20 cm
Seam allowance: 3 cm
Cut the outer panels 78 cm long.
The lining must fit comfortably over your hips but should not contain as much fullness as the outer skirt.
Use:
Full hip measurement × 1.15–1.25
Divide by two and add 3 cm to each panel for side seam allowances.
Use the lower multiplier for a straighter lining and the higher multiplier for more walking ease.
Hip measurement: 105 cm
105 cm × 1.2 = 126 cm total lining width
126 cm ÷ 2 = 63 cm per panel
Add 3 cm seam allowance:
Cut two lining panels measuring 66 cm wide.
The lining controls the finished skirt length.
Use:
Desired finished length + 3 cm seam allowance
For a finished 55 cm skirt:
Cut the lining panels 58 cm long.
The lining will be pulled slightly upward when the bubble forms. When you are between two lengths, cut it a little longer. It is easier to shorten the skirt during fitting than negotiate with fabric you have already removed.
The finished waistband must stretch over your full hip measurement.
Use:
Full hip measurement + 5 cm ease + 3 cm seam allowance
For a 105 cm hip:
105 cm + 5 cm + 3 cm = 113 cm
Use:
Twice the elastic width + 4 cm
For 30 mm elastic:
6 cm + 4 cm = 10 cm
Cut one waistband strip measuring 113 cm × 10 cm.
When your fabric is not wide enough, join two shorter strips and position the seams at the side seams.
For lightweight fabric, apply a narrow strip of lightweight interfacing to the outer half of the waistband. Do not interface the entire casing heavily or it may prevent the elastic from stretching comfortably.
Cut:
Mark the top edge of each piece with a removable fabric marker or a small notch inside the seam allowance.
When your fabric has a directional print, make sure both outer panels face the same way.
Prewash and press washable fabric before cutting. Different fabrics can shrink at different rates, and the lined bubble construction does not respond kindly when one layer decides to become noticeably shorter after its first wash.
Pockets can be added, but they need to be handled carefully so they do not drag the bubble hem downward.
Use lightweight pocket fabric and attach the pockets to the outer skirt only.
Position the pocket openings approximately 8–10 cm below the top raw edge, allowing for the waistband seam.
Sew the pocket pieces to the side seams before assembling the outer-skirt tube.
After the skirt is gathered, tack the upper pocket bags to the waistband seam allowance. This helps support the weight of anything you place inside.
Keep pocket contents light. A phone, keys and several handfuls of mysterious handbag coins may pull the bubble out of shape.
For a simpler pocket option, add small patch pockets to the front before sewing the side seams.
Place the two outer panels right sides together.
Pin or clip the side edges.
Sew both side seams using a 1.5 cm seam allowance.
Finish the raw edges with an overlocker, zigzag stitch or pinking shears.
Press the seams open or towards the back.
When adding side-seam pockets, complete the pockets as you sew the side seams.
You now have one large outer-skirt tube.
Place the two lining panels right sides together.
Sew both side seams using a 1.5 cm seam allowance.
Finish the raw edges and press the seams.
You now have a smaller lining tube.
Fold the lower edge of the outer skirt so the side seams meet.
Mark the centre front and centre back.
Repeat with the lower edge of the lining.
You should now have four evenly spaced quarter marks on each lower edge:
Quarter marks help distribute the gathers evenly and prevent all the fullness from drifting towards one side.
Set the sewing machine to its longest straight stitch.
Sew two parallel rows of gathering stitches around the lower edge of the outer skirt.
Place one row approximately 8 mm from the raw edge and the second approximately 13 mm from the edge.
Do not backstitch.
Leave long thread tails at the beginning and end.
Two gathering rows create neater, more controllable gathers than one row and make it less likely that the thread will snap halfway through.
Turn the outer skirt right side out.
Turn the lining wrong side out.
Slide the outer skirt inside the lining.
The right sides of the outer fabric and lining should now face each other at the lower edges.
Match the side seams and quarter marks.
The outer edge will be considerably wider than the lining edge.
Pull the bobbin threads gently to gather the lower edge of the outer skirt.
Distribute the gathers between each set of quarter marks.
Continue adjusting until the gathered outer edge matches the lower lining edge exactly.
Pin or clip the edges together, placing pins fairly close together.
Check that the gathers are even and that neither fabric tube is twisted.
Return the machine to a standard stitch length.
Sew around the lower edge using a 1.5 cm seam allowance.
Keep the gathers facing upward as they pass under the presser foot and smooth them gently with a stiletto or seam ripper tip.
Do not push your fingers close to the needle.
Sew slowly over bulky gathered areas.
Finish the joined raw edges together with an overlocker or zigzag stitch.
When the outer fabric is bulky, trim or grade the seam allowance carefully to reduce thickness.
Do not trim so close that the gathering stitches or construction seam are weakened.
Press the seam allowance towards the lining using a suitable iron temperature.
Pull the lining through the open waist edge.
Arrange the lining inside the outer skirt.
The extra outer length should begin folding underneath, forming the bubble hem.
Hold the skirt by its upper edge and shake it gently so the fabric settles.
Smooth the lining downward inside the skirt.
The lower seam should roll towards the inside and remain hidden.
Place the skirt on a dress form or try it on carefully while holding the upper edge.
Check:
When one area hangs lower, redistribute the fabric along the lower seam.
When the whole skirt is too long, shorten it from the upper edge rather than interfering with the completed bubble hem.
Smooth the lining inside the outer skirt.
Match the side seams and upper raw edges.
Pin the layers together at the side seams, centre front and centre back.
Baste the lining and outer fabric together approximately 8 mm from the raw edge.
Treat the two layers as one from this point onward.
Sew two rows of long gathering stitches around the upper edge through both layers.
Leave long thread tails.
The combined skirt waist now needs to gather to the finished waistband length.
Keep the upper gathers lighter and flatter than the bubble-hem gathers to avoid unnecessary bulk around the waist.
Fold the waistband strip in half with the short ends right sides together.
Sew the short ends using a 1.5 cm seam allowance.
Press the seam open.
You now have a waistband ring.
Mark the ring into four equal sections.
Place the waistband around the outside of the skirt with right sides together.
Match the waistband seam to one skirt side seam and match all four quarter points.
Pull the gathering threads until the skirt waist fits the waistband.
Distribute the gathers evenly.
Pin or clip securely.
Sew around the waistband using a 1.5 cm seam allowance.
Finish the joined raw edges if desired, taking care not to add excessive bulk.
Press the seam allowances upward into the waistband.
Press the remaining raw waistband edge 1.5 cm towards the wrong side.
Fold the waistband over the seam allowance towards the inside of the skirt.
The folded edge should cover the original waistband stitching line.
Pin or clip it in place.
From the right side, stitch in the ditch beside the waistband seam, catching the folded edge on the inside.
Leave an opening approximately 5 cm wide for inserting the elastic.
Alternatively, edge-stitch the folded inner edge from inside the skirt when that gives you better control.
Wrap the elastic around your waist where the skirt will sit.
Adjust it until it feels secure but comfortable.
A common starting point is:
Waist measurement minus 2.5–5 cm
The correct amount depends on the firmness and stretch of the elastic.
Add approximately 2.5 cm for overlapping the elastic ends.
Do not rely entirely on a formula. Elastic varies wildly. Some behaves beautifully, while some seems to have been designed for restraining garden furniture during a cyclone.
Attach a safety pin or elastic-threading tool to one end of the elastic.
Thread it through the waistband casing.
Secure the opposite end temporarily so it does not disappear into the casing.
Keep the elastic flat and untwisted.
Overlap the elastic ends by approximately 2.5 cm.
Try on the skirt before stitching the elastic permanently.
Adjust the length when necessary.
Sew the overlapped elastic securely using a box with a cross or several rows of zigzag stitching.
Pull the waistband gently so the elastic disappears inside the casing.
Stitch the casing opening closed.
Stretch the waistband several times to distribute the gathers evenly.
Optional: Stitch vertically through the waistband at each side seam. This anchors the elastic and helps prevent it twisting inside the casing.
Press the waistband and side seams carefully.
Avoid crushing the bubble hem flat.
Use steam from a short distance or place the skirt over a tailor’s ham when lightly pressing the rounded lower edge.
Allow the skirt to cool while hanging.
When using taffeta or synthetic fabric, test the iron temperature on a scrap first.
For a fuller puffball shape:
Do not add large amounts of width and length at the same time without testing. That can create a very bulky skirt, particularly around the upper thighs.
For a softer, easier-to-wear version:
This version works well with simple T-shirts, fine knitwear and cropped jackets.
A fitted waistband creates a more tailored finish but requires an opening.
You will need to:
This is better suited to intermediate sewists.
The elastic-waist version is easier to fit and much more forgiving after lunch.
Yes. A smooth fitted yoke can keep the fullness away from the waist and upper hips.
Use an existing yoke skirt pattern that fits you well, then replace the lower skirt pieces with the bubble construction.
Gather the upper edge of the bubble skirt to the lower edge of the yoke.
This is an excellent option when you enjoy the rounded hem but prefer a smoother silhouette across the stomach.
The easiest way to style a voluminous skirt is to keep the upper half relatively simple.
Try:
For a softer mature style, try a knee-length bubble skirt in black, navy, olive or chocolate with a fine knit top and simple flats.
The bubble hem does not have to arrive in hot pink taffeta accompanied by a dramatic soundtrack.
The outer skirt may contain too much width.
Reduce the fullness multiplier, use a drapier fabric or add a smooth upper yoke.
Concentrating more gathering towards the lower hem rather than the waist can also help.
The lower gathers may not be distributed evenly, or the lining may be twisted.
Hang the skirt and redistribute the fabric around the lower seam.
Check that the lining side seams sit directly beneath the outer side seams.
The lining may be too long, or the outer fabric may not contain enough extra length to roll underneath.
Shorten the lining from the waist edge before attaching the waistband.
Do not trim the lower joined seam unless you intend to undo and reconstruct it.
Press the seam allowance towards the lining.
Understitch the lining close to the lower seam if the fabric allows you to reach it comfortably before turning the skirt.
A slightly shorter lining also helps pull the seam towards the inside.
The upper edge may contain too much gathering, or the fabric may be too heavy.
Reduce the outer width, use lighter lining and press the gathers flat before attaching the waistband.
A yoke is another good solution.
Make sure the casing is only slightly wider than the elastic.
Anchor the elastic by stitching vertically through the waistband at the side seams.
The pocket bags may be too heavy or unsupported.
Use lightweight pocket fabric and anchor the upper pocket bags into the waistband seam.
Keep the contents light.
You can use an existing elastic-waist gathered-skirt pattern as the starting point.
Our simple gathered-skirt tutorial is useful for understanding the basic rectangular construction.
To turn a gathered skirt into a bubble skirt:
There is also an older bubble-skirt refashion showing how an existing lined skirt can be adapted.
Follow the care requirements of the most delicate fabric used.
When both fabrics are washable:
When using taffeta, silk or specialist lining, dry cleaning may be the safer option.
The bubble hem looks clever because the construction is hidden inside.
From the outside, you see a smooth rounded edge with no ordinary hem stitching. Inside, it is simply a longer outer skirt gathered to a shorter lining.
Once you understand that relationship, you can adjust the same basic method to create a dramatic puffball mini, a soft knee-length skirt or a relaxed midi with just a hint of volume.
Make the first version in an inexpensive cotton poplin and keep the fullness moderate. Once you know how the shape sits on your body, you can confidently reach for the special fabric.
Or the piece of crisp floral cotton that has been waiting in the stash for twelve years because it was apparently “too good to cut.”