 Part of my pledge for the Craft Gossip Dolly Donation Challenge was to create a shirt and pair of pants for the boy doll.
But after a full day of drafting and sewing, and redrafting and ripping and resewing (and a little bit of cussing thrown in), I realized that a shirt for this doll was a more difficult undertaking than I had assumed. And I started wondering how much little boys would really enjoy having a second set of clothes for their dolls anyway. Perhaps what they would want more is an alter-ego for their doll. And then I started thinking that in times of crisis, it might be comforting for a child’s lovey doll to also be very powerful – a superhero.
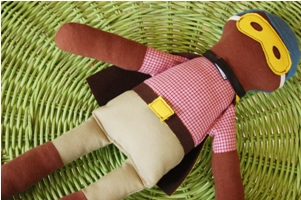
And so I created a Superhero Outfit for the boy Dolly Donation doll. It comes with a superhero cape, a superhero mask, and a superhero belt. I think it turned out gosh-awful cute, if I say so myself. AND it’s also super easy to make!!
Read more about the Craft Gossip Dolly Donation Challenge.
**Did you notice that my photo still has a faceless doll? Don’t worry, he’s been handed off to Aunty Denise, our Needlework Editor, who will see to it that he gets a very handsome face!**
So.. do you want to make some Superhero Gear for your Dolly Donations doll? Read below to find out how.
What you need:
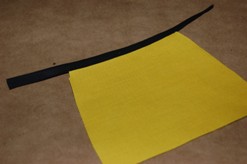
— 9 1/2″ x 7″ of two pieces of fabrics
— 9 1/2″ x 7″ of fusible webbing
— 3/4″ hook and loop tape (Velcro)
— 7 3/4″ bias tape (doesn’t have to actually be on the bias, as it won’t be curved)
— 6 1/4″ of 1/4″ elastic
— Cape and mask pattern
Here’s how to make it:
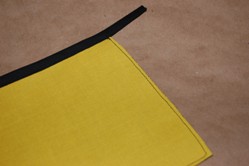
First things first, use the fusible webbing to fuse the two pieces of fabric together, back to back. (Follow the manufacturer’s instructions.) You’ll end up with a double-sided piece of fabric.
Let’s make the belt.
1. Cut a strip of fabric 1/2″ x 9 1/2″. This will become the belt.
2. Wrap the belt around the doll and check the fit. The ends should overlap by 3/4″ or so. Trim if necessary.
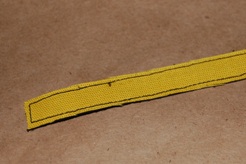 3. Edgestitch around the strip of fabric. The edge stitching will make sure that the pieces of fabric stay together even if the fusible webbing starts to pull apart.
.
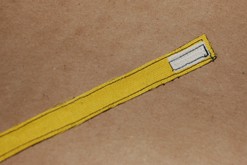 4. Cut your bit of Velcro in half the long way. Use one half for the belt, and save the other half for the cape. Stitch the bumpy side of the Velcro to the underside of one end of the belt, and the fuzzy side of the Velcro to the top of the other end of the belt.
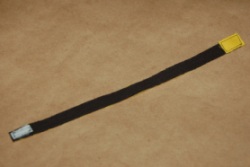 5. Cut a small rectangle (roughly 5/8″ x 7/8″) out of the larger fused fabric piece. This will be the belt buckle. I like to reverse the fabric so there’s some contrast between the buckle and the belt. Stitch the buckle to the top of one of the belt, going around all 4 edges of rectangle to secure the fusing. Your belt is done.
Now, let’s make the cape.
1. Cut the cape out of the fused fabric.
 2. Stitch the bias tape to the top of the cape so the edge of the cape is enclosed and centered on the piece of bias tape. Stitch the ends of the bias tape closed to create the neck strap. (Here’s a good tutorial for applying bias tape.)
 3. Edge stitch around the other three sides of the cape to secure the fusing.
.
.
.
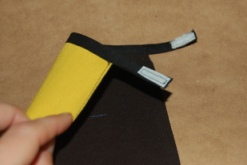 4. Take the other half of your Velcro (left over from the belt) and stitch it to the neck strap. Stitch the bumpy side of the Velcro to the underside of one end of the neck strap, and the fuzzy side of the Velcro to the top of the other end of the strap. The cape is done.
Last but not least, let’s make the mask.
1. Cut the mask shape out of the fused fabric. You may want to check the placement of the eyeholes to be sure they line up with the eyes on your dolly. Adjust the placement of the holes if necessary.
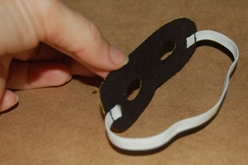 2. Stitch the ends of the 1/4″ elastic to the back of the mask at the dots marked on the pattern. I stitched across the elastic twice to be sure that it was secured. (Once down the elastic, and then backstitched across a second time.)
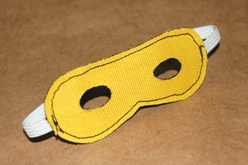 3. Edgestitch around the outer edge of the mask to secure the fusing. Don’t bother with trying to edgestitch around the eyeholes – the curves are way too tight to stitch accurately. Your mask is done.
.
Your Superhero Gear for the Dolly Donations Doll is complete!!
[tags]sewing, tutorial, pattern, dolly donations, doll, superhero, cape, mask, belt[/tags]


Genius!
Trying to find someone who can create super hero dolls that look like our superheroes on our website. You can click on superheroes on our website. We send dolls and teddy bears to kids who are chronically ill. We are a non profit organization.
Hi. Found your donation dolly while looking for a simple pattern for family project. Your dolls are cute and your mission is worthy. I make 10-15 dolls a year for a friend’s church’s mission trips to Haiti. I like your version, especially the little extras. Thanks for sharing.