• Home
  • Suggest A DIY
  • DIY Newsletter

Sewing

Patterns, Techniques, Articles, Blogs, and other resources to learn how to sew

  • About CraftGossip
  • Our Network
    • Bath & Body Crafts
    • Candle Making Ideas
    • Crochet Ideas
    • Cross Stitch
    • Edible Crafts
    • Felting Patterns
    • Glass Art
    • Home & Garden Ideas
    • Indie Crafts
    • Jewelry Making
    • Kids Crafts
    • Knitting Patterns
    • Lesson Plans
    • Needlework
    • Party Ideas
    • Polymer Clay
    • Quilting Ideas
    • Recycled Crafts
    • Scrapbooking
    • Sewing Patterns
    • Card Making
    • DIY Weddings
    • Not Craft Ideas
  • Giveaways
  • Roundups
  • Store
  • Search

From my studio last week: 3-21-2011

March 21, 2011 by Anne Weaver

I am so excited to show you what came from my studio last week. 

It’s a dress for my daughter, because the little girl clearly needs more clothes. (That’s sarcasm, by the way.)  Bwahahahaha!!!!   The child’s closet is literally STUFFED with clothes, and yet I continue to make them for her. 

Little girl clothes are just. so. much. fun.  Especially when you’re sewing with a friend, which is how this dress came about. 

The design was a collaboration between my friend Melissa and me.  We made matching dresses for our daughters to wear.  They like to coordinate their clothes for church sometimes.  In a few years she’ll “just die” if someone shows up wearing the same thing as her, but for now it’s the coolest thing ever.

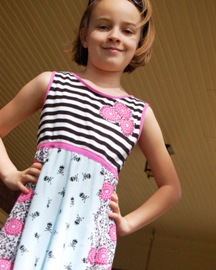
The shape of the dress is pretty basic.  A roundneck sleeveless bodice with an A-line gored skirt.  It’s made from knit fabric and bound with – you guessed it – foldover elastic.  I also stitched some foldover elastic around the waist just for a little bit of “pop” there. 

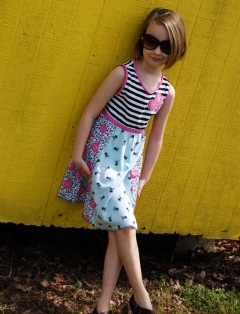
What’s funny is that this looks NOTHING like the design we started out making.  Our initial design was a halter dress with a gathered skirt.  Actually that would have been really cute, but changing it to a full bodice with no sleeves makes it where it can be worn over a t-shirt and leggings in the fall.  And the pie-shaped panels on the skirt took less fabric and was a more flattering twirly shape than a straight gathered panel. 

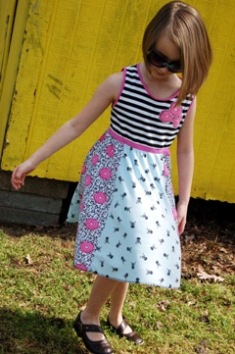
Right now I’m thinking of calling it The Garden Playdress, simply because she wore it to our community garden today and had sooo much fun playing outside in it.  She ran, she climbed, she dug, she weeded, she watered, and even pushed a wheelbarrow – all while wearing the dress and looking pretty as a picture.

I’m thinking that this is going to become a go-to style for us.  There are lots of possibilities for changing up the bodice or altering the skirt, but the basic shape is comfortable and works well for a growing body. 

And since it’s mixy-matchy and none of the pieces are really all that big, it doesn’t take very much yardage of any one print.  I’m already plotting and planning my next version. 

Because the child clearly needs some more clothes.  Bwahahahaha!!!

Next Pattern:

  • Organizing the Perfect Sewing And Quilting Studio
  • Last Minute Felt Easter Basket
«
»

Comments

  1. Jan says

    March 21, 2011 at 8:08 pm

    Very cute dress!!! I’m not familiar with binding with fold over elastic, but it sounds great. Can you get it at most fabric stores? I’m assuming it comes in a bunch of different colors?

    Thanks!

    • anneweaver says

      March 21, 2011 at 8:20 pm

      Thanks so much!! Foldover elastic is my new best sewing friend. It’s basically what it sounds like – elastic that folds over the edge of a piece of fabric. You just fold it over and zig zag it down. Easy peasy, lemon squeezy. It comes in sooo many colors and once you use it, you’ll be hooked. Sadly I’ve never been able to find it at my local fabric store. Check out this post for more on foldover elastic, including a links to a tutorial applying it and the place where I purchase my elastic: http://sewing.craftgossip.com/tutorial-the-peek-a-boo-shoulder-shirt/2011/03/09/ –Anne

  2. Jan says

    March 21, 2011 at 8:25 pm

    Thanks Anne! I will definitely check it out. Sounds way better that the traditional bias tape binding!!!

  3. Debbie says

    March 22, 2011 at 4:48 am

    Love this dress. The verticle pieces is really neat. Make more and upcycle those t-s… Thanks for reminding about my fold-over elastic stash.

  4. Miquela says

    March 22, 2011 at 4:48 am

    Very cute, very versatile dress! Oh the options. I’d like one for my daughter, yes, but I think I’ll have to make myself one, too. 😀

Have you read?

Pricing Handmade Sewing Items Without Undervaluing Yourself

If there’s one topic that makes sewists uncomfortable faster than sewing zippers, it’s pricing. Not how to sew the item — but how much to charge for it once it’s finished.

Most people don’t struggle with making handmade items. They struggle with putting a price on their time, skill, and effort without feeling awkward, guilty, or worried they’ll scare buyers away.

If you’ve ever thought:
“I’m not good enough to charge that much,”
“People won’t pay handmade prices,”
or “I’ll just price it low until I get better,”

you’re not alone. But you’re also not doing yourself any favours.

Let’s talk about how to price handmade sewing items in a way that’s fair, realistic, and sustainable — without undervaluing yourself.

Why Undervaluing Your Sewing Hurts More Than You Think

Underpricing doesn’t just affect your income. It affects your motivation, your confidence, and how seriously buyers take your work.

When handmade items are priced too low:

  • You burn out faster

  • You resent the time spent making them

  • You struggle to restock

  • Buyers assume “cheap” equals “low quality”

Ironically, pricing too low can make selling harder, not easier.

Handmade sewing items aren’t competing with mass-produced factory goods. They’re competing with thoughtfulness, quality, and care — and those have value.

Start With the Real Cost (Not Just Fabric)

One of the biggest pricing mistakes beginners make is charging only for materials.

Fabric, thread, zips, interfacing, labels, packaging — these are your base costs. But they’re only the starting point.

You also need to account for:

  • Cutting time

  • Sewing time

  • Pressing and finishing

  • Packaging

  • Listing, photographing, or selling time

Even if you enjoy sewing, your time still counts.

A simple rule:
If someone else had to make this for you, what would you expect to pay them per hour?

The “Straight Line” Trap (And Why It’s Not a Problem)

Many sewists worry that because their items are “simple,” they don’t deserve higher prices.

Straight seams, basic construction, minimal shaping — these are often seen as beginner skills. But from a buyer’s perspective, simplicity is often a feature, not a flaw.

Simple items are:

  • Practical

  • Durable

  • Easy to use

  • Less intimidating

  • Often more giftable

A well-made tote bag, table runner, or pouch doesn’t lose value because it’s simple. It gains value because it works.

A Simple Pricing Formula That Actually Works

You don’t need complicated spreadsheets to price handmade sewing items.

A beginner-friendly formula looks like this:

Materials + (Hourly rate × Time) + Fees = Price

Your hourly rate doesn’t need to be high — but it does need to exist.

Even a modest rate acknowledges that your time matters.

And remember: pricing isn’t permanent. You’re allowed to adjust as you learn.

Why “Charging Less Until I’m Better” Backfires

This mindset feels sensible, but it causes long-term problems.

When you price low “for now,” you:

  • Attract bargain-focused buyers

  • Set expectations that are hard to raise later

  • Undermine your confidence

  • Train yourself to accept less

Your skill will improve through repetition, not through underpricing.

Selling handmade items is a skill too — and pricing fairly is part of learning it.

What Buyers Are Actually Paying For

Most buyers don’t analyse your stitching technique.

They’re paying for:

  • Convenience

  • Thoughtful design

  • Quality materials

  • Handmade care

  • Supporting a real person

They want something useful, well made, and ready to use — not a bargain-bin price.

When you price confidently, buyers feel more confident too.

Comparing Prices Without Panicking

It’s smart to look at what others charge — but don’t use comparison as a weapon against yourself.

Instead of asking:
“Why are they charging more than me?”

Ask:

  • Are they targeting the same customer?

  • Are they selling the same type of item?

  • Are their materials similar?

There is room for different price points. You don’t need to be the cheapest to be successful.

Pricing for Sustainability, Not Just Sales

Selling handmade items should feel rewarding, not exhausting.

If your prices don’t allow you to:

  • Replace materials

  • Restock without stress

  • Enjoy sewing

  • Take breaks

…they’re too low.

A sustainable price keeps you sewing longer — and consistency is what builds sales over time.

The Confidence Shift That Changes Everything

Instead of asking:
“Is this worth what I’m charging?”

Ask:
“Would I be proud to sell this?”

If the item is:

  • Well made

  • Useful

  • Finished with care

Then it deserves a fair price.

You don’t need permission to charge what your work is worth. You just need to believe that your time, effort, and creativity matter.

Because they do.

Book Review – Sewing to Sell – The Beginner’s Guide to Starting a Craft Business

Selling your handmade items? Here’s how to figure a fair price.

Categories

Bags and purses Children's Christmas Easter fleece Free Sewing Patterns Girl's Dress Halloween Hats Home Decor No-sew Pillows Refashions Scrap Fabric sewing Sewing Patterns Sewing Techniques Skirts Softies T-shirts

RSS More Articles

  • The 5 Outlet Placement Mistakes You Don’t Want to Make
  • Celebrate the Spirit of the Southwest with These Stunning Indian Navajo Tribal Quilt Patterns
  • Pricing Handmade Sewing Items Without Undervaluing Yourself
  • Tips for Teaching the Alphabet to Kids
  • Yarn Sardines T-Shirt Review – A Whimsical Gift For Yarn Lovers
  • Cropped Chunky Granny Stitch Cardigan Crochet Pattern
  • Free Butterfly Digital Stamps for Card Making, Coloring and Paper Crafts
  • 14 Masculine Card Ideas for Guys
  • Juneteenth Cross Stitch Patterns
  • Ties to Knit for Father’s Day

Pick Your Blog

  • Sewing
  • Knitting
  • Quilting
  • Crochet
  • Home & Garden
  • Recycled Crafts
  • Scrapbooking
  • Card Making
  • Polymer Clay
  • Cross-Stitch
  • Edible Crafts
  • Felting
  • Glass Art
  • Indie Crafts
  • Kids Crafts
  • Jewelry Making
  • Lesson Plans
  • Needlework
  • Bath & Body
  • Party Ideas
  • Candle Making
  • DIY Weddings
  • Not Craft
  • Free Craft Projects

Copyright © 2026 · CraftGossip | Start Here | Contact Us | Link to Us | Your Editors | Privacy and affiliate policy