• Home
  • Suggest A DIY
  • DIY Newsletter

Sewing

Patterns, Techniques, Articles, Blogs, and other resources to learn how to sew

  • About CraftGossip
  • Our Network
    • Bath & Body Crafts
    • Candle Making Ideas
    • Crochet Ideas
    • Cross Stitch
    • Edible Crafts
    • Felting Patterns
    • Glass Art
    • Home & Garden Ideas
    • Indie Crafts
    • Jewelry Making
    • Kids Crafts
    • Knitting Patterns
    • Lesson Plans
    • Needlework
    • Party Ideas
    • Polymer Clay
    • Quilting Ideas
    • Recycled Crafts
    • Scrapbooking
    • Sewing Patterns
    • Card Making
    • DIY Weddings
    • Not Craft Ideas
  • Giveaways
  • Roundups
  • Store
  • Search

From my studio last week: April 12, 2011

April 12, 2011 by Anne Weaver

So this week’s studio recap is a day late.  I had planned on writing it up yesterday, but the one item that I made last week was in the wash and it took until today to get it clean and dried. 

When I saw this tutorial from Making It ImMACKulate for a little girl’s spring top with a ruffled button placket, I my first thought was, “What a cute shirt for a little girl!”  And then my next thought was, “And what a cute shirt for ME!” 

Seriously.  There’s no reason why this little girl’s top wouldn’t look good on a grown-up.  My sewing project last week is my first run through Making It ImMACKulate’s spring top, with a slight modification. 

Instead of a woven, I used an old knit shirt that was in the donate pile for my test run.  If it wasn’t going to work, I didn’t want to waste any of my good fabric. 

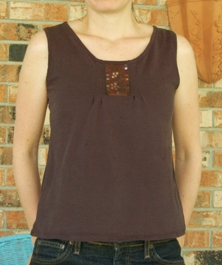
The stretchy fabric meant that I didn’t need to put the ruffled button placket down the front.  It’s super cute but I wanted to check the basic fit before putting the time into stitching down ruffles and buttons and loops. 

But without the ruffled button placket, the front looked a little plain.  I added a bit of chocolate brown ribbon – it’s mostly sheer with sparklysequins sewn here and there.

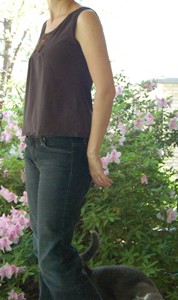
Other than the fact that I cut it a little bit too short, I am sooo happy with the fit on this shirt!  It’s loose through the midsection, but not so loose.  That’s important for pear-shaped girls like myself.  With larger hips and smaller shoulders, there’s a fine line between easy-breezy and “Are you expecting?” 

I’m definitely going to be making more of these for myself, maybe out of wovens and definitely with the pretty button placket.

Next Pattern:

  • Organizing the Perfect Sewing And Quilting Studio
  • Last Minute Felt Easter Basket
«
»

Comments

  1. Chris says

    April 12, 2011 at 3:51 pm

    The top turned out great!

  2. Debbie says

    April 13, 2011 at 4:58 am

    Nice top Anne. It looks good on you. You always inspire me.

Have you read?

Pricing Handmade Sewing Items Without Undervaluing Yourself

If there’s one topic that makes sewists uncomfortable faster than sewing zippers, it’s pricing. Not how to sew the item — but how much to charge for it once it’s finished.

Most people don’t struggle with making handmade items. They struggle with putting a price on their time, skill, and effort without feeling awkward, guilty, or worried they’ll scare buyers away.

If you’ve ever thought:
“I’m not good enough to charge that much,”
“People won’t pay handmade prices,”
or “I’ll just price it low until I get better,”

you’re not alone. But you’re also not doing yourself any favours.

Let’s talk about how to price handmade sewing items in a way that’s fair, realistic, and sustainable — without undervaluing yourself.

Why Undervaluing Your Sewing Hurts More Than You Think

Underpricing doesn’t just affect your income. It affects your motivation, your confidence, and how seriously buyers take your work.

When handmade items are priced too low:

  • You burn out faster

  • You resent the time spent making them

  • You struggle to restock

  • Buyers assume “cheap” equals “low quality”

Ironically, pricing too low can make selling harder, not easier.

Handmade sewing items aren’t competing with mass-produced factory goods. They’re competing with thoughtfulness, quality, and care — and those have value.

Start With the Real Cost (Not Just Fabric)

One of the biggest pricing mistakes beginners make is charging only for materials.

Fabric, thread, zips, interfacing, labels, packaging — these are your base costs. But they’re only the starting point.

You also need to account for:

  • Cutting time

  • Sewing time

  • Pressing and finishing

  • Packaging

  • Listing, photographing, or selling time

Even if you enjoy sewing, your time still counts.

A simple rule:
If someone else had to make this for you, what would you expect to pay them per hour?

The “Straight Line” Trap (And Why It’s Not a Problem)

Many sewists worry that because their items are “simple,” they don’t deserve higher prices.

Straight seams, basic construction, minimal shaping — these are often seen as beginner skills. But from a buyer’s perspective, simplicity is often a feature, not a flaw.

Simple items are:

  • Practical

  • Durable

  • Easy to use

  • Less intimidating

  • Often more giftable

A well-made tote bag, table runner, or pouch doesn’t lose value because it’s simple. It gains value because it works.

A Simple Pricing Formula That Actually Works

You don’t need complicated spreadsheets to price handmade sewing items.

A beginner-friendly formula looks like this:

Materials + (Hourly rate × Time) + Fees = Price

Your hourly rate doesn’t need to be high — but it does need to exist.

Even a modest rate acknowledges that your time matters.

And remember: pricing isn’t permanent. You’re allowed to adjust as you learn.

Why “Charging Less Until I’m Better” Backfires

This mindset feels sensible, but it causes long-term problems.

When you price low “for now,” you:

  • Attract bargain-focused buyers

  • Set expectations that are hard to raise later

  • Undermine your confidence

  • Train yourself to accept less

Your skill will improve through repetition, not through underpricing.

Selling handmade items is a skill too — and pricing fairly is part of learning it.

What Buyers Are Actually Paying For

Most buyers don’t analyse your stitching technique.

They’re paying for:

  • Convenience

  • Thoughtful design

  • Quality materials

  • Handmade care

  • Supporting a real person

They want something useful, well made, and ready to use — not a bargain-bin price.

When you price confidently, buyers feel more confident too.

Comparing Prices Without Panicking

It’s smart to look at what others charge — but don’t use comparison as a weapon against yourself.

Instead of asking:
“Why are they charging more than me?”

Ask:

  • Are they targeting the same customer?

  • Are they selling the same type of item?

  • Are their materials similar?

There is room for different price points. You don’t need to be the cheapest to be successful.

Pricing for Sustainability, Not Just Sales

Selling handmade items should feel rewarding, not exhausting.

If your prices don’t allow you to:

  • Replace materials

  • Restock without stress

  • Enjoy sewing

  • Take breaks

…they’re too low.

A sustainable price keeps you sewing longer — and consistency is what builds sales over time.

The Confidence Shift That Changes Everything

Instead of asking:
“Is this worth what I’m charging?”

Ask:
“Would I be proud to sell this?”

If the item is:

  • Well made

  • Useful

  • Finished with care

Then it deserves a fair price.

You don’t need permission to charge what your work is worth. You just need to believe that your time, effort, and creativity matter.

Because they do.

Book Review – Sewing to Sell – The Beginner’s Guide to Starting a Craft Business

Selling your handmade items? Here’s how to figure a fair price.

Categories

Bags and purses Children's Christmas Easter fleece Free Sewing Patterns Girl's Dress Halloween Hats Home Decor No-sew Pillows Refashions Scrap Fabric sewing Sewing Patterns Sewing Techniques Skirts Softies T-shirts

RSS More Articles

  • Everything You Need to Know About Embroidery Hoops
  • Needle Felting Fairy Tutorial by Santa Meada
  • Printable Stickers for Journals and Planners – Self Care
  • Stitch Your Favorite Fruit on a Sweater
  • 12 Color Wheel Inspired Scrapbook Layouts
  • Crafts With Old Bricks: Creative Ways To Upcycle Leftover Bricks
  • How To Make A Milk Mache Molding Compound
  • The 5 Outlet Placement Mistakes You Don’t Want to Make
  • Celebrate the Spirit of the Southwest with These Stunning Indian Navajo Tribal Quilt Patterns
  • Pricing Handmade Sewing Items Without Undervaluing Yourself

Pick Your Blog

  • Sewing
  • Knitting
  • Quilting
  • Crochet
  • Home & Garden
  • Recycled Crafts
  • Scrapbooking
  • Card Making
  • Polymer Clay
  • Cross-Stitch
  • Edible Crafts
  • Felting
  • Glass Art
  • Indie Crafts
  • Kids Crafts
  • Jewelry Making
  • Lesson Plans
  • Needlework
  • Bath & Body
  • Party Ideas
  • Candle Making
  • DIY Weddings
  • Not Craft
  • Free Craft Projects

Copyright © 2026 · CraftGossip | Start Here | Contact Us | Link to Us | Your Editors | Privacy and affiliate policy