• Home
  • Suggest A DIY
  • DIY Newsletter

Sewing

Patterns, Techniques, Articles, Blogs, and other resources to learn how to sew

  • About CraftGossip
  • Our Network
    • Bath & Body Crafts
    • Candle Making Ideas
    • Crochet Ideas
    • Cross Stitch
    • Edible Crafts
    • Felting Patterns
    • Glass Art
    • Home & Garden Ideas
    • Indie Crafts
    • Jewelry Making
    • Kids Crafts
    • Knitting Patterns
    • Lesson Plans
    • Needlework
    • Party Ideas
    • Polymer Clay
    • Quilting Ideas
    • Recycled Crafts
    • Scrapbooking
    • Sewing Patterns
    • Card Making
    • DIY Weddings
    • Not Craft Ideas
  • Giveaways
  • Roundups
  • Store
  • Search

From my studio last week: February 28, 2011

February 28, 2011 by Anne Weaver

Evidently it was “panty week” at my house last week.  I needed some new panties, and used that as an excuse to pare down the knit fabric scrap bins.  I used my larger pieces to make panties for myself, and the smaller ones to make them for my 
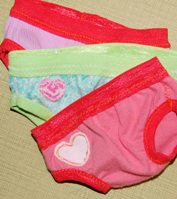
daughter’s American Girl doll.  I am soo in love with brightly colored foldover elastic!!!

Here are the panties for the American Girl doll.  The pattern is just a single piece of fabric.  I sew the elastic around the legholes and then stitch the panties together at the sides and finish off the top with unfolded elastic.  Easy, peasy.

.

.

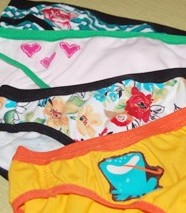
These are the four pairs I made for myself.  I had way too much fun coming up with the color schemes and the little appliques that went on each one. 

I just realized that photos of my undies are now out on the internet.  I’m sure this will come back to haunt me one day.  🙂 

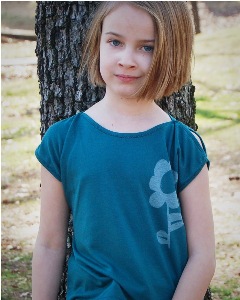
Another project from my studio last week was this top for my daughter.  It was inspired by this t-shirt from Tea Collection.  Theirs is a cute shirt, but $30 for a girl’s t-shirt is waaaay out of my budget.  I made mine for just $1 in materials. 

There are some significant differences between the two shirts.  My fabric was really lightweight and drapey, while theirs seems to have more body.  And on theirs, the shoulder seams are attached with buttons in three places, but I decided to just tack them together at the neck and armhole and let the shoulders stay open.  Little girl LOVES the peek-a-boo shoulders!

The fabric I used what just some random knit I got on discount from the chain store.  I had planned to use it just to test and refine the pattern, but it turned out that my first attempt was good enough to wear.  I used freezer paper stencil and bleach to create the flower design.  At first I was going to do a more details flower silhouette, but my daughter caught wind of my plans and asked if she could draw the flower for her shirt.  How could I say no?

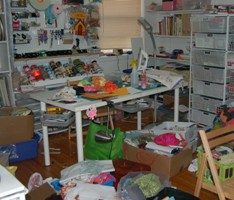
And just to give you a glimpse of what I’m up against in the studio, here’s a photo of my shame.  However cluttered or messy you think your studio is, I think I may have you beat! 

On the happy side, I did get a few square feet cleared out.  Not enough to justify an “after” photo, but enough to make it where I could at least walk into the room and use the cutting table.  (Which I did, and in the process made more mess…)

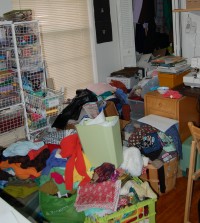
And if you think that’s bad, check out the really bad side of the room where I literally cannot walk through the piles of fabric.  Baby steps, folks…

I was thinking that I might write up a tutorial for the shirt I made for my girl.  Would that be something you’d want to see?

Next Pattern:

  • Organizing the Perfect Sewing And Quilting Studio
  • Last Minute Felt Easter Basket
«
»

Comments

  1. Nancy@Nancy's Couture says

    February 28, 2011 at 1:37 pm

    I would LOVE a tutorial for that shirt. I am in the process of making panties for myself and my daughter. Must be that time of year…LOL!

  2. Chris says

    February 28, 2011 at 1:43 pm

    LOVE the AG size undies. I need to make those for my girl’s dollies. Your studio looks like mine after a project. You are completely normal. 🙂 Happy Monday.

  3. Anna says

    February 28, 2011 at 2:28 pm

    The shirt is adorable!

    Also, do you have a linky for the AG unders?

    Thanks!

  4. Laura says

    February 28, 2011 at 2:34 pm

    LOL DD moved out of my craft room so I’m moving back in from an out door shed, my room is crazy at the moment. Just got hubby to move the big drafting table. Now I can try to sort before I start a project or three. 🙂 Loved the panties, I’ve really wanted to try them.

  5. Carolyn says

    February 28, 2011 at 2:51 pm

    I would love a tute for that shirt!

  6. Meggie says

    February 28, 2011 at 3:34 pm

    Would love a tutorial for the t-shirt! I just finished clearing away the floor in my office- organizing it is another story. I started four piles; KEEP, THROW, GIVE AWAY, and TO BE ORGANIZED

  7. Sarah @ Dolls And Daydreams says

    February 28, 2011 at 4:10 pm

    Oh my goodness your sewing room looks just like mine!!

    The T-shirt is so cute and your little girl looks very cool in it, i bet all her friends are jealous! Love the panties, still haven’t tried stretch fabric on my machine ….. hmm one day!

  8. Lisa says

    March 1, 2011 at 11:08 am

    Yeah, I’d actually be interested in a link to the AG underpants pattern, too. I have a few cousins who would probably appreciate a few pairs for their dolls.

  9. Tammy C. says

    March 18, 2011 at 8:01 pm

    That’s a super cute shirt! I’d love a tute!

  10. Shari @For the Little Doll In Your Life says

    April 19, 2011 at 7:04 pm

    I’ve been saving some of my old underwear with the intention of making some dolly underwear out of it. I would really like to hear more about how you made yours. I like how yours are not boxy looking like some other types I’ve seen online. And I’m not familiar with foldover elastic.

  11. Jodie R says

    February 9, 2012 at 12:39 pm

    I would love to get the pattern for the AG panties. I am just getting into sewing and would love to try new things.

  12. Linn says

    February 19, 2012 at 5:28 pm

    I would love the pattern for the AG undies for my Grandaughters.

  13. Kari says

    April 20, 2012 at 3:35 pm

    Is there a pattern for the AG panties? If so, how can I get one? Thanks!

  14. Andrea says

    December 19, 2012 at 10:53 am

    Can I get the pattern for the AG panties please?

  15. Lilliana Rose says

    December 20, 2012 at 11:11 am

    Would love the pattern for the AG undies and the tenny shoes made

  16. Carol says

    January 24, 2013 at 7:50 pm

    I understand baby steps. We are like minds in the sewing room.
    I would love to see a tutorial for the panties. I have been sewing 50 years and have never made undies. Mine or the dolls. Love to sew for dolly. Would love to see your directions.

  17. Kate says

    March 9, 2013 at 12:27 pm

    I would also love a pattern for the AG panties. They look fabulous!!

  18. Wendy says

    March 13, 2013 at 3:09 pm

    Do you have a pattern for the AG panties.

  19. Kay McElroy says

    March 25, 2013 at 5:37 am

    Would love the pattern for the panties for the AG doll.
    thanks

  20. Rachel says

    May 18, 2013 at 7:01 am

    Would love the pattern for the undies thank you

  21. Gloria Harris says

    May 27, 2013 at 5:08 pm

    Would also love the pattern for the undies for the ag doll, thank u

  22. Anne Meyer says

    November 30, 2013 at 6:24 pm

    I would like the pattern for the AG panties if possible. Thanks

  23. Debby Bjarnarson says

    March 12, 2014 at 7:22 am

    Do you have a pattern available for the AG undies? If so, could you please post or email the link? I absolutely love your site! Thank you for all the awesome inspiration!

    • Anne Weaver says

      March 14, 2014 at 8:48 pm

      As of now, I still haven’t made a pattern for the AG undies. I need to do it though!! If I get one made, I’ll be sure to post it here. –Anne

  24. Jean Davis says

    May 2, 2014 at 8:12 pm

    I would love to have the pattern for the AG panties. Did you ever post it?

    • Anne Weaver says

      May 3, 2014 at 7:41 am

      Jean, I still haven’t gotten around to doing that! But, I’ve just finished a course on making PDF patterns and I’m thinking I use what I’ve learned to make this pattern available. 🙂

  25. Betty says

    June 2, 2014 at 5:24 pm

    Where is the pattern for the undies? My GDs girls need some. Thanks

  26. Karen says

    June 25, 2014 at 7:42 am

    Oh those doll undies are the BEST !! They look amazing.

    PLEASE PLEASE PLEASE post a pdf of the pattern. Or even a jpeg would work… either way, just draw a sample 1″ square inside or right next to the pattern so we all can print it out and resize as needed on our own until that little 1″ square really measures 1″ in our printout.

    Thank you for your post, and for inspiring us all to make more undies for our dolls!

Have you read?

Pricing Handmade Sewing Items Without Undervaluing Yourself

If there’s one topic that makes sewists uncomfortable faster than sewing zippers, it’s pricing. Not how to sew the item — but how much to charge for it once it’s finished.

Most people don’t struggle with making handmade items. They struggle with putting a price on their time, skill, and effort without feeling awkward, guilty, or worried they’ll scare buyers away.

If you’ve ever thought:
“I’m not good enough to charge that much,”
“People won’t pay handmade prices,”
or “I’ll just price it low until I get better,”

you’re not alone. But you’re also not doing yourself any favours.

Let’s talk about how to price handmade sewing items in a way that’s fair, realistic, and sustainable — without undervaluing yourself.

Why Undervaluing Your Sewing Hurts More Than You Think

Underpricing doesn’t just affect your income. It affects your motivation, your confidence, and how seriously buyers take your work.

When handmade items are priced too low:

  • You burn out faster

  • You resent the time spent making them

  • You struggle to restock

  • Buyers assume “cheap” equals “low quality”

Ironically, pricing too low can make selling harder, not easier.

Handmade sewing items aren’t competing with mass-produced factory goods. They’re competing with thoughtfulness, quality, and care — and those have value.

Start With the Real Cost (Not Just Fabric)

One of the biggest pricing mistakes beginners make is charging only for materials.

Fabric, thread, zips, interfacing, labels, packaging — these are your base costs. But they’re only the starting point.

You also need to account for:

  • Cutting time

  • Sewing time

  • Pressing and finishing

  • Packaging

  • Listing, photographing, or selling time

Even if you enjoy sewing, your time still counts.

A simple rule:
If someone else had to make this for you, what would you expect to pay them per hour?

The “Straight Line” Trap (And Why It’s Not a Problem)

Many sewists worry that because their items are “simple,” they don’t deserve higher prices.

Straight seams, basic construction, minimal shaping — these are often seen as beginner skills. But from a buyer’s perspective, simplicity is often a feature, not a flaw.

Simple items are:

  • Practical

  • Durable

  • Easy to use

  • Less intimidating

  • Often more giftable

A well-made tote bag, table runner, or pouch doesn’t lose value because it’s simple. It gains value because it works.

A Simple Pricing Formula That Actually Works

You don’t need complicated spreadsheets to price handmade sewing items.

A beginner-friendly formula looks like this:

Materials + (Hourly rate × Time) + Fees = Price

Your hourly rate doesn’t need to be high — but it does need to exist.

Even a modest rate acknowledges that your time matters.

And remember: pricing isn’t permanent. You’re allowed to adjust as you learn.

Why “Charging Less Until I’m Better” Backfires

This mindset feels sensible, but it causes long-term problems.

When you price low “for now,” you:

  • Attract bargain-focused buyers

  • Set expectations that are hard to raise later

  • Undermine your confidence

  • Train yourself to accept less

Your skill will improve through repetition, not through underpricing.

Selling handmade items is a skill too — and pricing fairly is part of learning it.

What Buyers Are Actually Paying For

Most buyers don’t analyse your stitching technique.

They’re paying for:

  • Convenience

  • Thoughtful design

  • Quality materials

  • Handmade care

  • Supporting a real person

They want something useful, well made, and ready to use — not a bargain-bin price.

When you price confidently, buyers feel more confident too.

Comparing Prices Without Panicking

It’s smart to look at what others charge — but don’t use comparison as a weapon against yourself.

Instead of asking:
“Why are they charging more than me?”

Ask:

  • Are they targeting the same customer?

  • Are they selling the same type of item?

  • Are their materials similar?

There is room for different price points. You don’t need to be the cheapest to be successful.

Pricing for Sustainability, Not Just Sales

Selling handmade items should feel rewarding, not exhausting.

If your prices don’t allow you to:

  • Replace materials

  • Restock without stress

  • Enjoy sewing

  • Take breaks

…they’re too low.

A sustainable price keeps you sewing longer — and consistency is what builds sales over time.

The Confidence Shift That Changes Everything

Instead of asking:
“Is this worth what I’m charging?”

Ask:
“Would I be proud to sell this?”

If the item is:

  • Well made

  • Useful

  • Finished with care

Then it deserves a fair price.

You don’t need permission to charge what your work is worth. You just need to believe that your time, effort, and creativity matter.

Because they do.

Book Review – Sewing to Sell – The Beginner’s Guide to Starting a Craft Business

Selling your handmade items? Here’s how to figure a fair price.

Categories

Bags and purses Children's Christmas Easter fleece Free Sewing Patterns Girl's Dress Halloween Hats Home Decor No-sew Pillows Refashions Scrap Fabric sewing Sewing Patterns Sewing Techniques Skirts Softies T-shirts

RSS More Articles

  • Everything You Need to Know About Embroidery Hoops
  • Needle Felting Fairy Tutorial by Santa Meada
  • Printable Stickers for Journals and Planners – Self Care
  • Stitch Your Favorite Fruit on a Sweater
  • 12 Color Wheel Inspired Scrapbook Layouts
  • Crafts With Old Bricks: Creative Ways To Upcycle Leftover Bricks
  • How To Make A Milk Mache Molding Compound
  • The 5 Outlet Placement Mistakes You Don’t Want to Make
  • Celebrate the Spirit of the Southwest with These Stunning Indian Navajo Tribal Quilt Patterns
  • Pricing Handmade Sewing Items Without Undervaluing Yourself

Pick Your Blog

  • Sewing
  • Knitting
  • Quilting
  • Crochet
  • Home & Garden
  • Recycled Crafts
  • Scrapbooking
  • Card Making
  • Polymer Clay
  • Cross-Stitch
  • Edible Crafts
  • Felting
  • Glass Art
  • Indie Crafts
  • Kids Crafts
  • Jewelry Making
  • Lesson Plans
  • Needlework
  • Bath & Body
  • Party Ideas
  • Candle Making
  • DIY Weddings
  • Not Craft
  • Free Craft Projects

Copyright © 2026 · CraftGossip | Start Here | Contact Us | Link to Us | Your Editors | Privacy and affiliate policy