• Home
  • Suggest A DIY
  • DIY Newsletter

Sewing

Patterns, Techniques, Articles, Blogs, and other resources to learn how to sew

  • About CraftGossip
  • Our Network
    • Bath & Body Crafts
    • Candle Making Ideas
    • Crochet Ideas
    • Cross Stitch
    • Edible Crafts
    • Felting Patterns
    • Glass Art
    • Home & Garden Ideas
    • Indie Crafts
    • Jewelry Making
    • Kids Crafts
    • Knitting Patterns
    • Lesson Plans
    • Needlework
    • Party Ideas
    • Polymer Clay
    • Quilting Ideas
    • Recycled Crafts
    • Scrapbooking
    • Sewing Patterns
    • Card Making
    • DIY Weddings
    • Not Craft Ideas
  • Giveaways
  • Roundups
  • Store
  • Search

From my studio last week: February 28, 2011

February 28, 2011 by Anne Weaver

Evidently it was “panty week” at my house last week.  I needed some new panties, and used that as an excuse to pare down the knit fabric scrap bins.  I used my larger pieces to make panties for myself, and the smaller ones to make them for my daughter’s American Girl doll.  I am soo in love with brightly colored foldover elastic!!!
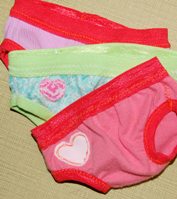
Here are the panties for the American Girl doll.  The pattern is just a single piece of fabric.  I sew the elastic around the legholes and then stitch the panties together at the sides and finish off the top with unfolded elastic.  Easy, peasy.

.

.
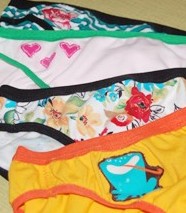
These are the four pairs I made for myself.  I had way too much fun coming up with the color schemes and the little appliques that went on each one. 

I just realized that photos of my undies are now out on the internet.  I’m sure this will come back to haunt me one day.  🙂 

Another project from my studio last week was this top for my daughter.  It was inspired by this t-shirt from Tea Collection.  Theirs is a cute shirt, but $30 for a girl’s t-shirt is waaaay out of my budget.  I made mine for just $1 in materials. 

There are some significant differences between the two shirts.  My fabric was really lightweight and drapey, while theirs seems to have more body.  And on theirs, the shoulder seams are attached with buttons in three places, but I decided to just tack them together at the neck and armhole and let the shoulders stay open.  Little girl LOVES the peek-a-boo shoulders!

The fabric I used what just some random knit I got on discount from the chain store.  I had planned to use it just to test and refine the pattern, but it turned out that my first attempt was good enough to wear.  I used freezer paper stencil and bleach to create the flower design.  At first I was going to do a more details flower silhouette, but my daughter caught wind of my plans and asked if she could draw the flower for her shirt.  How could I say no?

And just to give you a glimpse of what I’m up against in the studio, here’s a photo of my shame.  However cluttered or messy you think your studio is, I think I may have you beat! 

On the happy side, I did get a few square feet cleared out.  Not enough to justify an “after” photo, but enough to make it where I could at least walk into the room and use the cutting table.  (Which I did, and in the process made more mess…)
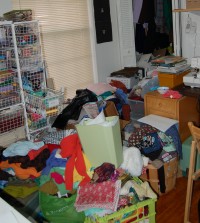
And if you think that’s bad, check out the really bad side of the room where I literally cannot walk through the piles of fabric.  Baby steps, folks…

I was thinking that I might write up a tutorial for the shirt I made for my girl.  Would that be something you’d want to see?
«
»

Comments

  1. Nancy@Nancy's Couture says

    February 28, 2011 at 1:37 pm

    I would LOVE a tutorial for that shirt. I am in the process of making panties for myself and my daughter. Must be that time of year…LOL!

  2. Chris says

    February 28, 2011 at 1:43 pm

    LOVE the AG size undies. I need to make those for my girl’s dollies. Your studio looks like mine after a project. You are completely normal. 🙂 Happy Monday.

  3. Anna says

    February 28, 2011 at 2:28 pm

    The shirt is adorable!

    Also, do you have a linky for the AG unders?

    Thanks!

  4. Laura says

    February 28, 2011 at 2:34 pm

    LOL DD moved out of my craft room so I’m moving back in from an out door shed, my room is crazy at the moment. Just got hubby to move the big drafting table. Now I can try to sort before I start a project or three. 🙂 Loved the panties, I’ve really wanted to try them.

  5. Carolyn says

    February 28, 2011 at 2:51 pm

    I would love a tute for that shirt!

  6. Meggie says

    February 28, 2011 at 3:34 pm

    Would love a tutorial for the t-shirt! I just finished clearing away the floor in my office- organizing it is another story. I started four piles; KEEP, THROW, GIVE AWAY, and TO BE ORGANIZED

  7. Sarah @ Dolls And Daydreams says

    February 28, 2011 at 4:10 pm

    Oh my goodness your sewing room looks just like mine!!

    The T-shirt is so cute and your little girl looks very cool in it, i bet all her friends are jealous! Love the panties, still haven’t tried stretch fabric on my machine ….. hmm one day!

  8. Lisa says

    March 1, 2011 at 11:08 am

    Yeah, I’d actually be interested in a link to the AG underpants pattern, too. I have a few cousins who would probably appreciate a few pairs for their dolls.

  9. Tammy C. says

    March 18, 2011 at 8:01 pm

    That’s a super cute shirt! I’d love a tute!

  10. Shari @For the Little Doll In Your Life says

    April 19, 2011 at 7:04 pm

    I’ve been saving some of my old underwear with the intention of making some dolly underwear out of it. I would really like to hear more about how you made yours. I like how yours are not boxy looking like some other types I’ve seen online. And I’m not familiar with foldover elastic.

  11. Jodie R says

    February 9, 2012 at 12:39 pm

    I would love to get the pattern for the AG panties. I am just getting into sewing and would love to try new things.

  12. Linn says

    February 19, 2012 at 5:28 pm

    I would love the pattern for the AG undies for my Grandaughters.

  13. Kari says

    April 20, 2012 at 3:35 pm

    Is there a pattern for the AG panties? If so, how can I get one? Thanks!

  14. Andrea says

    December 19, 2012 at 10:53 am

    Can I get the pattern for the AG panties please?

  15. Lilliana Rose says

    December 20, 2012 at 11:11 am

    Would love the pattern for the AG undies and the tenny shoes made

  16. Carol says

    January 24, 2013 at 7:50 pm

    I understand baby steps. We are like minds in the sewing room.
    I would love to see a tutorial for the panties. I have been sewing 50 years and have never made undies. Mine or the dolls. Love to sew for dolly. Would love to see your directions.

  17. Kate says

    March 9, 2013 at 12:27 pm

    I would also love a pattern for the AG panties. They look fabulous!!

  18. Wendy says

    March 13, 2013 at 3:09 pm

    Do you have a pattern for the AG panties.

  19. Kay McElroy says

    March 25, 2013 at 5:37 am

    Would love the pattern for the panties for the AG doll.
    thanks

  20. Rachel says

    May 18, 2013 at 7:01 am

    Would love the pattern for the undies thank you

  21. Gloria Harris says

    May 27, 2013 at 5:08 pm

    Would also love the pattern for the undies for the ag doll, thank u

  22. Anne Meyer says

    November 30, 2013 at 6:24 pm

    I would like the pattern for the AG panties if possible. Thanks

  23. Debby Bjarnarson says

    March 12, 2014 at 7:22 am

    Do you have a pattern available for the AG undies? If so, could you please post or email the link? I absolutely love your site! Thank you for all the awesome inspiration!

    • Anne Weaver says

      March 14, 2014 at 8:48 pm

      As of now, I still haven’t made a pattern for the AG undies. I need to do it though!! If I get one made, I’ll be sure to post it here. –Anne

  24. Jean Davis says

    May 2, 2014 at 8:12 pm

    I would love to have the pattern for the AG panties. Did you ever post it?

    • Anne Weaver says

      May 3, 2014 at 7:41 am

      Jean, I still haven’t gotten around to doing that! But, I’ve just finished a course on making PDF patterns and I’m thinking I use what I’ve learned to make this pattern available. 🙂

  25. Betty says

    June 2, 2014 at 5:24 pm

    Where is the pattern for the undies? My GDs girls need some. Thanks

  26. Karen says

    June 25, 2014 at 7:42 am

    Oh those doll undies are the BEST !! They look amazing.

    PLEASE PLEASE PLEASE post a pdf of the pattern. Or even a jpeg would work… either way, just draw a sample 1″ square inside or right next to the pattern so we all can print it out and resize as needed on our own until that little 1″ square really measures 1″ in our printout.

    Thank you for your post, and for inspiring us all to make more undies for our dolls!

Have you read?

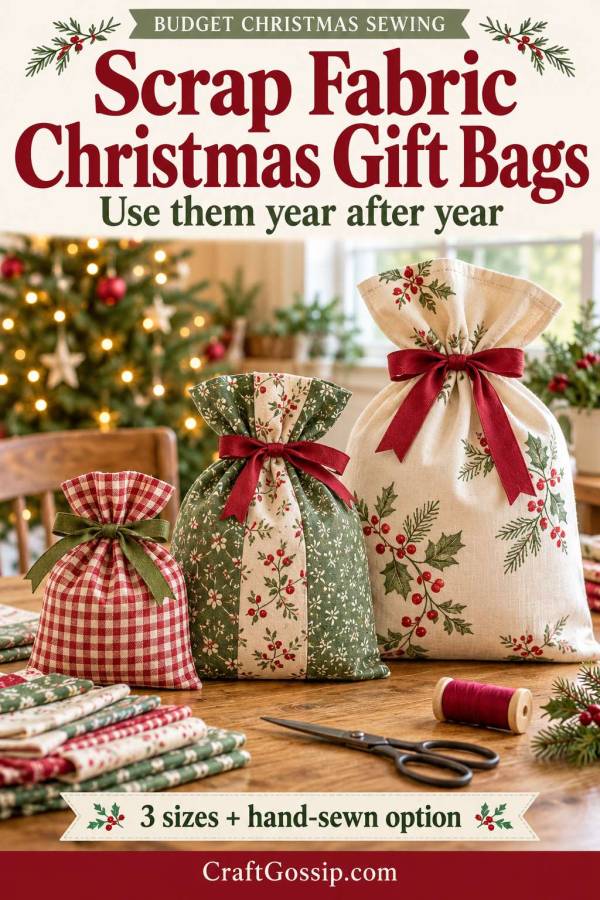
Christmas on a Budget -Scrap Fabric Christmas Gift Bags You Can Use Every Year

Christmas wrapping is one of those expenses that seems small until you add it all up. Paper, sticky tape, gift bags, bows and ribbon can take a surprising little bite out of the budget, especially when you are already trying to stretch the grocery money.

Then Christmas morning arrives, and much of it ends up in a pile beside the tree.

Reusable fabric Christmas gift bags offer a practical alternative, particularly when you make them from fabric you already own. Leftover quilting cotton, an unwanted pillowcase or the sound sections of a worn cotton shirt can become attractive wrapping that gets used again.

And no, you do not need to buy special Christmas fabric first. That rather defeats the purpose if we are trying to keep spending down.

These beginner-friendly bags use straight seams, a simple hem and a separate ribbon tie. There are no zippers, linings or drawstring channels to wrestle with. You can make them on a sewing machine or sew a small one entirely by hand.

We have shared reusable fabric gift bags in several styles before. This version keeps the construction deliberately straightforward, with the emphasis on using what you have.

Check your cupboards before buying supplies

Start with a small fabric hunt.

Look for:

  • Leftover woven cotton from sewing or quilting.
  • Unwanted cotton or cotton-blend pillowcases.
  • Sound sections of woven shirts, skirts or dresses.
  • Lightweight curtains or household linens you no longer use.
  • Ribbon saved from previous presents.
  • Cotton tape or existing fabric ties.
  • Thread in a reasonably coordinating colour.

You do not need perfectly matching thread. A neutral cream, grey or navy often works across several fabrics.

Choose textiles that you are happy to cut up. If an item is still useful as clothing or bedding, consider whether you would rather keep it, pass it on or donate it.

Wash and dry reclaimed fabric before cutting, following its care instructions. Press it flat so you can measure accurately.

Which fabrics are easiest for beginners?

A stable, medium-weight woven cotton is the easiest choice. It stays reasonably flat, presses neatly and does not stretch as you sew.

Avoid very stretchy T-shirts, slippery satin, heavily embellished clothing and fabric that has become thin or brittle. Heavy denim can be difficult to gather at the top and awkward to hand sew.

Hold pale fabric up to the light, too. If the surprise inside will be obvious, choose a more opaque fabric or keep the gift in its existing box.

Project details

Skill level: Beginner
Construction: Unlined, flat gift bag with a hemmed top and separate tie
Sizes: Small, medium and large
Sewing method: Machine or hand sewing
Seam allowance: 1 cm throughout, except for the top hem as described

These bags are wrapping, rather than shopping bags. Support heavier gifts from underneath instead of carrying them by the gathered top or ribbon.

Materials

For one bag, you will need:

  • Two fabric rectangles in your chosen size.
  • Sewing thread.
  • Ribbon, cotton tape or a fabric tie.
  • Fabric scissors.
  • Ruler or tape measure.
  • Pins or sewing clips.
  • Iron and ironing board.
  • Sewing machine or hand-sewing needle.
  • Optional fabric marker or tailor’s chalk.

A rotary cutter and cutting mat are useful if you already have them, but ordinary fabric scissors are perfectly adequate.

Three reusable gift bag sizes

Cut two rectangles for each bag.

All cutting measurements below already include the seam and hem allowances.

Bag sizeCut two rectanglesApproximate finished size, laid flat
Small22 cm wide × 29 cm tall20 cm wide × 25 cm tall
Medium32 cm wide × 44 cm tall30 cm wide × 40 cm tall
Large47 cm wide × 64 cm tall45 cm wide × 60 cm tall

The finished measurements describe the bag before you gather and tie it. Leave empty fabric above the gift so you can close the top comfortably.

The small bag suits modest items such as jewellery boxes or small craft supplies. The medium is useful for many books and folded accessories. The large can accommodate bulkier presents, depending on their shape.

Check the actual gift before cutting. A flat bag loses usable width as it wraps around a thick object.

For a rectangular box, a useful starting point is a finished flat width greater than the box’s width plus its depth. Allow height for the box, fabric passing underneath it and a generous empty section for gathering.

When in doubt, fold a piece of spare fabric around the gift first.

How to sew a scrap fabric Christmas gift bag

1. Cut your fabric

Cut two rectangles using the size chart.

Keep the longer measurement running from the top of the bag to the bottom. If your fabric has a directional print, check that the design faces upward on both panels.

The front and back do not need to match. A patterned front and plain back can look lovely and make a limited scrap go further.

2. Finish the side and bottom raw edges

For a bag that will be reused and washed, it is worth controlling fraying.

On each rectangle, finish the two long side edges and the bottom edge with a zigzag stitch or overlocker. Keep the finish close to the edge without trimming away a significant amount of fabric.

Leave the top edge unfinished for now. It will be enclosed in the hem.

If you are hand sewing, use the overcasting method explained below.

3. Hem the top of each panel

Place one rectangle wrong side up.

Fold the top edge down 1 cm toward the wrong side and press.

Fold it down another 2 cm and press again. The original raw edge should now be enclosed.

Pin or clip the hem, then stitch close to its lower folded edge.

Repeat for the second rectangle.

This is an ordinary hem, rather than a drawstring casing. The ribbon will wrap around the outside of the finished bag.

4. Sew the bag together

Place the two panels right sides together, matching the hemmed tops, sides and bottom.

Pin or clip around the sides and bottom.

Using a 1 cm seam allowance, sew down one side, across the bottom and up the other side. Leave the hemmed top open.

Backstitch at the beginning and end, especially where the side seams meet the opening.

When turning the bottom corners, stop with the needle down, lift the presser foot, turn the fabric and continue sewing.

5. Turn and press

Turn the bag right side out.

Ease the bottom corners into shape with your fingers or a blunt turning tool. Avoid pushing hard with scissors or anything sharp.

Press the bag, following the fabric’s care requirements.

The bag has a flat bottom seam and will not stand upright on its own. That keeps this version simple and easy to fold away.

If you would prefer a shaped base for boxes, our earlier fabric gift bag tutorial with boxed corners points to another construction option.

6. Add the gift and tie the top

Place the present inside and gather the empty fabric above it.

Wrap ribbon or tape around the gathered section and tie a bow.

As starting lengths, try:

  • Small bag: 60 cm.
  • Medium bag: 80 cm.
  • Large bag: 100 cm.

The length you need depends on the fullness of the bag and your preferred bow. Test with the gift inside before cutting precious ribbon.

There is no need to attach the tie. Keeping it separate makes washing easier and lets you replace it later.

How to make the bag without a sewing machine

The small bag is a manageable hand-sewing project. You can make larger sizes the same way, but they require more stitching.

Cut and press the fabric using the same measurements and folding instructions.

Finish the raw edges by hand

Use an overcast stitch along the sides and bottom of each panel.

Bring the needle through the fabric a few millimetres from the raw edge, pass the thread over the edge and repeat along it. Keep the stitches close enough to contain loose threads without pulling the edge into a tight curl.

Hand sew the top hems

Make the same 1 cm fold followed by a 2 cm fold.

Use small running stitches close to the lower folded edge to hold each hem. Secure the thread firmly at the beginning and end.

Backstitch the side and bottom seams

Place the panels right sides together and mark a stitching line 1 cm from the edges.

Use backstitch for these structural seams:

  1. Bring the needle up through the fabric a short stitch length ahead of your starting point.
  2. Insert it back at the starting point.
  3. Bring it up one stitch length beyond the previous emergence point.
  4. Insert it back where the previous stitch ended.
  5. Continue, keeping the stitches small and even.

Stitches around 2–3 mm long are a useful starting point. Secure the thread carefully at the top of each side seam.

Turn, press and tie as for the machine-sewn version.

Hand sewing takes longer, but it also lets you make a gift bag without buying equipment. A slightly wobbly seam does not stop it being useful.

Turn an unwanted pillowcase into a Christmas gift sack

A sound pillowcase can make a particularly easy large gift bag because much of the sewing is already done.

Wash it, check the seams and put the gift inside to test the fit.

If the existing opening works as a bag mouth, gather the fabric above the present and tie it with ribbon. You may not need to alter it at all.

Some pillowcases have an internal flap. Leave it in place if it is not in the way.

To make a shorter sack

Measure the depth you want from the existing opening, then add 1 cm for a new bottom seam.

Cut across both layers at that point.

Turn the pillowcase inside out, sew across the new bottom using a 1 cm seam allowance and finish the raw edges together.

Turn right side out and press.

This preserves the original opening and avoids sewing a new top hem. Check that any shortened sack still has enough empty fabric above the gift for tying.

Make gift bags from suitable clothing

Woven cotton shirts are useful sources of fabric, particularly the back panel.

Start by checking for wear, stains and thin areas. Cut around seams, darts and damaged sections.

For the simplest result:

  • Use the shirt back for one panel.
  • Cut the second panel from another sound section.
  • Keep both panels the same size.
  • Avoid bulky seams inside your seam allowances.

If you want to retain a shirt pocket, position it on the outside front of the bag. It can hold a gift tag or card.

Avoid cutting through button plackets for your first bag. Flat fabric is much easier to handle.

Choose your bag size to suit the usable material, rather than buying more fabric to match a predetermined size.

Join smaller scraps into a usable panel

Scraps can be pieced together before cutting your bag rectangles.

Sew strips together with 1 cm seam allowances, finish the raw edges and press the seams.

Once the pieced fabric is large enough, cut the bag panel to the measurement in the chart.

Remember that each join uses fabric. Two strips measuring 12 cm wide become a panel approximately 22 cm wide after joining with a 1 cm seam allowance.

Keep piecing simple. A few broad strips are quicker than dozens of tiny squares.

Save narrower leftovers for another small project, such as an easy fabric bookmark to tuck inside the bag.

Make ordinary fabric feel festive

You do not need a Christmas print.

Try:

  • A cream pillowcase bag with red ribbon.
  • Blue shirt fabric with a white tie.
  • Green cotton with a recycled card tag.
  • A floral bag with a small red fabric bow.
  • Striped fabric with a handwritten name label.

Choose one repeated colour to bring a mixed collection together.

Removable Christmas tags let the bags work for birthdays and other occasions, too.

If the bag is part of the gift, add a note saying:

“Please keep this bag and use it again.”

For bags staying within your household, make collecting and folding them part of the Christmas tidy-up.

Keep the saving

The biggest saving comes from using existing supplies and making bags you will reuse.

Before spending, ask:

  • Do I already have suitable fabric?
  • Can I use ribbon I have saved?
  • Does this bag need decoration?
  • Would a smaller bag fit the gift?
  • Am I making a useful replacement for wrapping I would otherwise buy?

Skip lining, interfacing, specialist closures and elaborate trims unless you already have them and want to use them.

Buying new fabric and equipment can make the first batch more expensive than paper wrapping. Start with a few bags from your stash and build the collection gradually.

Your time counts, too. Make one complete bag before cutting a dozen.

Caring for your reusable Christmas gift bags

Remove tags and loose ties before washing.

Follow the care requirements of the most delicate fabric used, wash with similar colours and dry completely before storing.

Check seams before each reuse and repair loose stitches while the job is small.

Keep food in appropriate food-safe packaging inside the bag. Reclaimed clothing and bedding should not become direct wrappers for homemade biscuits or fudge.

Fold the clean bags together and store them somewhere easy to find next Christmas.

A modest stack of handmade gift bags can become a lovely family tradition. They may not all match, and one might always have a slightly crooked seam, but that is part of their charm.

More importantly, they are ready when you need them, with no last-minute hunt for sticky tape.

Categories

Bags and purses Children's Christmas Easter fleece Free Sewing Patterns Girl's Dress Halloween Hats Home Decor No-sew Pillows Refashions Scrap Fabric sewing Sewing Patterns Sewing Techniques Softies T-shirts Women's

RSS feed: More Articles More Articles

  • Christmas on a Budget – How to Style Your Christmas Table Using Things You Already Own
  • The Miffy Crochet Book Review: 16 Sweet Projects for Bunny Lovers
  • Herbal Bath Soak for Muscle Relief Review
  • 10 Autumn Floral Cards
  • Knitting Machine Scarves with a Fun Twist
  • Gross Motor Math Ideas
  • 12 Free Crochet Vest Patterns for Easy, Wearable Layers
  • 5 Things To Do With That Odd Leftover Jar Of Thumbtacks
  • Crochet Octopus Patterns: Cute Minis, Squishy Plushies and Sea-Life Projects
  • 30 Handmade Christmas Gifts You Can Send in a Card or Envelope

Pick Your Blog

  • Sewing
  • Knitting
  • Quilting
  • Crochet
  • Home & Garden
  • Recycled Crafts
  • Scrapbooking
  • Card Making
  • Polymer Clay
  • Cross-Stitch
  • Edible Crafts
  • Felting
  • Glass Art
  • Indie Crafts
  • Kids Crafts
  • Jewelry Making
  • Lesson Plans
  • Needlework
  • Bath & Body
  • Party Ideas
  • Candle Making
  • DIY Weddings
  • Not Craft
  • Free Craft Projects

Copyright © 2026 · CraftGossip | Start Here | Contact Us | Link to Us | Your Editors | Privacy and affiliate policy