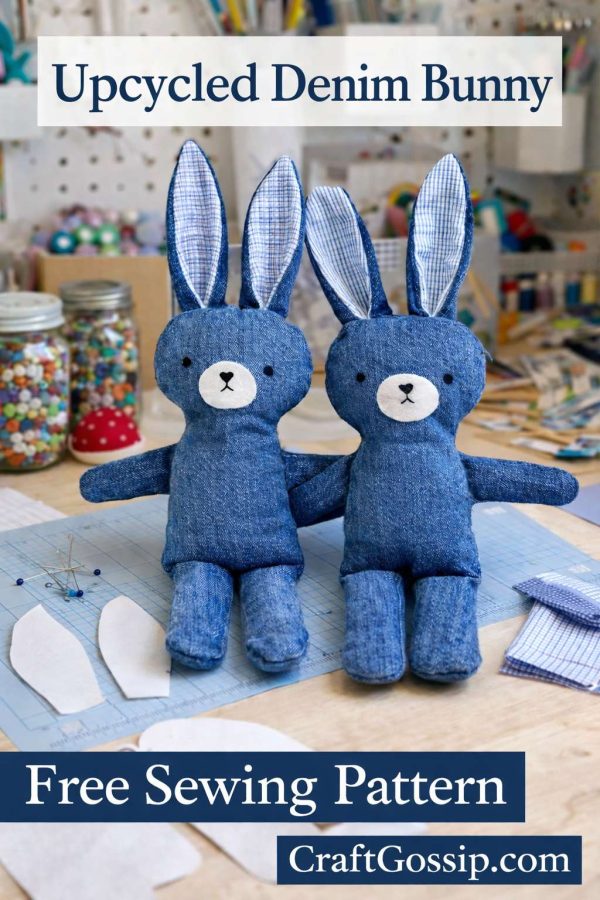
A meaningful soft toy made from upcycled clothing
Why This Bunny Makes Such a Special Keepsake
The magic of this project isn’t in the pattern—it’s in the materials.
Using old denim and a men’s business shirt adds layers of meaning:
- Denim brings durability, softness with age, and that familiar “home” feel
- Business shirts often carry memories of workdays, milestones, or routines
- Each piece of fabric already holds a story before you add a single stitch
Because the shape is deliberately basic, no two bunnies ever look the same. A knee fade becomes character. A shirt stripe becomes personality. Even the weight of the fabric affects how the bunny slouches or stands.
This project is perfect for:
- Memory toys made from a parent’s clothing
- Baby shower gifts with emotional value
- Easter keepsakes that last beyond the season
- Grandparent-made heirlooms
- Handmade toys that feel grounded, not precious
Skill Level
Beginner-friendly with room to personalise
If you can sew a straight seam and turn a project right side out, you can make this bunny. It’s also a lovely slow hand-sewing project if you prefer stitching in the evenings.
Materials
Chances are, everything you need is already in your house.
- Old denim jeans (medium-weight works best; avoid stretch denim)
- Men’s cotton business shirt (for ear inserts and optional details)
- Coordinating sewing thread
- Toy stuffing (polyfill, wool, or fabric scraps)
- Small scrap of felt or fabric for face
- Hand sewing needle
- Sewing machine (optional)
- Fabric scissors
- Pins or clips
- Paper for pattern drafting
- Pencil or fabric marker
Choosing the Right Clothing to Upcycle
Not all old clothes behave the same once they’re cut up.
For the denim:
- Look for jeans that are soft but not worn through
- Thighs and upper legs are ideal cutting areas
- Avoid thick seams when placing pattern pieces
For the shirt:
- Choose 100% cotton or cotton-blend shirts
- Shirt fronts and sleeves work beautifully for ears
- Subtle stripes or checks add lovely contrast
Washing the clothing before cutting is always a good idea—especially if it’s been stored for a while.
Finished Size
Approximately 30–35 cm tall, depending on your pattern and seam allowance.
This is a good “tuck under the arm” size—big enough to cuddle, small enough for little hands.
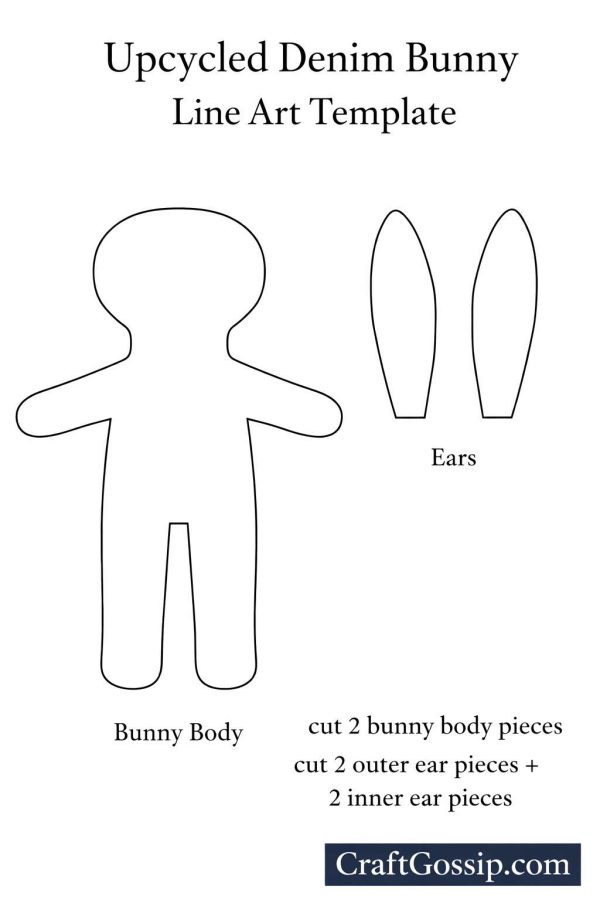
Step 1: Draft the Bunny Pattern
This pattern is intentionally uncomplicated.
Bunny Body
On paper, draw a single-piece shape that includes:
- A softly rounded head
- Straight or gently tapered sides
- Two simple leg shapes at the bottom
Think of a rounded rectangle with a split at the bottom for legs. No arms are needed—this gives the bunny its minimalist, timeless look.
Bunny Ears
Draw one long oval shape:
- Slightly wider at the base
- Narrower and softly rounded at the tip
Once you’re happy with the proportions, cut out the paper pieces.
Step 2: Cut the Fabric
From denim:
- Cut 2 bunny body pieces
- Cut 2 outer ear pieces
From the shirt:
- Cut 2 inner ear pieces
Tip: Place pattern pieces to take advantage of natural fades or stripes—this adds character without extra effort.
Step 3: Sew the Ears
Place one denim ear piece right sides together with one shirt ear piece.
Stitch around the edge, leaving the bottom open.
Turn right side out and gently finger-press the seams. You can lightly press with an iron, but don’t flatten the ear too much—softness looks better than crisp lines here.
Repeat for the second ear.
Set aside.
Step 4: Attach the Ears
Lay one bunny body piece right side up.
Position the ears at the top of the head:
- Raw edges aligned with the head edge
- Ears pointing downward toward the body
Pin securely.
Place the second bunny body piece on top, right sides together, sandwiching the ears between the layers.
Pin all the way around the bunny shape.
Step 5: Sew the Bunny Body
Sew around the bunny using a 1 cm seam allowance.
Leave a turning gap:
- Along one side, or
- At the inside of one leg
Clip curves gently around the head and between the legs to reduce bulk.
Turn the bunny right side out slowly, easing out the ears and legs.
Step 6: Stuff the Bunny
Stuffing sets the personality of this bunny.
- Start with the ears, using small amounts
- Fill the head firmly but not hard
- Keep the body and legs slightly slouchy
That relaxed posture makes the bunny feel more comforting and less stiff.
Once you’re happy with the shape, hand stitch the opening closed using a ladder stitch.
Step 7: Add the Face
The face should stay simple—this is part of the keepsake charm.
Popular options:
- Felt circles for eyes and a small oval nose
- Embroidered French knot eyes
- A tiny stitched “X” or straight-line mouth
For babies, stick to embroidered features only.
Keep the expression neutral and gentle—it ages better over time.
Optional Keepsake Touches
This is where the emotional weight really comes in.
Ideas to personalise:
- Stitch an initial onto one foot
- Add a tiny embroidered heart over the chest
- Use a shirt cuff or label as a hidden tag
- Sew a note into the seam explaining the fabric’s origin
“This bunny was made from Dad’s work shirt and the jeans Mum wore every weekend.”
Those details turn a handmade toy into a family story.
Care Instructions
Because this bunny is made from durable, everyday fabrics:
- Wash gently inside a pillowcase
- Use mild detergent
- Air dry when possible
The fabric will soften and fade further with time—and that’s part of its beauty.
Why Handmade Keepsakes Matter
Children don’t remember price tags. They remember feel.
They remember which toy smelled like home.
Which one felt right under their arm.
Which one stayed.
A bunny made from upcycled clothing carries warmth you can’t buy. It holds familiarity, comfort, and history—quietly stitched into every seam.
This isn’t a toy meant to stay perfect.
It’s meant to stay loved.