• Home
  • Suggest A DIY
  • DIY Newsletter

Sewing

Patterns, Techniques, Articles, Blogs, and other resources to learn how to sew

  • About CraftGossip
  • Our Network
    • Bath & Body Crafts
    • Candle Making Ideas
    • Crochet Ideas
    • Cross Stitch
    • Edible Crafts
    • Felting Patterns
    • Glass Art
    • Home & Garden Ideas
    • Indie Crafts
    • Jewelry Making
    • Kids Crafts
    • Knitting Patterns
    • Lesson Plans
    • Needlework
    • Party Ideas
    • Polymer Clay
    • Quilting Ideas
    • Recycled Crafts
    • Scrapbooking
    • Sewing Patterns
    • Card Making
    • DIY Weddings
    • Not Craft Ideas
  • Giveaways
  • Roundups
  • Store
  • Search

Sewing Tutorial: Buttonhole basics

July 5, 2009 by Anne Weaver

buttonholebasics

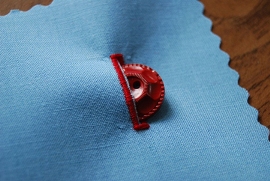
Sally from Sew Sally breaks down the basics of creating buttonholes in a simple, approachable manner that anyone can follow. For her Sew, Mama, Sew! article, she starts by emphasizing the importance of measuring your button first, as this will determine the size of your buttonhole. She recommends using a ruler and marking the fabric lightly with a pencil to ensure accuracy.

Once you’ve measured, Sally explains three methods for sewing buttonholes: using the automatic buttonhole stitch on your sewing machine, freehand stitching, and sewing by hand. She suggests that beginners start with the machine’s automatic feature, which produces consistent results, but for those without this option, the freehand method works just as well, as long as you practice first on scrap fabric.

From my own experience, I can’t stress enough the importance of stabilizing your fabric. I like to add interfacing or even a layer of lightweight fusible tape where the buttonhole will be stitched. This extra step ensures that your buttonhole doesn’t warp or stretch, giving a clean, professional finish. Also, don’t forget to always use sharp scissors or a seam ripper to open your buttonhole. There’s nothing worse than accidentally snipping your stitches!

Get the how-to.


«
»

Have you read?

How To Sew a Throw Pillow

Tired of your old and drab throw pillows that came with your couch, or maybe yours didn’t come with any and you would like some! Then I have the sewing project for you.

How to Sew a Throw pillow. This sewing project is easy that even if this is your first project I can guarantee you success at it. Plus this sewing project doesn’t take long.

Actually, it is so quick you may just make a throw pillow for each month of the year to keep it fresh and new. Start sewing your very own throw pillows today and impress your friends when they come over to visit and you can say I made those.

13 Floor Pillows to Sew for Your Home

Easy Pillow Blanket Quillow Sewing Tutorial

14 Quillows To Sew – Quilt / Pillow Sewing Patterns

Categories

Bags and purses Children's Christmas Easter fleece Free Sewing Patterns Girl's Dress Halloween Hats Home Decor No-sew Pillows Refashions Scrap Fabric sewing Sewing Patterns Sewing Techniques Softies T-shirts Women's

RSS More Articles

  • A Single Skein Shawl to Knit for Summer
  • Book Review: Dear Math, We’re Not Friends
  • 7 Easy Ways to Upgrade Plain Tomato Sauce From a Squeezy Bottle
  • The Hattitude Beanie free crochet pattern
  • FREE Palm Leaf Font for Summer
  • 10 Quilted Bag Ideas to Make with Scrap Fabrics
  • Stitch a Silly Goose Wizard
  • 14 Crochet Pumpkin Patterns for Cozy Fall Decorating
  • How to Turn Digital Stamps Into No-Line Images (Step-by-Step Guide for Cardmakers)
  • How to Make A Floral Fancy Fold Card

Pick Your Blog

  • Sewing
  • Knitting
  • Quilting
  • Crochet
  • Home & Garden
  • Recycled Crafts
  • Scrapbooking
  • Card Making
  • Polymer Clay
  • Cross-Stitch
  • Edible Crafts
  • Felting
  • Glass Art
  • Indie Crafts
  • Kids Crafts
  • Jewelry Making
  • Lesson Plans
  • Needlework
  • Bath & Body
  • Party Ideas
  • Candle Making
  • DIY Weddings
  • Not Craft
  • Free Craft Projects

Copyright © 2026 · CraftGossip | Start Here | Contact Us | Link to Us | Your Editors | Privacy and affiliate policy