• Home
  • Suggest A DIY
  • DIY Newsletter

Sewing

Patterns, Techniques, Articles, Blogs, and other resources to learn how to sew

  • About CraftGossip
  • Our Network
    • Bath & Body Crafts
    • Candle Making Ideas
    • Crochet Ideas
    • Cross Stitch
    • Edible Crafts
    • Felting Patterns
    • Glass Art
    • Home & Garden Ideas
    • Indie Crafts
    • Jewelry Making
    • Kids Crafts
    • Knitting Patterns
    • Lesson Plans
    • Needlework
    • Party Ideas
    • Polymer Clay
    • Quilting Ideas
    • Recycled Crafts
    • Scrapbooking
    • Sewing Patterns
    • Card Making
    • DIY Weddings
    • Not Craft Ideas
  • Giveaways
  • Roundups
  • Store
  • Search

Tutorial: Color your fabric with markers and alcohol inks

April 21, 2009 by Anne Weaver

scarfyoli

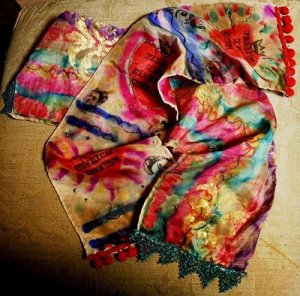
When I saw these scarves at Yoli’s Sacred Journey, I thought they must be the result of some very complex fabric dying process.  It turns out that she used permanent markers and alcohol inks. Get the tutorial.

Here is our quick guide

Coloring fabric with markers and alcohol inks is a fun and easy way to add a pop of color to your sewing projects. This tutorial will show you how to use markers and alcohol inks to create beautiful, one-of-a-kind fabric designs.

To begin, you will need a selection of markers and alcohol inks in the colors of your choice. You will also need a piece of fabric to color, preferably a light-colored, natural fabric such as cotton or linen. Be sure to pre-wash and iron the fabric before coloring to remove any sizing or starch.

Start by sketching out a design on your fabric with a pencil or fabric marker. This will help you to plan the colors and placement of your design. Once you are happy with your design, you can begin coloring your fabric.

Using the markers, color in the areas of your design that you want to be bold and bright. Be sure to use a light touch and multiple layers to build up the color.

Next, use the alcohol inks to add detail and depth to your design. The ink will flow over the surface of the fabric, creating a subtle, watercolor effect. Experiment with different techniques such as blending, layering, and blending to create different effects.

Once you are happy with your design, allow the fabric to dry completely. Once dry, you can use the fabric in your sewing projects such as making bags, pillows, or even clothes.

It’s important to note that the colors of the fabric may change or fade over time if exposed to direct sunlight or bleach. To avoid this, you can use a fabric sealer to set the ink and protect the fabric.

In conclusion, coloring fabric with markers and alcohol inks is a fun and easy way to add a pop of color to your sewing projects.


Next Pattern:

  • Book Review - Making Clothes for Your Dog: How to…
  • Wrap Your Wrists in Style: Discover Your Free Sewing…
  • Monday Musings: When Your Hobby Becomes Your Job…
«
»

Comments

  1. Yoli says

    April 21, 2009 at 8:45 am

    Thanks so much for the shot out! I will gladly return the favor!

    Yoli

  2. Pam says

    July 11, 2013 at 10:30 am

    Lovely, lovely effect sorry to be a kill joy but doesn’t the alchohol make the fabric flammable? I hope not because I would like to experiment with this for items to sell.
    Pam

    • Anne Weaver says

      July 15, 2013 at 12:44 pm

      I don’t know about whether the alcohol would make the fabric flammable. Chemistry wasn’t my thing in high school. I’d think that the alcohol would wash out in the washing machine, but that’s just my unscientific, unproven guess. You’d need to research more to determine flammability. –Anne

  3. Sandra says

    May 13, 2014 at 8:00 am

    Hi! This might be a stupid question, but does the color come off in the wash? I’d like to use this as a sort of spray tye dye effect. Thanks! The scarfs are so pretty.

    • Anne Weaver says

      May 14, 2014 at 7:05 am

      I’m not sure. I’d suggest testing it with a piece of scrap fabric to see if the colors hold. –Anne

  4. celia says

    December 31, 2015 at 5:37 am

    If you wear a scarf painted with alcohol ink and perm markers, prepare to have a very colorful neck upon removal.

  5. LK says

    September 19, 2017 at 12:09 pm

    You have to heat-set the alcohol ink. I used an iron on a silk setting and then tested by rinsing under cool water. The ink will set with heat and not run or transfer to the skin.

  6. Leigh says

    March 5, 2018 at 10:06 pm

    I do believe that, as in cooking, alcohol evaporates. So not likely flammable

  7. Hillary says

    May 7, 2022 at 5:54 am

    Would a hair dryer on high, moved slowly over the surface, seal inks on boots? I want to ink up some cheap combat boots.

Have you read?

Pricing Handmade Sewing Items Without Undervaluing Yourself

If there’s one topic that makes sewists uncomfortable faster than sewing zippers, it’s pricing. Not how to sew the item — but how much to charge for it once it’s finished.

Most people don’t struggle with making handmade items. They struggle with putting a price on their time, skill, and effort without feeling awkward, guilty, or worried they’ll scare buyers away.

If you’ve ever thought:
“I’m not good enough to charge that much,”
“People won’t pay handmade prices,”
or “I’ll just price it low until I get better,”

you’re not alone. But you’re also not doing yourself any favours.

Let’s talk about how to price handmade sewing items in a way that’s fair, realistic, and sustainable — without undervaluing yourself.

Why Undervaluing Your Sewing Hurts More Than You Think

Underpricing doesn’t just affect your income. It affects your motivation, your confidence, and how seriously buyers take your work.

When handmade items are priced too low:

  • You burn out faster

  • You resent the time spent making them

  • You struggle to restock

  • Buyers assume “cheap” equals “low quality”

Ironically, pricing too low can make selling harder, not easier.

Handmade sewing items aren’t competing with mass-produced factory goods. They’re competing with thoughtfulness, quality, and care — and those have value.

Start With the Real Cost (Not Just Fabric)

One of the biggest pricing mistakes beginners make is charging only for materials.

Fabric, thread, zips, interfacing, labels, packaging — these are your base costs. But they’re only the starting point.

You also need to account for:

  • Cutting time

  • Sewing time

  • Pressing and finishing

  • Packaging

  • Listing, photographing, or selling time

Even if you enjoy sewing, your time still counts.

A simple rule:
If someone else had to make this for you, what would you expect to pay them per hour?

The “Straight Line” Trap (And Why It’s Not a Problem)

Many sewists worry that because their items are “simple,” they don’t deserve higher prices.

Straight seams, basic construction, minimal shaping — these are often seen as beginner skills. But from a buyer’s perspective, simplicity is often a feature, not a flaw.

Simple items are:

  • Practical

  • Durable

  • Easy to use

  • Less intimidating

  • Often more giftable

A well-made tote bag, table runner, or pouch doesn’t lose value because it’s simple. It gains value because it works.

A Simple Pricing Formula That Actually Works

You don’t need complicated spreadsheets to price handmade sewing items.

A beginner-friendly formula looks like this:

Materials + (Hourly rate × Time) + Fees = Price

Your hourly rate doesn’t need to be high — but it does need to exist.

Even a modest rate acknowledges that your time matters.

And remember: pricing isn’t permanent. You’re allowed to adjust as you learn.

Why “Charging Less Until I’m Better” Backfires

This mindset feels sensible, but it causes long-term problems.

When you price low “for now,” you:

  • Attract bargain-focused buyers

  • Set expectations that are hard to raise later

  • Undermine your confidence

  • Train yourself to accept less

Your skill will improve through repetition, not through underpricing.

Selling handmade items is a skill too — and pricing fairly is part of learning it.

What Buyers Are Actually Paying For

Most buyers don’t analyse your stitching technique.

They’re paying for:

  • Convenience

  • Thoughtful design

  • Quality materials

  • Handmade care

  • Supporting a real person

They want something useful, well made, and ready to use — not a bargain-bin price.

When you price confidently, buyers feel more confident too.

Comparing Prices Without Panicking

It’s smart to look at what others charge — but don’t use comparison as a weapon against yourself.

Instead of asking:
“Why are they charging more than me?”

Ask:

  • Are they targeting the same customer?

  • Are they selling the same type of item?

  • Are their materials similar?

There is room for different price points. You don’t need to be the cheapest to be successful.

Pricing for Sustainability, Not Just Sales

Selling handmade items should feel rewarding, not exhausting.

If your prices don’t allow you to:

  • Replace materials

  • Restock without stress

  • Enjoy sewing

  • Take breaks

…they’re too low.

A sustainable price keeps you sewing longer — and consistency is what builds sales over time.

The Confidence Shift That Changes Everything

Instead of asking:
“Is this worth what I’m charging?”

Ask:
“Would I be proud to sell this?”

If the item is:

  • Well made

  • Useful

  • Finished with care

Then it deserves a fair price.

You don’t need permission to charge what your work is worth. You just need to believe that your time, effort, and creativity matter.

Because they do.

Book Review – Sewing to Sell – The Beginner’s Guide to Starting a Craft Business

Selling your handmade items? Here’s how to figure a fair price.

Categories

Bags and purses Children's Christmas Easter fleece Free Sewing Patterns Girl's Dress Halloween Hats Home Decor No-sew Pillows Refashions Scrap Fabric sewing Sewing Patterns Sewing Techniques Skirts Softies T-shirts

RSS More Articles

  • The 5 Outlet Placement Mistakes You Don’t Want to Make
  • Celebrate the Spirit of the Southwest with These Stunning Indian Navajo Tribal Quilt Patterns
  • Pricing Handmade Sewing Items Without Undervaluing Yourself
  • Tips for Teaching the Alphabet to Kids
  • Yarn Sardines T-Shirt Review – A Whimsical Gift For Yarn Lovers
  • Cropped Chunky Granny Stitch Cardigan Crochet Pattern
  • Free Butterfly Digital Stamps for Card Making, Coloring and Paper Crafts
  • 14 Masculine Card Ideas for Guys
  • Juneteenth Cross Stitch Patterns
  • Ties to Knit for Father’s Day

Pick Your Blog

  • Sewing
  • Knitting
  • Quilting
  • Crochet
  • Home & Garden
  • Recycled Crafts
  • Scrapbooking
  • Card Making
  • Polymer Clay
  • Cross-Stitch
  • Edible Crafts
  • Felting
  • Glass Art
  • Indie Crafts
  • Kids Crafts
  • Jewelry Making
  • Lesson Plans
  • Needlework
  • Bath & Body
  • Party Ideas
  • Candle Making
  • DIY Weddings
  • Not Craft
  • Free Craft Projects

Copyright © 2026 · CraftGossip | Start Here | Contact Us | Link to Us | Your Editors | Privacy and affiliate policy