• Home
  • Suggest A DIY
  • DIY Newsletter

Sewing

Patterns, Techniques, Articles, Blogs, and other resources to learn how to sew

  • About CraftGossip
  • Our Network
    • Bath & Body Crafts
    • Candle Making Ideas
    • Crochet Ideas
    • Cross Stitch
    • Edible Crafts
    • Felting Patterns
    • Glass Art
    • Home & Garden Ideas
    • Indie Crafts
    • Jewelry Making
    • Kids Crafts
    • Knitting Patterns
    • Lesson Plans
    • Needlework
    • Party Ideas
    • Polymer Clay
    • Quilting Ideas
    • Recycled Crafts
    • Scrapbooking
    • Sewing Patterns
    • Card Making
    • DIY Weddings
    • Not Craft Ideas
  • Giveaways
  • Roundups
  • Store
  • Search

Tutorial: How to take in the neck when refashioning a T-shirt or sweater

January 4, 2010 by Anne Weaver

This winter I’ve been having a ball (and saving TONS of money) refashioning adult-sized sweaters into dresses for my daughter.  (See the tutorials at Smashed Peas and Carrots, Get Your Craft On, or Make It and Love It.)  Now that we’ve created enough sweater dresses, I’m moving on to t-shirt dresses.

One limiting factor has been the size of the neck hole.  Because I’m just taking in the shirt (or sweater) at the sides and the armholes, the neck retains the original adult size.  If the neck hole is too big, it looks kind of silly on my little girl.  Well, not so little.  “Mama, I’m only 6 but I feel like a teenager.”  Yikes.  But I digress…

Anyway, yesterday the shirt that would be absolutely perfect as a dress for her had a neck that was too big.  My first thought was to pass on the project, but then I realized that a quick snip and a short seam on each shoulder would solve the problem.  Here’s how I did it:

1.  First, I cut the sleeves off of the shirt (or sweater). 
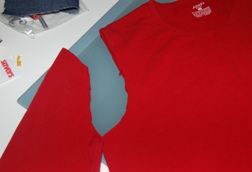
neckhole1

2.  Then, I cut along each shoulder seam from the armhole to the neck.  The serged seam allowance was bulky and in the way, so I cut that off as well.  (It’s shown still attached in this photo, but I snipped it off right afterwards.)
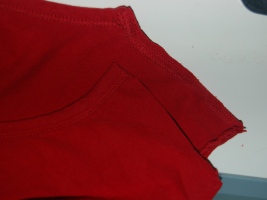
 neckhole2

3.  I pinned the shirt front to the back at the shoulders, right sides together.  Most necks are shaped so that the bulk of the hole is oriented toward the front.  This is where I needed to take in the neck, so I offset it so that the top of the back shoulder pieces (shown as the top layer in the photo) were about 1/2 inch below the fronts. 
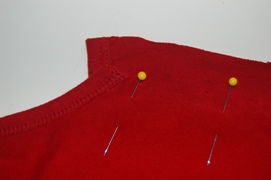
neckhole3

When you pin the shoulders together, make sure that the neck edges align at the place where your seam will be sewn.  In the picture below, I show where my stitching line would be.  See how the neck binding on the front and back pieces meets at that imaginary line?  That will create a smooth line between the two pieces.
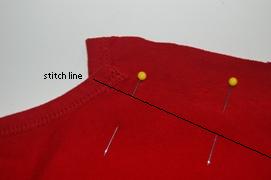
neckhole3_lines

4. This is the shoulder sewn back together.  The edges meet up nicely.
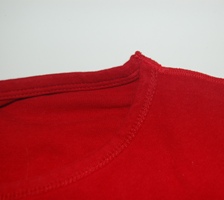
neckhole4

«
»

Comments

  1. Cathi says

    October 15, 2010 at 2:22 pm

    I have been trying to figure out how to do this for years ! thank you! I’m guessing you could add the sleeve back on by sewing a new seam lenghwise on the sleeve so where it attaches to the armhole will fit?

    • anneweaver says

      October 16, 2010 at 6:22 pm

      Whenever I refashion as shirt, I end up cutting off the sleeves. I cut new armholes that fit me (or my daughter) better, and then recut the sleeves to match. When I take in the neckline, I do it after I’ve cut off the sleeves, but before I cut the new armhole. Then it’s just business as usual setting in the sleeve.

  2. Marlene says

    August 12, 2015 at 7:41 am

    I wanted to decrease the depth of the ‘scoop’ on my tee shirt. I was thinking of making a loose running stitch and pulling the thread slightly, to make the neckline the way I’d like. I’ll give my idea a try before trying the cut and re-sew technique (which is a lot more work). I have several tee shirts that I want to fix necklines. [In case you’re wondering why I don’t want a deep neckline, I had open heart surgery and the scar shows unless the neckline is high enough. I am self conscious about it.]

  3. Martha says

    January 29, 2016 at 1:49 am

    This sounds like a very good idea. I just wish the instructions were more clear. It seems a bit confusing. Is there any way you could add better details?

Have you read?

Baby Lock Sewing Machines Labor Day Sale – Save 10%

If a new sewing or embroidery machine has been sitting on your wish list, this might be the little nudge you needed.

The Baby Lock Labor Day Sale is on now, with 10% off qualifying machines and accessories through September 8, 2026. You’ll also receive free shipping on orders over $100.

That includes sewing machines, embroidery machines, quilting machines, sergers, hoops, feet, stabilisers and plenty of those clever little accessories we always seem to convince ourselves we absolutely need.

Shop the Baby Lock Labor Day Sale here

If you’re new to machine embroidery, have a read through the embroidery tip that fixes most stitching problems before starting. Baby Lock also has a large collection of free sewing and embroidery projects, with ideas for beginners through to experienced stitchers.

The sale ends September 8, so it’s worth taking a look now if you were already planning to upgrade your machine or add a few accessories to your sewing room.

This post contains affiliate links. CraftGossip may earn a small commission if you make a purchase, at no extra cost to you. The offer applies to qualifying online purchases. Exclusions and full Baby Lock promotional terms apply.

Categories

Bags and purses Children's Christmas Easter fleece Free Sewing Patterns Girl's Dress Halloween Hats Home Decor No-sew Pillows Refashions Scrap Fabric sewing Sewing Patterns Sewing Techniques Softies T-shirts Women's

RSS More Articles

  • Baby Lock Sewing Machines Labor Day Sale – Save 10%
  • How To Make A Simple Beaded Necklace Without A Clasp
  • Pumpkin Worksheets for Kids
  • Free Pumpkin Spice Digital Stamps for Fall Card Making and Paper Crafts
  • 25 Adult-Friendly Halloween Crafts For A Spooky, Stylish Handmade Home
  • 13 Whimsical Witchy Halloween Card Ideas
  • DIY Margarita Face Scrub – A Zesty Skincare Treat for Glowing Summer Skin
  • Gourds to Stitch for Harvest Time
  • 10 Halloween Scrapbook Layout Templates with Fun Shape-Based Designs
  • Book Review – Needle Felting Miniatures for Beginners

Pick Your Blog

  • Sewing
  • Knitting
  • Quilting
  • Crochet
  • Home & Garden
  • Recycled Crafts
  • Scrapbooking
  • Card Making
  • Polymer Clay
  • Cross-Stitch
  • Edible Crafts
  • Felting
  • Glass Art
  • Indie Crafts
  • Kids Crafts
  • Jewelry Making
  • Lesson Plans
  • Needlework
  • Bath & Body
  • Party Ideas
  • Candle Making
  • DIY Weddings
  • Not Craft
  • Free Craft Projects

Copyright © 2026 · CraftGossip | Start Here | Contact Us | Link to Us | Your Editors | Privacy and affiliate policy