• Home
  • Suggest A DIY
  • DIY Newsletter

Sewing

Patterns, Techniques, Articles, Blogs, and other resources to learn how to sew


CraftGossip.com may earn a commission when you buy through links on our site.
  • About CraftGossip
  • Our Network
    • Bath & Body Crafts
    • Candle Making Ideas
    • Crochet Ideas
    • Cross Stitch
    • Edible Crafts
    • Felting Patterns
    • Glass Art
    • Home & Garden Ideas
    • Indie Crafts
    • Jewelry Making
    • Kids Crafts
    • Knitting Patterns
    • Lesson Plans
    • Needlework
    • Party Ideas
    • Polymer Clay
    • Quilting Ideas
    • Recycled Crafts
    • Scrapbooking
    • Sewing Patterns
    • Stamping
    • DIY Weddings
    • Not Craft Ideas
  • Giveaways
  • Popular Halloween Crafts
  • Roundups
  • Christmas
  • Search

Tutorial: How to take in the neck when refashioning a T-shirt or sweater

January 4, by Anne Weaver. 4 Comments

This winter I’ve been having a ball (and saving TONS of money) refashioning adult-sized sweaters into dresses for my daughter.  (See the tutorials at Smashed Peas and Carrots, Get Your Craft On, or Make It and Love It.)  Now that we’ve created enough sweater dresses, I’m moving on to t-shirt dresses.

One limiting factor has been the size of the neck hole.  Because I’m just taking in the shirt (or sweater) at the sides and the armholes, the neck retains the original adult size.  If the neck hole is too big, it looks kind of silly on my little girl.  Well, not so little.  “Mama, I’m only 6 but I feel like a teenager.”  Yikes.  But I digress…

Anyway, yesterday the shirt that would be absolutely perfect as a dress for her had a neck that was too big.  My first thought was to pass on the project, but then I realized that a quick snip and a short seam on each shoulder would solve the problem.  Here’s how I did it:

1.  First, I cut the sleeves off of the shirt (or sweater).  neckhole1

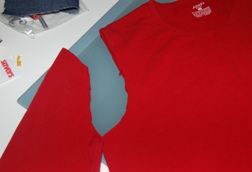
2.  Then, I cut along each shoulder seam from the armhole to the neck.  The serged seam allowance was bulky and in the way, so I cut that off as well.  (It’s shown still attached in this photo, but I snipped it off right afterwards.) neckhole2

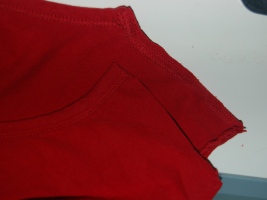
3.  I pinned the shirt front to the back at the shoulders, right sides together.  Most necks are shaped so that the bulk of the hole is oriented toward the front.  This is where I needed to take in the neck, so I offset it so that the top of the back shoulder pieces (shown as the top layer in the photo) were about 1/2 inch below the fronts.  neckhole3

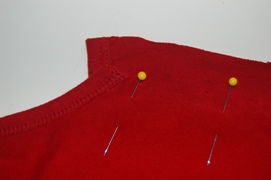
When you pin the shoulders together, make sure that the neck edges align at the place where your seam will be sewn.  In the picture below, I show where my stitching line would be.  See how the neck binding on the front and back pieces meets at that imaginary line?  That will create a smooth line between the two pieces.neckhole3_lines

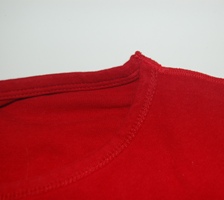
4. This is the shoulder sewn back together.  The edges meet up nicely.neckhole4

Next Pattern:

  • Best tips for refashioning old clothes into looks…
  • Sewing pattern: Mend a hole in a sweater
«
»

Comments

  1. Cathi says

    October 15, 2010 at 2:22 pm

    I have been trying to figure out how to do this for years ! thank you! I’m guessing you could add the sleeve back on by sewing a new seam lenghwise on the sleeve so where it attaches to the armhole will fit?

    Reply
    • anneweaver says

      October 16, 2010 at 6:22 pm

      Whenever I refashion as shirt, I end up cutting off the sleeves. I cut new armholes that fit me (or my daughter) better, and then recut the sleeves to match. When I take in the neckline, I do it after I’ve cut off the sleeves, but before I cut the new armhole. Then it’s just business as usual setting in the sleeve.

      Reply
  2. Marlene says

    August 12, 2015 at 7:41 am

    I wanted to decrease the depth of the ‘scoop’ on my tee shirt. I was thinking of making a loose running stitch and pulling the thread slightly, to make the neckline the way I’d like. I’ll give my idea a try before trying the cut and re-sew technique (which is a lot more work). I have several tee shirts that I want to fix necklines. [In case you’re wondering why I don’t want a deep neckline, I had open heart surgery and the scar shows unless the neckline is high enough. I am self conscious about it.]

    Reply
  3. Martha says

    January 29, 2016 at 1:49 am

    This sounds like a very good idea. I just wish the instructions were more clear. It seems a bit confusing. Is there any way you could add better details?

    Reply

Leave a Reply to Marlene Cancel reply

Have you read?

Peanut Jumpsuit Sewing Pattern

DIY Daybed Pillow with Arms – Sewing Tutorial

How to Make Continuous Bias Tape – Sewing Tutorial

My Nest Swaddle Sack Sleep Pattern

Lined Canvas Zipper Pouch – DIY Sewing Tutorial

Support Us


Trending popular ideas

Sewing Pattern : Easy fabric carrots
12 Cute Easter Sewing Projects to Make for Kids
Sewing Patterns - 15 Women's Shorts You Can Sew
Sewing Pattern - Womens high-waist wide-leg trousers
Mary Jane Baby Shoes - Free Sewing Pattern
Sorting and Storing Fabric Scraps
DIY Reusable Swiffer Duster Cloth - Easy Sewing Tutorial
Easy Striped Rag Blanket - Sewing Tutorial
Big Easter Bunny Plushie Sewing Pattern
Free Sewing pattern: Summer Frock for little girls

RSS From The Network

  • How to make a colorful recycled newspaper fringe banner
  • Easter Chick Punch Needle Pattern
  • Peanut Jumpsuit Sewing Pattern
  • DIY Daybed Pillow with Arms – Sewing Tutorial
  • Leprechaun Crafts for Kids
  • Easy Easter Egg Placemat Pattern
  • Faux Inlay Technique
  • Sunshine Layout
  • Love You With All My Heart Crochet Blanket
  • 21 Peacock Crafts For Kids To Make

Categories

Aprons Baby Bags and purses Blankets Bunny Children's Christmas Sewing Patterns Clutch Denim Easter Fabric fleece Girl's Dress Girl's Skirt Hair accessories Halloween Hats Hems Home Decor Hot Pad jeans Kitchen modern No-sew Organization Pets Pillows Pincushions quilts Refashions Scrapbusters Scrap Fabric sewing Sewing Patterns & Tutorials Sewing Techniques Skirts Small pouches Softies spring T-shirts Tabletop Totes Valentine's Day Vintage Patterns Women's

Copyright © 2021 · CraftGossip | Start Here | Contact Us | Link to Us | Your Editors | Privacy and affiliate policy