• Home
  • Suggest A DIY
  • DIY Newsletter

Sewing

Patterns, Techniques, Articles, Blogs, and other resources to learn how to sew

  • About CraftGossip
  • Our Network
    • Bath & Body Crafts
    • Candle Making Ideas
    • Crochet Ideas
    • Cross Stitch
    • Edible Crafts
    • Felting Patterns
    • Glass Art
    • Home & Garden Ideas
    • Indie Crafts
    • Jewelry Making
    • Kids Crafts
    • Knitting Patterns
    • Lesson Plans
    • Needlework
    • Party Ideas
    • Polymer Clay
    • Quilting Ideas
    • Recycled Crafts
    • Scrapbooking
    • Sewing Patterns
    • Card Making
    • DIY Weddings
    • Not Craft Ideas
  • Giveaways
  • Roundups
  • Store
  • Search

Tutorial: Pleated burlap tree skirt, #JustAddMichaels

November 4, 2013 by Anne Weaver

Tutorial: Pleated burlap tree skirt

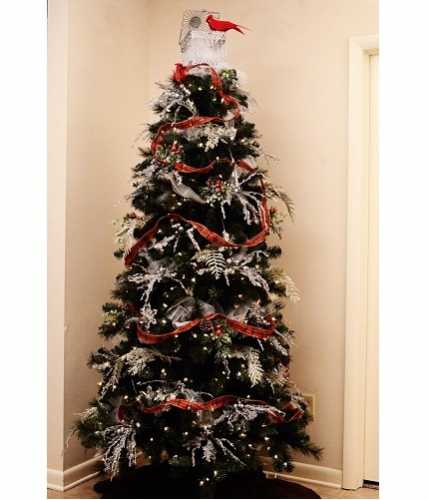
Today I’m going to show you how I made the pleated burlap tree skirt for my Michaels Dream Tree.  My theme was an Icy Woodland Dream Tree, inspired by the beauty of an ice-encrusted tree.

Tutorial: Pleated burlap tree skirt, #JustAddMichaels

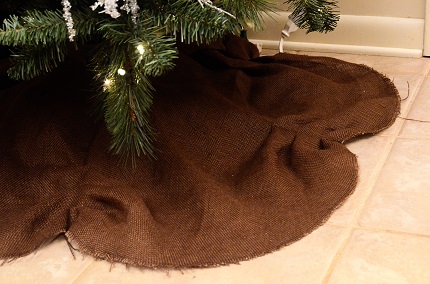
I was able to find all the icy, sparkly ornaments and picks I needed to decorate the tree at my Michaels store.  For the skirt, I wanted to make something that mimics the ground underneath a tree.  The chocolate brown burlap was just what I needed!  You can find the burlap in the sewing section, in precut Crafty Cuts.  I added pleats in five places around the sides to give it a scalloped edge and to also add some dimension to the top of the skirt.

Pleated burlap tree skirt tutorial

This tree skirt is super easy to make.  I made it in less than an hour, and that was with me figuring out the steps along the way.  I keep the edges raw so there’s no having to fiddle with hemming a curve, but I do stitch around the edge to keep the burlap from fraying too badly.

Materials:

— 44” square piece of burlap (1 Crafty Cuts pack will give you enough to make this square, and have some left over for another project)

— matching thread

— 2” Velcro

How to make it:

1.  Fold the burlap in half and then in half again to make a square, 22” x 22”.

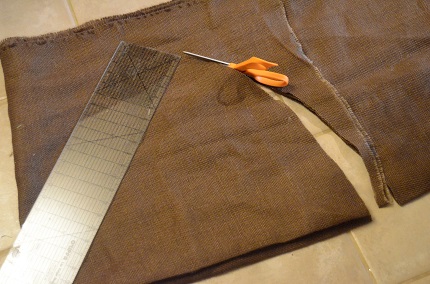
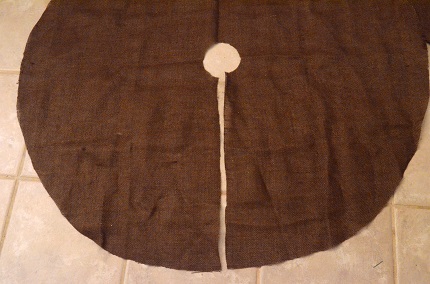
2.  Cut the folded fabric into a circle (actually, it’s a quarter of a circle) with the double-folded corner at the center.  Your curve doesn’t have to be perfect.  I used a ruler to mark 22” from the center point and then rotated it around as I cut.
Tutorial: Pleated burlap tree skirt, #JustAddMichaels

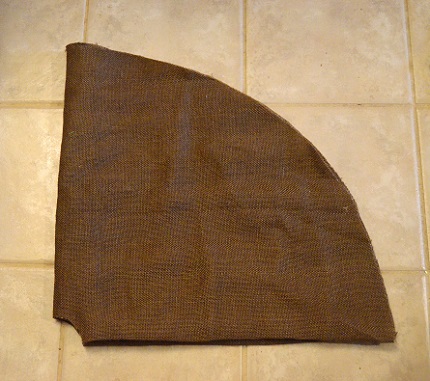
3.  With your big circle of fabric still folded into quarters, cut a smaller circle (again, really just a quarter of a circle) from the double-folded corner.  The radius for this circle should be a little less than 2”.
Tutorial: Pleated burlap tree skirt, #JustAddMichaels

4.  Unfold the circle and cut a slit from the outside edge to the hole cut out of the center.  I used a crease from when it was folded as a guide to keep my line straight.
Tutorial: Pleated burlap tree skirt, #JustAddMichaels

5.  Now, go to the sewing machine and stitch around the whoooooole thing, ¼” from the edge. This will keep the burlap from fraying.

6.  Stitch your Velcro pieces to either side of the slit, just below the circle opening.

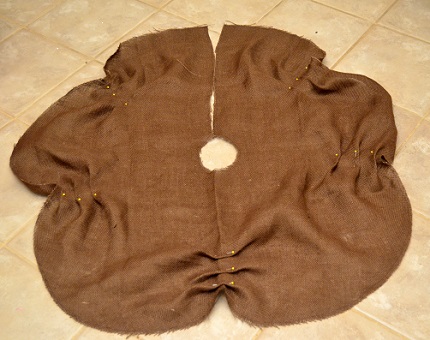
7.  Now for the pleats.  At five evenly spaced places around the edge of the tree skirt, fold and pin three large pleats.  This will gather the sides up to create a scalloped edge and give the skirt a little dimension.
Tutorial: Pleated burlap tree skirt, #JustAddMichaels

8.  Stitch the pleats down with a single line of stitching down the middle.

That’s all it takes to make a simple burlap skirt!  Wrap it around the bottom of your tree.
Tutorial: Pleated burlap tree skirt, #JustAddMichaels


Tutorial: Pleated burlap tree skirt, #JustAddMichaels

«
»

Have you read?

AITA for Charging Extra for Rush Orders (Even Though I Work From Home)

Dear Crafty Readers,

“I run my sewing business from home. I don’t have a shopfront. I don’t clock in and out. I just sew in my own space, around my own schedule.

And because of that, people assume I’m endlessly flexible.

When someone needs something urgently, they’ll ask if I can ‘just squeeze it in.’ They’ll message late at night. They’ll explain how important the deadline is to them.

I started charging a rush fee.

And that’s when the pushback began.

‘But you’re already home.’
‘It shouldn’t cost more if you’re not travelling anywhere.’
‘Can’t you just do it this once?’

A few people have acted genuinely offended — like I’m being greedy or unreasonable.

Now I’m second-guessing myself.

Am I the asshole for charging extra for rush orders, even though I work from home?

— Anonymous

If you’ve ever felt awkward adding a rush fee — or tempted to waive it just to avoid tension — you’re not alone.

This question cuts right to the heart of how creative, home-based work is still misunderstood.

Why “Working From Home” Changes How People Treat You

There’s a strange assumption that if you work from home, your time is somehow more flexible — or less valuable.

People often think:

  • You’re already there

  • You can just reshuffle things

  • You’re not “really” inconvenienced

What they don’t see is that home-based work still has:

  • Schedules

  • Commitments

  • Limits

  • Personal time

Being at home doesn’t mean being on call.

What a Rush Order Actually Costs You

A rush order isn’t just about sewing faster.

It often means:

  • Dropping other work

  • Rearranging personal plans

  • Sewing late into the evening

  • Working under pressure

  • Carrying someone else’s urgency

That urgency has a cost — even if it doesn’t show up on a receipt.

“But It’s Just One Item…”

This phrase is another familiar one.

A rush order is rarely just one item. It’s the mental load that comes with:

  • Watching the clock

  • Worrying about deadlines

  • Rushing decisions

  • Feeling responsible for someone else’s timing mistake

That pressure deserves compensation — not guilt.

Why Rush Fees Feel Uncomfortable to Charge

Many sewists hesitate to add rush fees because:

  • They don’t want to seem difficult

  • They fear losing the sale

  • They worry about appearing greedy

But a rush fee isn’t a punishment. It’s a boundary.

It tells customers: This is possible, but it costs more because it costs me more.

The Double Standard Around Creative Work

Interestingly, rush fees are widely accepted in other industries.

People expect to pay more for:

  • Express shipping

  • Same-day services

  • Last-minute bookings

But when it comes to handmade or creative work, that logic often disappears — especially when the work happens at home.

That double standard puts unnecessary pressure on makers.

When Waiving Rush Fees Backfires

Many sellers learn this the hard way.

When you don’t charge extra for urgency:

  • Rush orders become expected

  • Boundaries blur quickly

  • Stress increases

  • Resentment builds

What starts as flexibility can quietly turn into burnout.

Is Charging Extra Unfair — or Honest?

This is where opinions really split.

Some readers will say:

  • “A rush fee is completely reasonable.”

Others might argue:

  • “If you can do it, why charge more?”

And a few will admit:

  • “I never thought about the impact of urgency.”

All of those perspectives exist — and they’re worth hearing.

So… Are They the Asshole?

There’s no universal answer here.

But there is an important question underneath it all:

Should working from home mean giving up control over your time?

For many sewists, the answer is a firm no.

Over to You, Crafty Readers 

Now it’s your turn — and this one tends to spark strong opinions.

  • Do you charge rush fees?

  • Have you ever felt guilty enforcing them?

  • As a buyer, would you expect to pay more for urgency?

  • Or do you think rush fees are unnecessary?

 Scroll down and join the discussion.
This is one of those topics where lived experience really matters.

(And if you’ve got a sewing dilemma of your own, you can submit it anonymously to Sewing.CraftGossip — sometimes the hardest part is asking the question.)


Categories

Bags and purses Children's Christmas Easter fleece Free Sewing Patterns Girl's Dress Halloween Hats Home Decor No-sew Pillows Refashions Scrap Fabric sewing Sewing Patterns Sewing Techniques Softies T-shirts Women's

RSS More Articles

  • Free Felted Woodland Mini Mending Pattern Review
  • Free Felting Tutorial Friday: Needle Felted Dragonfly
  • Knit a Hood for Your Fall Wanderings
  • Book Review: Borders
  • How to Make a Cute Teddy Bear Mini Journal
  • United We Stitch Invites Quilters and Textile Artists to Imagine the Future of Democracy
  • Free Plaid Crochet Throw Pattern Review
  • How to Make a DIY Detox Hair and Scalp Mask for Product Buildup
  • AITA for Charging Extra for Rush Orders (Even Though I Work From Home)
  • Cross Stitch a Job and Get a Jump on Holiday Crafting

Pick Your Blog

  • Sewing
  • Knitting
  • Quilting
  • Crochet
  • Home & Garden
  • Recycled Crafts
  • Scrapbooking
  • Card Making
  • Polymer Clay
  • Cross-Stitch
  • Edible Crafts
  • Felting
  • Glass Art
  • Indie Crafts
  • Kids Crafts
  • Jewelry Making
  • Lesson Plans
  • Needlework
  • Bath & Body
  • Party Ideas
  • Candle Making
  • DIY Weddings
  • Not Craft
  • Free Craft Projects

Copyright © 2026 · CraftGossip | Start Here | Contact Us | Link to Us | Your Editors | Privacy and affiliate policy