• Home
  • Suggest A DIY
  • DIY Newsletter

Sewing

Patterns, Techniques, Articles, Blogs, and other resources to learn how to sew

  • About CraftGossip
  • Our Network
    • Bath & Body Crafts
    • Candle Making Ideas
    • Crochet Ideas
    • Cross Stitch
    • Edible Crafts
    • Felting Patterns
    • Glass Art
    • Home & Garden Ideas
    • Indie Crafts
    • Jewelry Making
    • Kids Crafts
    • Knitting Patterns
    • Lesson Plans
    • Needlework
    • Party Ideas
    • Polymer Clay
    • Quilting Ideas
    • Recycled Crafts
    • Scrapbooking
    • Sewing Patterns
    • Card Making
    • DIY Weddings
    • Not Craft Ideas
  • Giveaways
  • Roundups
  • Store
  • Search

How to Put an invisible zipper foot on your Sewing machine

August 17, 2009 by Anne Weaver

invisiblezipperfoot

If the instructions on the little plastic invisible zipper feet leave you confused or frustrated, then take a look at this tutorial offered by Coats & Clark’s Sewing Secrets blog.  (This blog is no longer activie and re-directs) We were able to find this tips and tricks section of the new page.

They give step-by-step instructions and plenty of photographs to show you how to get the invisible zipper foot on to your machine.  Here is another helpful tutorial we found for Zipper foots.


Next Pattern:

  • The Coziest DIY You Need – Lavender Rice Heating Pad…
  • Sew a Buttonhole Using a Buttonhole Foot
  • Best Thread Color For Invisible Repairs
«
»

Comments

  1. D M says

    June 7, 2014 at 9:46 pm

    Where is the darn tutorial for putting the invisible zipper foot on your machine?

    • Anne Weaver says

      June 8, 2014 at 7:37 am

      I hear you! Definitely a tutorial I’ll keep my eye out for. The last time I tried to put an invisible zipper on my machine, I spent over an hour fiddling with all the pieces. I finally just gave up and stitched the zipper down with a regular presser foot.

      • Judy Holmes says

        May 1, 2016 at 12:09 am

        I bought a zipper foot last year and threw out the instructuins when i had sewn the zip. Now I want to sew another zip this year but I have forgotten how to attach the zipper foot. I cannot find (except for the photo) where you have a video of this.
        Judy

  2. Ruth Miller says

    September 1, 2014 at 3:38 pm

    The link is imbedded in the text.
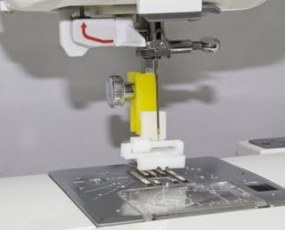
    Second from the link which is weird I figured out.. The yellow in my case goes on the white Slipping in where the x part is into the white.. Then this yellow bit slides over the metal column then you screw the screw back into place

    • barbara D says

      January 16, 2020 at 8:13 pm

      except that it doesn’t lead to the tutorial. I get sent to the yarnspirations website, and no tutorial to be found. I can buy a foot there, but don’t need one, I already have the foot, just need to know how to put it on my new machine.

      • Shellie Wilson says

        January 27, 2020 at 5:24 pm

        Looks like they have changed their website completely. We have made some updates to the post to reflect that.

Have you read?

Pricing Handmade Sewing Items Without Undervaluing Yourself

If there’s one topic that makes sewists uncomfortable faster than sewing zippers, it’s pricing. Not how to sew the item — but how much to charge for it once it’s finished.

Most people don’t struggle with making handmade items. They struggle with putting a price on their time, skill, and effort without feeling awkward, guilty, or worried they’ll scare buyers away.

If you’ve ever thought:
“I’m not good enough to charge that much,”
“People won’t pay handmade prices,”
or “I’ll just price it low until I get better,”

you’re not alone. But you’re also not doing yourself any favours.

Let’s talk about how to price handmade sewing items in a way that’s fair, realistic, and sustainable — without undervaluing yourself.

Why Undervaluing Your Sewing Hurts More Than You Think

Underpricing doesn’t just affect your income. It affects your motivation, your confidence, and how seriously buyers take your work.

When handmade items are priced too low:

  • You burn out faster

  • You resent the time spent making them

  • You struggle to restock

  • Buyers assume “cheap” equals “low quality”

Ironically, pricing too low can make selling harder, not easier.

Handmade sewing items aren’t competing with mass-produced factory goods. They’re competing with thoughtfulness, quality, and care — and those have value.

Start With the Real Cost (Not Just Fabric)

One of the biggest pricing mistakes beginners make is charging only for materials.

Fabric, thread, zips, interfacing, labels, packaging — these are your base costs. But they’re only the starting point.

You also need to account for:

  • Cutting time

  • Sewing time

  • Pressing and finishing

  • Packaging

  • Listing, photographing, or selling time

Even if you enjoy sewing, your time still counts.

A simple rule:
If someone else had to make this for you, what would you expect to pay them per hour?

The “Straight Line” Trap (And Why It’s Not a Problem)

Many sewists worry that because their items are “simple,” they don’t deserve higher prices.

Straight seams, basic construction, minimal shaping — these are often seen as beginner skills. But from a buyer’s perspective, simplicity is often a feature, not a flaw.

Simple items are:

  • Practical

  • Durable

  • Easy to use

  • Less intimidating

  • Often more giftable

A well-made tote bag, table runner, or pouch doesn’t lose value because it’s simple. It gains value because it works.

A Simple Pricing Formula That Actually Works

You don’t need complicated spreadsheets to price handmade sewing items.

A beginner-friendly formula looks like this:

Materials + (Hourly rate × Time) + Fees = Price

Your hourly rate doesn’t need to be high — but it does need to exist.

Even a modest rate acknowledges that your time matters.

And remember: pricing isn’t permanent. You’re allowed to adjust as you learn.

Why “Charging Less Until I’m Better” Backfires

This mindset feels sensible, but it causes long-term problems.

When you price low “for now,” you:

  • Attract bargain-focused buyers

  • Set expectations that are hard to raise later

  • Undermine your confidence

  • Train yourself to accept less

Your skill will improve through repetition, not through underpricing.

Selling handmade items is a skill too — and pricing fairly is part of learning it.

What Buyers Are Actually Paying For

Most buyers don’t analyse your stitching technique.

They’re paying for:

  • Convenience

  • Thoughtful design

  • Quality materials

  • Handmade care

  • Supporting a real person

They want something useful, well made, and ready to use — not a bargain-bin price.

When you price confidently, buyers feel more confident too.

Comparing Prices Without Panicking

It’s smart to look at what others charge — but don’t use comparison as a weapon against yourself.

Instead of asking:
“Why are they charging more than me?”

Ask:

  • Are they targeting the same customer?

  • Are they selling the same type of item?

  • Are their materials similar?

There is room for different price points. You don’t need to be the cheapest to be successful.

Pricing for Sustainability, Not Just Sales

Selling handmade items should feel rewarding, not exhausting.

If your prices don’t allow you to:

  • Replace materials

  • Restock without stress

  • Enjoy sewing

  • Take breaks

…they’re too low.

A sustainable price keeps you sewing longer — and consistency is what builds sales over time.

The Confidence Shift That Changes Everything

Instead of asking:
“Is this worth what I’m charging?”

Ask:
“Would I be proud to sell this?”

If the item is:

  • Well made

  • Useful

  • Finished with care

Then it deserves a fair price.

You don’t need permission to charge what your work is worth. You just need to believe that your time, effort, and creativity matter.

Because they do.

Book Review – Sewing to Sell – The Beginner’s Guide to Starting a Craft Business

Selling your handmade items? Here’s how to figure a fair price.

Categories

Bags and purses Children's Christmas Easter fleece Free Sewing Patterns Girl's Dress Halloween Hats Home Decor No-sew Pillows Refashions Scrap Fabric sewing Sewing Patterns Sewing Techniques Skirts Softies T-shirts

RSS More Articles

  • Everything You Need to Know About Embroidery Hoops
  • Needle Felting Fairy Tutorial by Santa Meada
  • Printable Stickers for Journals and Planners – Self Care
  • Stitch Your Favorite Fruit on a Sweater
  • 12 Color Wheel Inspired Scrapbook Layouts
  • Crafts With Old Bricks: Creative Ways To Upcycle Leftover Bricks
  • How To Make A Milk Mache Molding Compound
  • The 5 Outlet Placement Mistakes You Don’t Want to Make
  • Celebrate the Spirit of the Southwest with These Stunning Indian Navajo Tribal Quilt Patterns
  • Pricing Handmade Sewing Items Without Undervaluing Yourself

Pick Your Blog

  • Sewing
  • Knitting
  • Quilting
  • Crochet
  • Home & Garden
  • Recycled Crafts
  • Scrapbooking
  • Card Making
  • Polymer Clay
  • Cross-Stitch
  • Edible Crafts
  • Felting
  • Glass Art
  • Indie Crafts
  • Kids Crafts
  • Jewelry Making
  • Lesson Plans
  • Needlework
  • Bath & Body
  • Party Ideas
  • Candle Making
  • DIY Weddings
  • Not Craft
  • Free Craft Projects

Copyright © 2026 · CraftGossip | Start Here | Contact Us | Link to Us | Your Editors | Privacy and affiliate policy