
I know there are tons of fabric flower tutorials out there, but I thought I’d add one of my own to the mix.
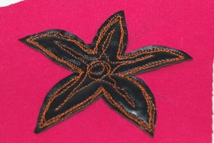
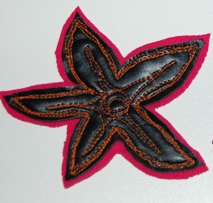
It’s made from two stacked layers, each of which is free-motion stitched with a bright orange thread. The top of each layer is shiny black vinyl repurposed from a broken pair of boots a friend gave me. The vinyl is stitched down to scraps of t-shirt knit I had left over from previous refashion projects, and the button is from my random button jar. So the materials for this flower cost me nothing. I love freebie projects!!
What you need:
— small piece of vinyl – you can buy some from the fabric store, but I love old make-up bags (and broken boots!) for things like this
— small piece of t-shirt knit
— button for the center
Now, how to put it together:

1. Cut out a couple of flower shapes from the vinyl, one large and one small. Keep the shapes fairly simple.
2. Use free-motion stitching to stitch each flower to knit fabric. You’ll need to drop the feed dogs and use a free-motion or darning foot if you have one. It has a wide open circle at the bottom that allows you to see where you’re stitching. Mine looks like this:
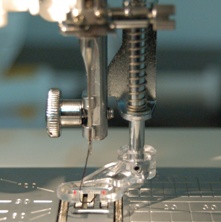
If you’ve never done free-motion stitching before, you’ll probably want to practice a little on a scrap of fabric to get a feel for it. With the feed dogs down, you can stitch in any direction – forward, backward, left, right, however you want. However, the down side is that you don’t have the feed dogs helping regulate your stitch size. To get smooth lines and even stitches, you need to balance the speed of the needle (how far you’re pressing down your foot pedal) with how fast you’re moving the fabric. The faster the needle and the slower the fabric moves, the smaller the stitches.

Start at the center of the flower with a small spiral.

Then stitch lines down the center of each petal.
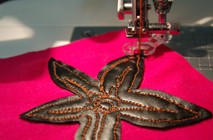
Then stitch all the way around the flower, roughly 1/8″ from the edge.
Unless you’re a free-motion superstar, your lines will probably be wonky and wavy. That’s fine. Just go around the flower two more times and the wonky lines will blend together and look all artistic.
3. Trim around the flowers, leaving a 1/8″ border of knit.
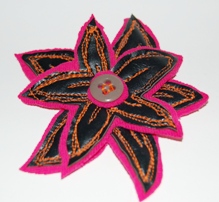
4. Stack the small flower on top of the larger one. Take a few hand stitches by hand to secure them together, then stitch a button in the center. I added a circle of knit under the button for a little extra “pop”.
If the thick layers are too difficult to stitch through, you could always just stitch the button to the top layer, and then use glue to hold the layers together.
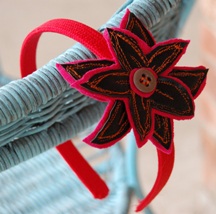
Your flower is done! Stitch (or glue) a pin blank to the back to make a brooch, or put in on a headband for a fun hair accessory.


Great tutorial. I especially like the instructions for free motion quilting.