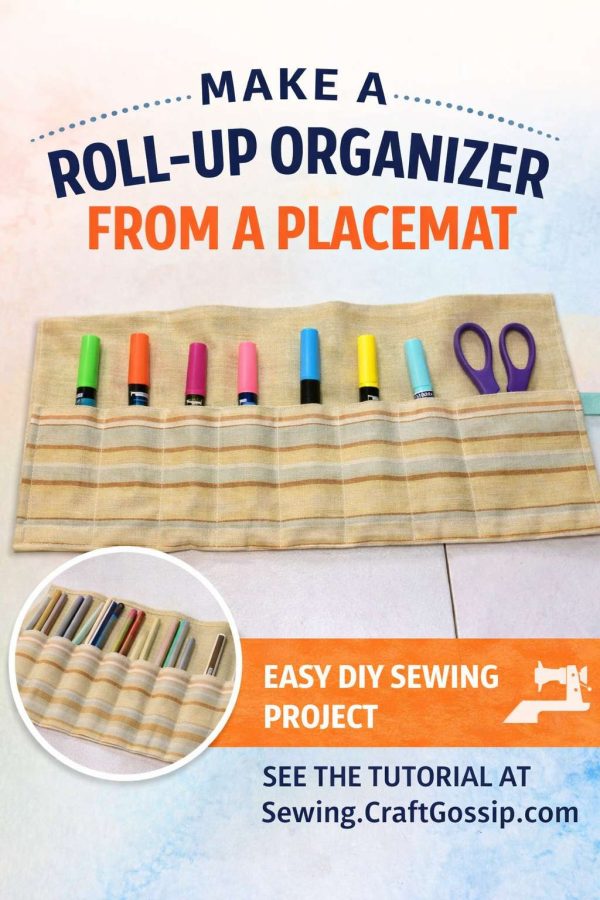
If your sewing room (or kitchen drawer… or craft tote) is bursting at the seams, this roll-up organizer made from a placemat might be exactly what you need. It’s one of those deceptively simple sewing projects that looks far more impressive than the time it takes to make—and it’s perfect for using items you already have at home.
This placemat roll-up organizer tutorial is ideal for storing crochet hooks, knitting needles, paintbrushes, pencils, makeup brushes, or even cutlery for picnics and travel. If you’ve ever wished for a portable, tidy way to keep long tools from rattling around loose in a bag, this project ticks all the boxes.
Best of all? You don’t need advanced sewing skills or expensive supplies. A sturdy placemat does most of the work for you.
Why a Placemat Makes the Perfect Organizer Base
Placemats are one of my favourite “hidden gem” sewing supplies. They’re already quilted or reinforced, usually have finished edges, and come in endless styles—from modern cotton prints to rustic woven textures. That means less prep work and a faster finish.
Using a placemat as the base gives your roll-up organizer enough structure to protect tools while still being flexible enough to roll neatly and tie closed.
This is also a fantastic upcycling sewing project. Old placemats, thrift store finds, or even mismatched table linens can all be turned into something genuinely useful.
What You Can Store in a Roll-Up Organizer
This placemat organizer is wonderfully versatile. Depending on how you size the pockets, it works beautifully for:
- Knitting needles and crochet hooks
- Sewing tools like scissors, rulers, and rotary cutters
- Art supplies such as paintbrushes or markers
- Makeup brushes for travel
- Kids’ colouring tools
- Picnic cutlery or reusable straws
Once you make one, you’ll probably find yourself making a second—and a third.
Supplies You’ll Need
You won’t need much for this project, which makes it perfect for a quick afternoon sew.
- 1 sturdy placemat
- Coordinating fabric for pockets (optional if your placemat already has layers)
- Sewing machine
- Thread
- Pins or clips
- Measuring tape or ruler
- Ribbon, twill tape, or fabric ties
That’s it. No special tools, no tricky notions.
How the Roll-Up Placemat Organizer Comes Together
The basic construction is refreshingly straightforward. The placemat forms the backing, while a folded strip of fabric creates the pockets. Vertical stitching divides the pockets into sections sized to fit your tools.
Once the pockets are stitched in place, you add ties to one side of the placemat so the organizer can roll up neatly and stay closed. When rolled, everything is visible, secure, and easy to grab—no more digging through bags.
This project is especially forgiving, which makes it great for beginner sewists or anyone looking for a quick, satisfying make.
Make It Your Own
One of the nicest things about this sewing tutorial is how easy it is to customise.
- Adjust pocket widths for specific tools
- Use contrast thread for a decorative look
- Add a flap at the top for extra security
- Embroider names or labels for gifting
- Make matching sets for craft fairs or handmade gifts
These also make brilliant handmade presents for teachers, knitters, artists, or anyone who loves being organised (or needs a little help getting there).
A Practical Sewing Project You’ll Actually Use
This roll-up organizer from a placemat is one of those projects that quietly becomes indispensable. It’s tidy, portable, adaptable, and endlessly useful—whether it lives in your sewing room, your handbag, or your suitcase.
If you’re looking for an easy sewing project that combines organisation with creativity, this one is well worth adding to your to-make list.
Just one fold and a handful of straight seams, and you’re done. Dollar Store Crafts shows how to do it. Change up the size of the pockets to make it an organizer for markers, make-up brushes, knitting needles, etc. Get the tute.
Nice! Very practical. I love things that are made from other things. I also recreated placemats into something else: small totebags / purses. Check it out here, if you like: http://wp.me/p2XTOJ-42