• Home
  • Suggest A DIY
  • DIY Newsletter

Sewing

Patterns, Techniques, Articles, Blogs, and other resources to learn how to sew

  • About CraftGossip
  • Our Network
    • Bath & Body Crafts
    • Candle Making Ideas
    • Crochet Ideas
    • Cross Stitch
    • Edible Crafts
    • Felting Patterns
    • Glass Art
    • Home & Garden Ideas
    • Indie Crafts
    • Jewelry Making
    • Kids Crafts
    • Knitting Patterns
    • Lesson Plans
    • Needlework
    • Party Ideas
    • Polymer Clay
    • Quilting Ideas
    • Recycled Crafts
    • Scrapbooking
    • Sewing Patterns
    • Card Making
    • DIY Weddings
    • Not Craft Ideas
  • Giveaways
  • Roundups
  • Store
  • Search

Sewing Tutorial: Sidewalk tic tac toe toss game

June 25, 2015 by Anne Weaver

Tutorial: Sidewalk tic tac toe toss game

Tutorial: Sidewalk tic tac toe toss game

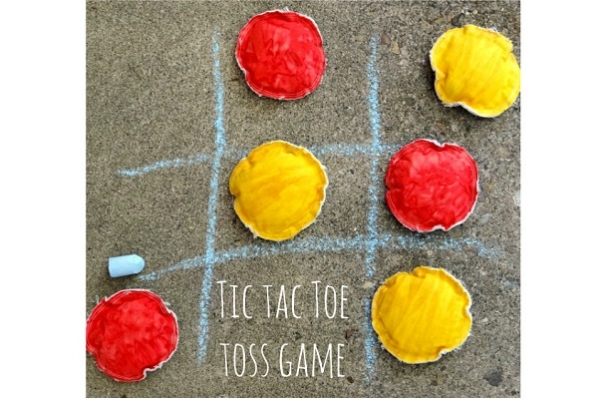
Becky from Patchwork Posse shares a tutorial at Skip To My Lou showing how you can make a sidewalk tic tac toe set.  The gameboard gets drawn on the sidewalk with chalk, with players tossing in colored beanbags to take the spaces.  Kids can play again and again and again using the same chalked tic tac toe board.  And if I know anything about kids, they’ll start out playing tic tac toe, but pretty soon they’ll start inventing new rules and maybe an entirely new way to play with the beanbag tic tac toe pieces.

Click below for her tutorial:

Tic Tac Toe Toss Game, by Patchwork Posse

[photo from Patchwork Posse on Skip To My Lou]

If you are looking for fun active games to get the kids moving, I highly recommend this Floor Is Lava Board Game

Sidewalk chalk is a great way to entertain the kids and you don’t need to buy it. It is so easy to make at home and inexpensive too. Sidewalk chalk is great for adults who like to draw or doodle too. Grab the kids and find some concrete sit down and have fun.

Looking for more sidewalk chalk crafts? Check out these articles we wrote featuring Sidewalk chalk tutorials, ideas and activities too.   We have a popular recipe over on our site too – DIY Sidewalk Chalk .

Making and using sidewalk chalk became very popular in 2020 as decorations and drawings were placed on the streets by children during the lockdown. If you are looking to make your own chalk check out this Sidewalk Chalk paint Kit it uses liquid chalk for squeezing and painting rather than hand drawing with solid sidewalk chalk.
«
»

Have you read?

Easy Halloween Fabric Candy Basket Beginner Sewing Pattern for Trick-or-Treating

There’s something about Halloween that makes handmade projects feel extra special. Maybe it’s the nostalgia, maybe it’s the excuse to pull out bold fabrics you’d never use any other time of year. This fabric Halloween candy basket is one of those simple sewing projects that feels festive without being fussy—and it’s sturdy enough to survive a proper trick-or-treat haul.

If you’re looking for an easy Halloween sewing project for beginners, this fabric candy basket ticks all the boxes. It’s quick to make, uses straight seams only, and can be reused year after year. No plastic pumpkin buckets cracking in the heat, no noisy handles dragging along the footpath—just a soft, practical basket that actually holds a decent amount of lollies.

Why Sew a Fabric Halloween Candy Basket?

Reusable fabric Halloween baskets are a great alternative to store-bought trick-or-treat buckets. They’re lightweight for kids, easy to personalise, and much nicer to store once Halloween is over.

This pattern is ideal if you:

  • Want a beginner-friendly Halloween sewing project 
  • Prefer reusable, eco-friendly alternatives 
  • Need a last-minute costume accessory 
  • Like projects that work for multiple seasons 

Once Halloween is over, these baskets also work beautifully for toy storage or dress-up accessories.

Finished Size

Approx. 8 inches wide x 5 inches tall
(Handle not included in height)

This size is perfect for candy, small toys, glow sticks, and all the treasures kids collect on Halloween night.

What You’ll Need

  • Halloween-themed quilting cotton for basket exterior 
  • Coordinating cotton fabric for lining 
  • Matching or contrasting fabric for handle 
  • Fusible fleece or medium-weight interfacing 
  • Matching sewing thread 
  • Sewing machine 
  • Scissors or rotary cutter 
  • Pins or clips 
  • Iron 

Optional: walking foot if your machine struggles with layers

Halloween Fabric Ideas That Work Well

This is where you can have some fun.

Great exterior fabric choices:

  • Black with white stars or moons 
  • Orange prints with subtle texture 
  • Small bats, spiders, or pumpkins 
  • Black-and-white stripes for a modern Halloween look 

For the lining, try:

  • Polka dots 
  • Candy-themed prints 
  • Bold contrast colours (lime green, purple, orange) 

Avoid very large novelty prints—small-scale patterns look better once the basket is sewn.

Cutting Instructions

Basket Exterior
Cut 1 rectangle: 10” x 16”

Basket Lining
Cut 1 rectangle: 10” x 16”

Interfacing
Cut 1 rectangle: 10” x 16”

Handle
Cut 1 rectangle: 4” x 16”
Cut 1 rectangle of interfacing: 4” x 16”

Step-by-Step Sewing Instructions

Step 1: Prepare the Basket Exterior

Fuse interfacing to the wrong side of the exterior fabric.

Fold the fabric in half with right sides together so the short ends meet.
Sew the side seam using a ¼” seam allowance.
Press the seam open.

Step 2: Box the Bottom Corners

With the basket still inside out, flatten one bottom corner so the side seam lines up with the bottom fold.

Measure 2” across the corner and draw a straight line.
Sew along the line.
Trim excess fabric.

Repeat on the opposite corner.

Step 3: Sew the Lining

Repeat Step 1 and Step 2 using the lining fabric.

Important: leave a 3” opening along the side seam for turning later.

Step 4: Make the Handle

Fuse interfacing to the wrong side of the handle fabric.

Fold handle lengthwise with right sides together.
Sew along the long edge.
Turn right side out and press flat.

Topstitch along both long edges for strength—Halloween baskets get dragged, swung, and overfilled.

Step 5: Attach the Handle

Pin handle ends to the right side of the basket exterior, centred on opposite sides.

Double-check the handle isn’t twisted.
Baste the handle ends in place.

Step 6: Assemble the Basket

Place the basket exterior inside the lining, right sides together.

Match side seams and pin around the top edge.
Sew around the top edge.

Step 7: Turn & Press

Turn the basket right side out through the lining opening.

Push lining inside basket and press the top edge neatly.

Step 8: Finish

Topstitch around the top edge to secure the lining.

Close the lining opening with a hand stitch or a neat machine stitch.

Your Halloween fabric candy basket is complete and ready for trick-or-treating.

Easy Halloween Customisation Ideas

  • Add a name using iron-on vinyl or embroidery 
  • Use glow-in-the-dark thread for topstitching 
  • Shorten the handle for toddlers 
  • Make matching baskets for siblings 
  • Coordinate basket fabric with a costume 

This pattern also works brilliantly as a Halloween party favour basket or table decoration.

Beginner Tips for Success

  • Quilting cotton is easiest to work with 
  • Press after every step for a cleaner finish 
  • Use heavier interfacing if you want a sturdier basket 
  • Don’t overthink perfection—Halloween fabric hides a lot

Categories

Bags and purses Children's Christmas Easter fleece Free Sewing Patterns Girl's Dress Halloween Hats Home Decor No-sew Pillows Refashions Scrap Fabric sewing Sewing Patterns Sewing Techniques Softies T-shirts Women's

RSS More Articles

  • Easy Halloween Fabric Candy Basket Beginner Sewing Pattern for Trick-or-Treating
  • Book Review: Once in a Blue Moon
  • 12 Scrapbook Layouts with Stenciled Backgrounds
  • Why Brava Yarn Is a Great Choice for Crochet Projects
  • Jelly Roll Gems Quilt Kit Featuring Handmade Sweetness by My Sew Quilty Life
  • Easy Thanksgiving Turkey Finger Painting Craft for Kids
  • I’m The Bomb Bath Bomb Maker T-Shirt Review – A Fun Gift For Bath Bomb Makers
  • Halloween Sampler Cross Stitch Patterns
  • Video Ribbon Embroidery Tutorials for French Knots
  • Book Review: Knits for Little Ones

Pick Your Blog

  • Sewing
  • Knitting
  • Quilting
  • Crochet
  • Home & Garden
  • Recycled Crafts
  • Scrapbooking
  • Card Making
  • Polymer Clay
  • Cross-Stitch
  • Edible Crafts
  • Felting
  • Glass Art
  • Indie Crafts
  • Kids Crafts
  • Jewelry Making
  • Lesson Plans
  • Needlework
  • Bath & Body
  • Party Ideas
  • Candle Making
  • DIY Weddings
  • Not Craft
  • Free Craft Projects

Copyright © 2026 · CraftGossip | Start Here | Contact Us | Link to Us | Your Editors | Privacy and affiliate policy