
I promised you a tutorial for making the Peek-a-Boo Shoulder Shirt, and here it is! This really is a quick, easy shirt to make. With no set-in sleeves, it’s just two pieces of fabric with edges bound and sewn together at the sides and sleeves. Seriously, easy. And with this style of shirt showing up all over the mall and boutique-y stores, I’m sooo going to be making a bunch of these for the little girl.
It’s easy enough to make out of jersey knit yardage, but even easier if you use a repurposed t-shirt (no hemming required!). You can bind the edges with the knit, or do what I did and use foldover elastic.
And speaking of foldover elastic – do you know much I LOVE LOVE LOVE foldover elastic? I love it for shirts, for panties, for anything stretchy that needs a finished edge. Especially elastic in pretty candy colors, like the mint green I used on this shirt. It makes the edges POP.
You can find a number of sources online for foldover elastic, but I order my foldover from Hobovian on Etsy. (If you send her an email request to her at Hobovian@ebay or Hobovian@etsy, she’ll mail you free samples of the colors in her shop.)
Remember how I said yesterday that I had a little suprise up my sleeve? Well, Hobovian has generously offered to give away a 5-piece sampler pack of her fabulous elastic to 10 lucky Craft Gossip readers. Each pack will include 5 5-yard lengths of foldover, for a total of 25 yards. Awesome!!! If you haven’t used foldover already, you’ll be hooked after just one project. And if you already use foldover, then you know how much fun it can be.
Go to the giveaway and get yourself entered, then come back to this post for the tutorial for the Peek-a-Boo Shoulder Shirt. Deadline for entry is March 16, 2011.
Now, on to the tutorial…
First, gather your materials.
You’ll need either jersey knit yardage or a t-shirt large enough to cut your pieces. (Size needed will depend on the size of shirt you’re making.) You’ll also need some foldover elastic to bind the edges. I used less than 2 yards to bind the edges in the child’s size 6 shirt I made.
Now that you’ve got your materials, let’s draft the pattern.
This is a super easy pattern to draft. Get a t-shirt that fits and draw a boxy short-sleeve shape using the t-shirt as a guide.
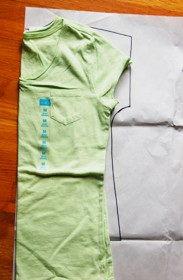 You’ll notice that the one I drew is wider than the shirt. That’s because I used a shirt that’s fairly fitted and I wanted the shirt I’m making to be boxy and loose.
You’ll also notice that I didn’t draw a separate front and back. The front and the back are the same shape, except for the neckline. If you cut the pattern on the taller (back) neckline, then you can cut two pieces at the same time and then adjust the neck on one of them to make the front.
Now let’s sew this baby together.
1. Adjust the neckline on the front piece, making sure that the neck will be big enough to go over the head. I check this by pinning the shirt together at the shoulders and sliding it over the head. If it’s too tight, just cut the neck deeper or wider.
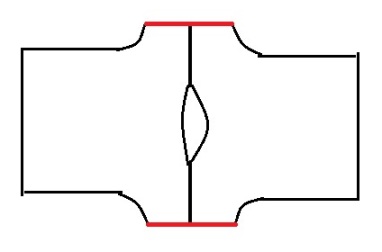
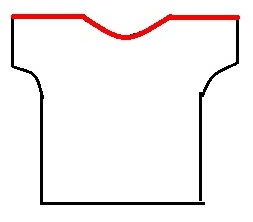 2. Bind the top edges of each t-shirt piece with foldover elastic or knit fabric. (Bind the edges marked with red in the handy-dandy roughly-drawn diagram.)
If you’ve never used foldover elastic before, it’s really simple to do. There’s a line woven down the middle of the elastic. This is the fold line. Wrap the elastic around the edge of the fabric with the fold line aligned with the edge of the fabric. Hold it in place with your hands and zig zag it in place. Easy peasy. If you want to see how it’s done, check out this video tutorial by Grosgrain. Her video shows the elastic being stretched as it’s applied. This will create a gathered edge. For this project, we want a smooth edge so don’t pull the elastic as you stitch it down.
If you don’t have any foldover, you could also bind the edges with strips of knit fabric. This binding tutorial at Gorgeous Things shows how to do it.
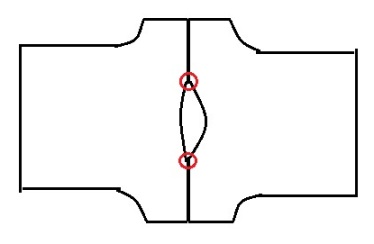 3. Tack the front to the back at the neck with a couple of hand stitches. You’ll need to overlap the two pieces slightly.
.
.
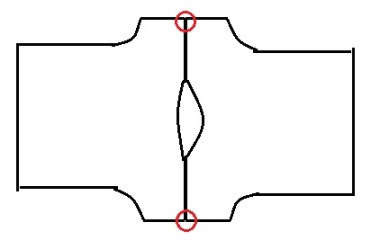 4. Now tack them together at the sleeve bottoms just like you did at the neck.
You may need to trim a little off the ends to make the front and back exactly the same length before doing this step.
.
 5. It’s time for some more binding. This time, bind the bottoms of the sleeves.
.
.
.
.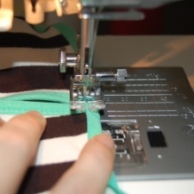 The binding will cover up the handstitches where you tacked the sleeves together, making it look like it all magically comes together at the bottom. (Photo of me stitching the sleeve binding on my Janome MC6300P.)
.
.
6. Lay the shirt out flat, with right sides together. Sew the side seams.
7. If you used a repurposed shirt, you’re done. If you working with yardage, fold up a small hem and stitch it in place with a zig zag.
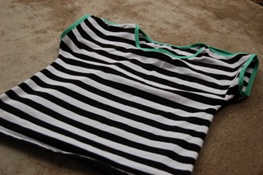 See? I told you it was easy!!
If you make a shirt out of my tutorial, I’d love to see it! Email me at [email protected] with links to photos of your finished Peek-a-Boo shirts.


Uh, Hello, I think I love you. I’m totally gonna make some of these for all three of the ladies in our house- Mommy, 18 month old diva, and the new princess due in April. And they may all be matching. Thanks!!
No reason we can’t make that for ourselves, too, right? And you’re so right, it really IS all over the malls. I just went shopping for the first time in ages and I remember thinking, oh heck, I could make that!
Thanks again for a great tute!
I am gonna make some of these for my daughters,they are gonna love them!! Thanks for the tutorial and the giveaway!!
wonderful and stylish. thanks for sharing with us.
Love the tut – very clear & easy to understand – no little girls around and I don’t dare go sleeveless but just wanted to let you know I really enjoyed the tut ….