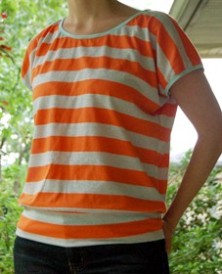
Here it is – the long overdue tutorial for making my Slouchy Shirt.
 It’s a simple loose-fitting t-shirt gathered on to a fitted band at the hips. It looks more dressed up than a plain tee, but it also happens to be incredibly comfortable. Shhh… it’ll be our little secret.
As an added bonus, these shirts are also quick and easy to make. Now that I’ve got the process down I can make one in just 30 minutes. I wonder if it would be obnoxious to be seen wearing one every day of the week?
Let’s make one!
Added 4/28/2014: I now have a downloadable PDF pattern for The Slouchy Shirt.
Gather your supplies:
Approximately 1 yard of preshrunk lightweight knit fabric – maybe more, maybe less depending on the size of your shirt and the amount of shrinkage that happens when you wash the fabric. I used a rayon/poly blend jersey knit.
Approximately 2 yards of foldover elastic. This isn’t entirely necessary, though foldover is my preferred method for finishing the edges. You could also finish the edges with strips cut from the knit (or from constrasting knit fabric).
Create your pattern:
 The pattern is really really really simple. Take a t-shirt that fits you well and use it as a guide to draw a simple T shape. Here’s how I drew mine. Notice that the angle on the underarm on the slouchy shirt is the same as the t-shirt, but I’ve added roughly 2 inches of ease at the fold (total of 4 inches). I also squared off the shoulder and increased the size of the armhole.
Remember that you’ll need enough length to allow the shirt to blouse. It’s hard to say how much you’ll need – it’s a matter of personal taste and also depends on your body shape. The shirt I traced is actually pretty long, so it turns out I didn’t need to add any length. If in doubt, making it longer rather than shorter. You can always chop off the length later; you can’t add it back on without an ugly seam across the belly of your shirt.
In the interest of laziness, I use the same pattern for the front and the back. My pattern shows only the back neckline. After both pieces are cut, I go back and adjust the neckline on one of them to be the front. If there’s a particular curve that I want to use for the front neckline, I’ll sometimes draw it on the pattern (but not cut it). That way I can still cut two pieces at the same time, then use the line drawing as a guide to cut just one of them a little deeper.
Sew it up:
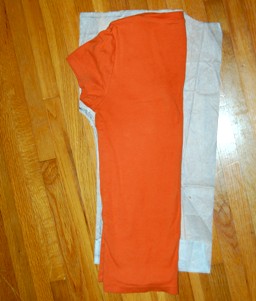
1. Cut out your pattern pieces. Because you’re using the same pattern for the front and the back, you can cut them at the same time. If the fabric is a stripe, my anal-retentive self likes to make sure that the stripes are all lined up before I cut.
If you’re really lucky and you didn’t lose too much width when you preshrunk your fabric, you can do an additional fold and avoid sewing the shoulder seams. Out of the three shirts I made, I was only able to do this once. It was a happy discovery when I happened, though, as it saved enough fabric that I was able to make a matching shirt for my daughter.
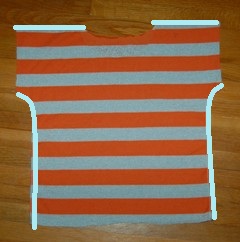 2. Sew the pieces together at the shoulders and sides. I use a serger for this, but you could also use a zig zag on a regular sewing machine.
3. Cut the front neck to the shape you want. I start small and try it on to see how it looks. There’s usually a sequence of trimming and trying on before I get the neckline exactly right.
4. Bind the edges of the neck and the armholes using foldover elastic. Foldover elastic is soooo quick and easy! Here’s a video tutorial where I show you how to do it.
If you don’t have any foldover elastic, you can also cut strips of your knit fabric and bind the edges with that. Go here or here to find out how.
5. Cut a band of the knit fabric for the bottom of the shirt, 8″ x slightly smaller than your hip measurement. (It’s hard to say exactly how much you should subtract, as different fabrics will have different amounts of stretch. I usually start with 2″ less than my hip measurement.)
6. Sew the short ends together to make a loop. Now, fold it in half lengthwise and try it on to check the size. It needs to be tight enough that it will gather the loose shirt in and sit on your hips without sliding down. If it’s too loose, you can easily adjust it smaller.
 You can also use this time to check the length of your shirt. Put the shirt on and tuck the bottom edge into the top of the band. If there’s too much blousing, then chop off a little from the bottom edge of the shirt.
Here is my daughter trying on the pint-sized shirt I’m making for her. You can see how thrilled she is with being my dressform.
6. Now all that’s left is sewing your band to the bottom of the shirt. First, cut small notches to mark the sides and the middles of the bottom edge of the shirt and the double (non-folded) edge of the band. This will help you get a consistent stretch when sewing the smaller band to the larger shirt.
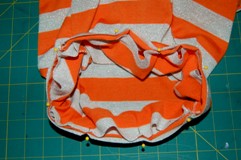 7. Pin the band to the shirt right sides together and matching the notches. Make sure that you’re pinning the non-folded edge of the band.
Because the band is smaller than the shirt, it’ll look like a big ol’ gathered mess. That’s okay.
8. Sew the band on to the shirt, stretching the band to fit.
 You’re done! Easy peasy, lemon squeezy.


I love this! Now to just get over my fear of sewing jersey. . .
Cute stuff! This is a great alternative to everyday t-shirts. Thanks for the tutorial 🙂
I love this kind of shirt! Looks great!
i love it- you are the best- thank you anne
I have 2 tshirts that are too long and loose fitting. How could I make them like this tshirt? Could I put elastic in the band? Sorry, I’m a sewing newbie!
I don’t see any reason why you couldn’t. If your shirts are big enough, you might be able to just fold them in half and cut your pattern from it. The thing to keep in mind is that the slouchy shirt has the sleeves and body of the shirt cut from one piece, while a regular t-shirt has set-in sleeves. If the shirt you’re cutting isn’t wide up to allow for the sleeves, you could always make it a sleeveless shirt. You could also just keep the top the way it is, and just add the band to the bottom. If you do that, you can cut the fabric you need for the band off of the bottom. Or, like you’re thinking, you could put elastic in the band. It all really just depends on how loose and long the shirt is. –Anne
Thanks for this pattern and the great idea. What is the width of the fold over elastic that you use.
Thanks so much!! I use a 5/8″ wide fold over elastic. The lightweight fold over elastic like people use to make headbands will work better than the heavier stuff used for making diapers. –Anne
Thanks for getting back to me. I can’t wait to try it.