• Home
  • Suggest A DIY
  • DIY Newsletter

Sewing

Patterns, Techniques, Articles, Blogs, and other resources to learn how to sew

  • About CraftGossip
  • Our Network
    • Bath & Body Crafts
    • Candle Making Ideas
    • Crochet Ideas
    • Cross Stitch
    • Edible Crafts
    • Felting Patterns
    • Glass Art
    • Home & Garden Ideas
    • Indie Crafts
    • Jewelry Making
    • Kids Crafts
    • Knitting Patterns
    • Lesson Plans
    • Needlework
    • Party Ideas
    • Polymer Clay
    • Quilting Ideas
    • Recycled Crafts
    • Scrapbooking
    • Sewing Patterns
    • Card Making
    • DIY Weddings
    • Not Craft Ideas
  • Giveaways
  • Roundups
  • Store
  • Search

Tutorial: The TV Tutu

April 1, 2011 by Anne Weaver

Have you ever noticed how PLAIN your TV looks when it’s not in use?  I mean, it’s just a big, black rectangle hanging on your wall.  We can’t have that, can we?  That was my inspiration for my TV Tutu.  After all, our little girls wear tutus around the house and we put gathered tulle on the backs of little girl baby onesies.  Why not wrap it around your TV for some extra spring bling?

I knowwww you want to make one for your own TV, so I wrote up a short tutorial showing how to make one.

Here’s what you need:

1 25-yard spool of tulle in the color of your choice

3 yards of elastic

Here’s how to make it:

1.  Unroll the whole 25 yards of tulle into a huge pile of fluff on your floor.

.

.

.

2. Find the two ends and place one on top of the other, esssentially creating a double layer of tulle.

Fold it lengthwise, making sure that the bottom layer is 1-2 inches wider than the top.  Don’t even attempt to fold the whole thing.  Just do it in stages, in combination with the next step.

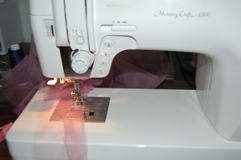
3.  Take it to your sewing machine and stitch 1/2″ from the folded edge to make the world’s longest casing.  Fold, stitch, fold, stitch…

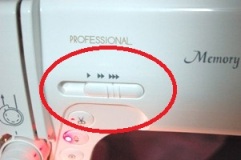
If your machine has a variable speed setting, set it to the top speed.  With a 12 1/2 yard seam in front of you, the faster you can sew the better.

Here’s what the speed setting looks like on the Janome Memory Craft 6300.

.

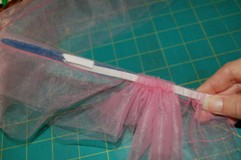
4.  Now, thread the elastic through the casing.

I used a long plastic tool made for threading cord and elastic through casings, which made this part go really fast.

Tie the ends of the elastic together to make a long stretchy gathered loop of elastic.  A tutu for your TV!!!

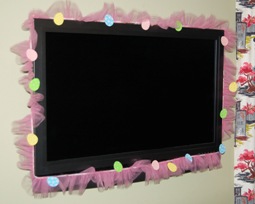
You’re done!  All you have to do now is wrap it around your TV and wait for the compliments to come flooding in.

You can leave it plain, or you can spruce it up for different holidays.  I added peel & stick foam Easter eggs to turn mine into a fancy Easter decoration.  Or, you could add flowers for a generic springtime TV tutu.

Or, you could add all kinds of silliness and put it out for April Fools’ Day.  Even better, take a bunch of photos while you’re making it and write up a tutoria to post on your blog for April Fools’ Day.  That’s  right, folks, this project tutorial is a big ‘ole…

APRIL FOOLS!!!

And do you want to know the ultimate April Fools’ joke is with this thing?  The day I made it, my daughter came home from school and saw this tacky thing wrapped around our TV and thought it was the prettiest thing she’s seen.  So now it’s staying on our TV until Easter.  April Fools’ to me, too!

Next Pattern:

  • DIY Fluffy One-Seam Tutu Skirt Tutorial
  • Back-to-School Ready: DIY Drawstring Backpack…
  • DIY Tablet Pouch Tutorial: A Stylish and Practical Craft
«
»

Comments

  1. Genki says

    March 31, 2011 at 6:36 pm

    I’m so glad that was an April Fool’s post. As I was reading, I was thinking ‘That seriously is the UGLIEST thing ever’! But I’m not surprised your little girl liked it!

  2. Liz says

    March 31, 2011 at 6:45 pm

    I am sooooo relieved 🙂

  3. Beverly @ FlamingoToes.com says

    April 1, 2011 at 9:10 am

    LOVE IT!! I guess we were on the same tutu wavelength because my tutorial today also has a tutu!!!
    Love that – and you could use it for so many decor additions. TV’s, Refrigerators, Toilets . . . the list goes on and on!! 🙂

  4. Adrianna says

    April 2, 2011 at 12:11 am

    oh man, just what my home needs! There are two big built-in shelving units in our house – my side has some nice pottery and pretty knick knacks, my husbands has a big ol TV and assorted electronic devices. This would even things out nicely 🙂

  5. stacey says

    April 2, 2011 at 1:03 am

    Haaaaaaa, the April Fools joke that backfires? My husband would die if something like this ended up in our house, joke or not. Thanks for the laugh!

  6. Katharine says

    April 3, 2011 at 2:11 am

    Well you had me going… Thanks for the laugh!

Have you read?

Pricing Handmade Sewing Items Without Undervaluing Yourself

If there’s one topic that makes sewists uncomfortable faster than sewing zippers, it’s pricing. Not how to sew the item — but how much to charge for it once it’s finished.

Most people don’t struggle with making handmade items. They struggle with putting a price on their time, skill, and effort without feeling awkward, guilty, or worried they’ll scare buyers away.

If you’ve ever thought:
“I’m not good enough to charge that much,”
“People won’t pay handmade prices,”
or “I’ll just price it low until I get better,”

you’re not alone. But you’re also not doing yourself any favours.

Let’s talk about how to price handmade sewing items in a way that’s fair, realistic, and sustainable — without undervaluing yourself.

Why Undervaluing Your Sewing Hurts More Than You Think

Underpricing doesn’t just affect your income. It affects your motivation, your confidence, and how seriously buyers take your work.

When handmade items are priced too low:

  • You burn out faster

  • You resent the time spent making them

  • You struggle to restock

  • Buyers assume “cheap” equals “low quality”

Ironically, pricing too low can make selling harder, not easier.

Handmade sewing items aren’t competing with mass-produced factory goods. They’re competing with thoughtfulness, quality, and care — and those have value.

Start With the Real Cost (Not Just Fabric)

One of the biggest pricing mistakes beginners make is charging only for materials.

Fabric, thread, zips, interfacing, labels, packaging — these are your base costs. But they’re only the starting point.

You also need to account for:

  • Cutting time

  • Sewing time

  • Pressing and finishing

  • Packaging

  • Listing, photographing, or selling time

Even if you enjoy sewing, your time still counts.

A simple rule:
If someone else had to make this for you, what would you expect to pay them per hour?

The “Straight Line” Trap (And Why It’s Not a Problem)

Many sewists worry that because their items are “simple,” they don’t deserve higher prices.

Straight seams, basic construction, minimal shaping — these are often seen as beginner skills. But from a buyer’s perspective, simplicity is often a feature, not a flaw.

Simple items are:

  • Practical

  • Durable

  • Easy to use

  • Less intimidating

  • Often more giftable

A well-made tote bag, table runner, or pouch doesn’t lose value because it’s simple. It gains value because it works.

A Simple Pricing Formula That Actually Works

You don’t need complicated spreadsheets to price handmade sewing items.

A beginner-friendly formula looks like this:

Materials + (Hourly rate × Time) + Fees = Price

Your hourly rate doesn’t need to be high — but it does need to exist.

Even a modest rate acknowledges that your time matters.

And remember: pricing isn’t permanent. You’re allowed to adjust as you learn.

Why “Charging Less Until I’m Better” Backfires

This mindset feels sensible, but it causes long-term problems.

When you price low “for now,” you:

  • Attract bargain-focused buyers

  • Set expectations that are hard to raise later

  • Undermine your confidence

  • Train yourself to accept less

Your skill will improve through repetition, not through underpricing.

Selling handmade items is a skill too — and pricing fairly is part of learning it.

What Buyers Are Actually Paying For

Most buyers don’t analyse your stitching technique.

They’re paying for:

  • Convenience

  • Thoughtful design

  • Quality materials

  • Handmade care

  • Supporting a real person

They want something useful, well made, and ready to use — not a bargain-bin price.

When you price confidently, buyers feel more confident too.

Comparing Prices Without Panicking

It’s smart to look at what others charge — but don’t use comparison as a weapon against yourself.

Instead of asking:
“Why are they charging more than me?”

Ask:

  • Are they targeting the same customer?

  • Are they selling the same type of item?

  • Are their materials similar?

There is room for different price points. You don’t need to be the cheapest to be successful.

Pricing for Sustainability, Not Just Sales

Selling handmade items should feel rewarding, not exhausting.

If your prices don’t allow you to:

  • Replace materials

  • Restock without stress

  • Enjoy sewing

  • Take breaks

…they’re too low.

A sustainable price keeps you sewing longer — and consistency is what builds sales over time.

The Confidence Shift That Changes Everything

Instead of asking:
“Is this worth what I’m charging?”

Ask:
“Would I be proud to sell this?”

If the item is:

  • Well made

  • Useful

  • Finished with care

Then it deserves a fair price.

You don’t need permission to charge what your work is worth. You just need to believe that your time, effort, and creativity matter.

Because they do.

Book Review – Sewing to Sell – The Beginner’s Guide to Starting a Craft Business

Selling your handmade items? Here’s how to figure a fair price.

Categories

Bags and purses Children's Christmas Easter fleece Free Sewing Patterns Girl's Dress Halloween Hats Home Decor No-sew Pillows Refashions Scrap Fabric sewing Sewing Patterns Sewing Techniques Skirts Softies T-shirts

RSS More Articles

  • The 5 Outlet Placement Mistakes You Don’t Want to Make
  • Celebrate the Spirit of the Southwest with These Stunning Indian Navajo Tribal Quilt Patterns
  • Pricing Handmade Sewing Items Without Undervaluing Yourself
  • Tips for Teaching the Alphabet to Kids
  • Yarn Sardines T-Shirt Review – A Whimsical Gift For Yarn Lovers
  • Cropped Chunky Granny Stitch Cardigan Crochet Pattern
  • Free Butterfly Digital Stamps for Card Making, Coloring and Paper Crafts
  • 14 Masculine Card Ideas for Guys
  • Juneteenth Cross Stitch Patterns
  • Ties to Knit for Father’s Day

Pick Your Blog

  • Sewing
  • Knitting
  • Quilting
  • Crochet
  • Home & Garden
  • Recycled Crafts
  • Scrapbooking
  • Card Making
  • Polymer Clay
  • Cross-Stitch
  • Edible Crafts
  • Felting
  • Glass Art
  • Indie Crafts
  • Kids Crafts
  • Jewelry Making
  • Lesson Plans
  • Needlework
  • Bath & Body
  • Party Ideas
  • Candle Making
  • DIY Weddings
  • Not Craft
  • Free Craft Projects

Copyright © 2026 · CraftGossip | Start Here | Contact Us | Link to Us | Your Editors | Privacy and affiliate policy