• Home
  • Suggest A DIY
  • DIY Newsletter

Sewing

Patterns, Techniques, Articles, Blogs, and other resources to learn how to sew

  • About CraftGossip
  • Our Network
    • Bath & Body Crafts
    • Candle Making Ideas
    • Crochet Ideas
    • Cross Stitch
    • Edible Crafts
    • Felting Patterns
    • Glass Art
    • Home & Garden Ideas
    • Indie Crafts
    • Jewelry Making
    • Kids Crafts
    • Knitting Patterns
    • Lesson Plans
    • Needlework
    • Party Ideas
    • Polymer Clay
    • Quilting Ideas
    • Recycled Crafts
    • Scrapbooking
    • Sewing Patterns
    • Card Making
    • DIY Weddings
    • Not Craft Ideas
  • Giveaways
  • Roundups
  • Store
  • Search

An inexpensive but effective fabric marking tool

May 19, 2015 by Anne Weaver

An inexpensive but effective fabric marking tool

An inexpensive but effective fabric marking tool

Fabric marking pens are expensive, y’all. At least the ones you find on the notions wall at the fabric store. Lauren from Pattern Workshop and Baste and Gather shares her fabric marking pen find. They’re inexpensive, widely available, and come in a range of colors.  The ink doesn’t disappear with exposure to air or a hot iron, but they do wash out easily.

Want to know what they are?  Click the link below to go to her post to find out:

The Best Fabric Marking Tool for Garment Sewing, by Baste and Gather

[photo from Baste and Gather]
«
»

Comments

  1. Peta says

    May 20, 2015 at 4:21 pm

    Best discovery I ever made. So cheap (I think I paid $6.00 dollars for the set) and considering what washable markers are at a craft shop. No contest. Crayola also have a battery powered LED light box at Target, Australia, for the grand price of $29.00 AUS. I ran all the same tests with the markers and got exactly the same results. Also I will go hunting in hardware shops for other craft Items. It’s probably where the craft company get their ideas any way. E.G. Magnetised extendable arm gadget for picking up screws lost in an engine etc. $50.00 craft shop/$13.00 Bunnings. great for picking up pins, needles and sewing machine feet in those nasty, inaccessible places. Also natural bristle basting brush. Paint department. Last but not least brush used with chalk paint. Paint department again and at a loss less cost. Give it a try.

Have you read?

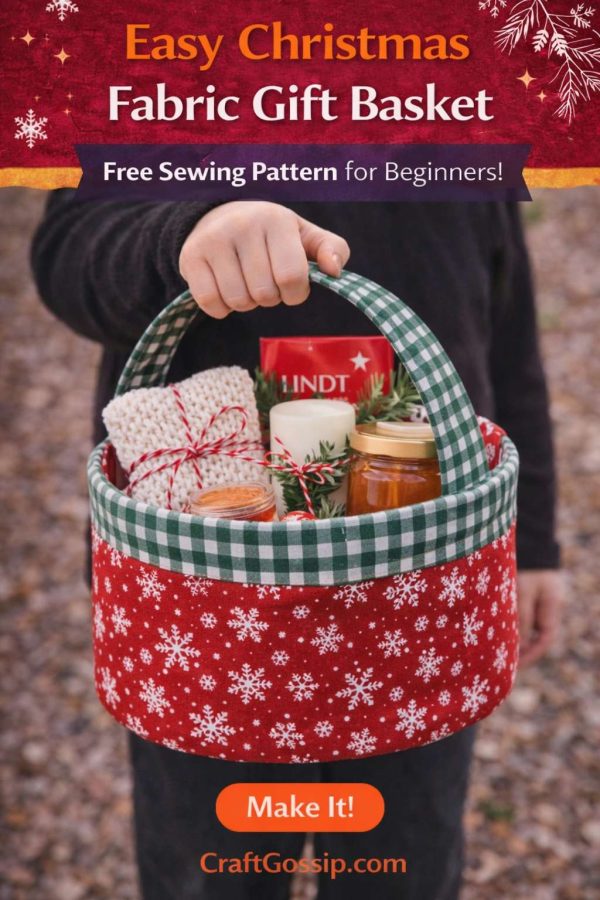
Easy Christmas Fabric Gift Basket Sewing Pattern (Perfect for Beginners)

There’s something quietly special about a handmade Christmas gift basket. Not loud. Not over-the-top. Just thoughtful, useful, and clearly made with care. This fabric Christmas gift basket is one of those projects that looks lovely on the day and keeps working long after the wrapping paper is gone.

Instead of disposable boxes or cellophane baskets that never quite survive storage, this reusable fabric basket becomes part of the gift. It’s soft but structured, beginner-friendly to sew, and endlessly adaptable depending on what you fill it with. Think cosy socks, handmade soap, baked treats, or a few carefully chosen favourites for someone you love.

If you’re looking for an easy Christmas sewing project that feels meaningful without being complicated, this one fits beautifully into a busy December.

Why Sew a Fabric Christmas Gift Basket?

A fabric gift basket feels personal in a way store-bought packaging never does. It says, I made this just for you, without needing embroidery skills or weeks of prep time.

This pattern is ideal if you:

  • Want a beginner sewing project with practical results 
  • Prefer reusable, low-waste gift wrapping 
  • Need a handmade option that works for adults and teens 
  • Like projects you can repeat year after year 

Once the gift has been opened, the basket doesn’t get tossed. It gets reused—for storage, décor, or future gifting.

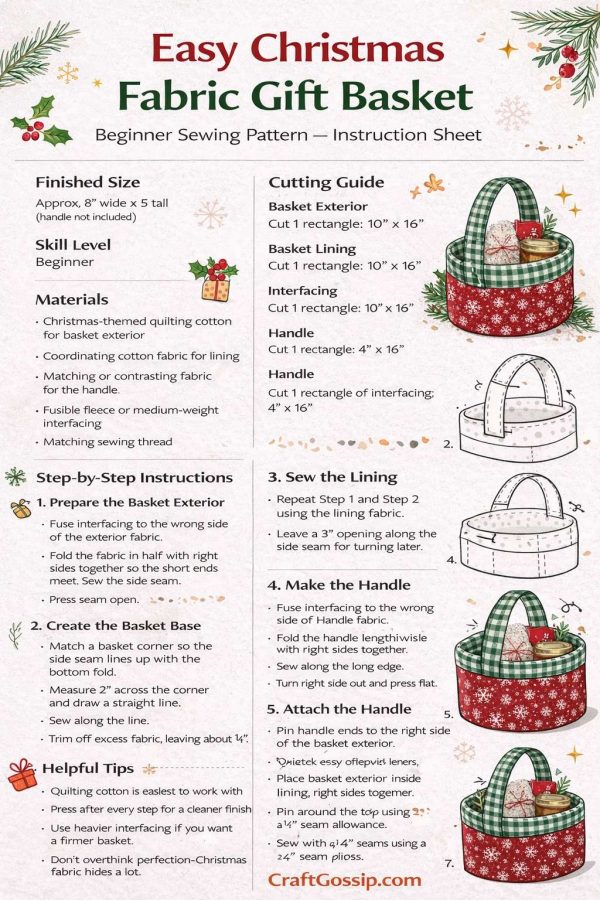
Finished Size

Approx. 8 inches wide x 5 inches tall
(handle not included in height)

This size works beautifully for small gift collections: bath products, candles, jams, knitting notions, stationery, or a cosy winter bundle.

What You’ll Need

  • Christmas-themed quilting cotton for the basket exterior 
  • Coordinating cotton fabric for the lining 
  • Matching or contrasting fabric for the handle 
  • Fusible fleece or medium-weight interfacing 
  • Matching sewing thread 
  • Sewing machine 
  • Scissors or rotary cutter 
  • Pins or clips 
  • Iron 

Optional but helpful: walking foot if your machine struggles with thicker layers

Christmas Fabric Choices That Work Well

You don’t need novelty prints for this to feel festive.

Lovely exterior fabric options include:

  • Red, green, or navy with subtle patterns 
  • Snowflakes, stars, berries, or holly motifs 
  • Classic stripes, plaids, or gingham 
  • Tone-on-tone metallic accents used sparingly 

For the lining:

  • Soft neutrals like cream or grey 
  • Polka dots or tiny prints 
  • A surprise pop of colour inside the basket 

Small-scale prints hold their shape and age better than large novelty designs.

Cutting Instructions

Basket Exterior
Cut 1 rectangle: 10” x 16”

Basket Lining
Cut 1 rectangle: 10” x 16”

Interfacing
Cut 1 rectangle: 10” x 16”

Handle
Cut 1 rectangle: 4” x 16”
Cut 1 rectangle of interfacing: 4” x 16”

If you want a taller basket, you can add an extra inch to the height measurement. I wouldn’t recommend increasing the width unless you also increase the interfacing strength.

Step-by-Step Sewing Instructions

Step 1: Prepare the Basket Exterior

Fuse the interfacing to the wrong side of the exterior fabric according to the manufacturer’s instructions.

Fold the fabric in half with right sides together so the short ends meet.
Sew the side seam using a ¼” seam allowance.
Press the seam open.

Step 2: Create the Basket Base

With the basket still inside out, flatten one bottom corner so the side seam lines up with the bottom fold.

Measure 2 inches across the corner and draw a straight line.
Sew along the line.
Trim off excess fabric, leaving about ¼”.

Repeat for the opposite corner.

Step 3: Sew the Lining

Repeat Step 1 and Step 2 using the lining fabric.

Leave a 3-inch opening along the side seam—this is for turning the basket later.

Step 4: Make the Handle

Fuse interfacing to the wrong side of the handle fabric.

Fold the handle lengthwise with right sides together.
Sew along the long edge using a ¼” seam allowance.
Turn right side out and press flat.

Topstitch along both long edges for strength and a polished finish.

Step 5: Attach the Handle

Pin the handle ends to the right side of the basket exterior, centred on opposite sides.

Double-check the handle isn’t twisted.
Baste the handle ends in place.

Step 6: Assemble the Basket

Place the basket exterior inside the lining, right sides together.

Match side seams and pin around the top edge.
Sew around the top using a ¼” seam allowance.

Step 7: Turn & Press

Turn the basket right side out through the lining opening.

Push the lining inside the basket and press the top edge neatly.

Step 8: Finish

Topstitch around the top edge to keep the lining in place and give the basket a professional finish.

Close the lining opening with a hand stitch or neat machine stitch.

Your Christmas fabric gift basket is complete.

Gift Ideas That Work Perfectly in This Basket

This basket shines when it’s filled thoughtfully.

  • Handmade soap or bath products 
  • Candles and matches 
  • Baked goods wrapped in parchment 
  • Knitted socks or scarves 
  • Tea, coffee, or hot chocolate kits 
  • Craft supplies for a creative friend 

Tie a simple tag to the handle and you’re done—no extra wrapping required.

Beginner Tips for Success

  • Quilting cotton is easiest for first-time sewists 
  • Press after every step for cleaner results 
  • Use heavier interfacing if you want a firmer basket 
  • Shorten the handle for tabletop gifting 
  • Small imperfections disappear once the basket is filled 

A Handmade Christmas Gift That Keeps Giving

This fabric Christmas gift basket sewing pattern is one of those rare projects that feels calm to make and genuinely useful to give. It’s simple enough for beginners, adaptable for experienced sewists, and timeless enough to come back out every December.

It’s not flashy. It doesn’t shout. But it’s the kind of handmade piece people keep—and that’s exactly what a good Christmas project should be.

Categories

Bags and purses Children's Christmas Easter fleece Free Sewing Patterns Girl's Dress Halloween Hats Home Decor No-sew Pillows Refashions Scrap Fabric sewing Sewing Patterns Sewing Techniques Softies T-shirts Women's

RSS feed: More Articles More Articles

  • Christmas Tree Crochet Scarf – A Fun and Festive Pattern Worth Revisiting
  • Paper Snowflake Art Book Review: 100 Patterns for a Nostalgic Paper Craf
  • 20 Infant Lesson Plan Ideas for Birth to 12 Months
  • Free Felting Tutorial Friday: Wet Felted Wool Cookie Cutter Ornaments
  • Free Poinsettia Embroidery Design Review
  • DIY Terracotta Pot Miniature Pond: A Mossy Little Water Garden for Your Patio
  • 20 November Lesson Plan Ideas for Preschool and Elementary
  • Book Review: Stitches from the Yuletide by Kathy Schmitz
  • Thanksgiving Scrapbook Layouts That Tell the Story Around the Table
  • How To Make Christmas Resin Jewelry: Easy Handmade Pendants, Earrings And Gift Ideas

Pick Your Blog

  • Sewing
  • Knitting
  • Quilting
  • Crochet
  • Home & Garden
  • Recycled Crafts
  • Scrapbooking
  • Card Making
  • Polymer Clay
  • Cross-Stitch
  • Edible Crafts
  • Felting
  • Glass Art
  • Indie Crafts
  • Kids Crafts
  • Jewelry Making
  • Lesson Plans
  • Needlework
  • Bath & Body
  • Party Ideas
  • Candle Making
  • DIY Weddings
  • Not Craft
  • Free Craft Projects

Copyright © 2026 · CraftGossip | Start Here | Contact Us | Link to Us | Your Editors | Privacy and affiliate policy